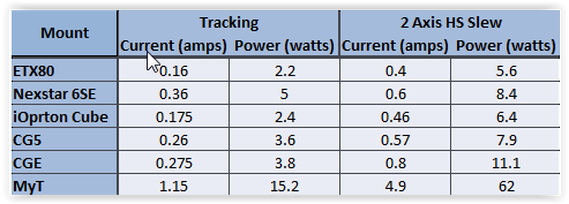
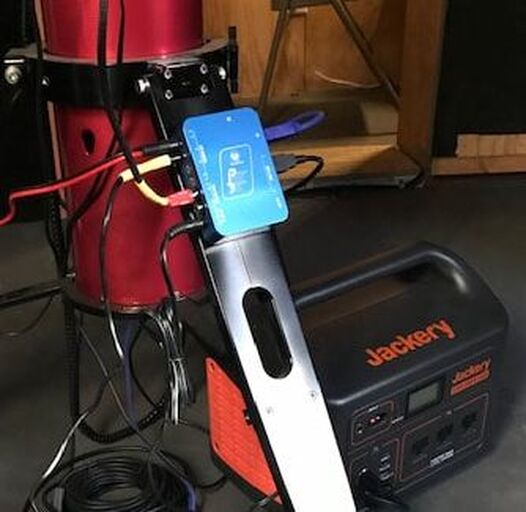
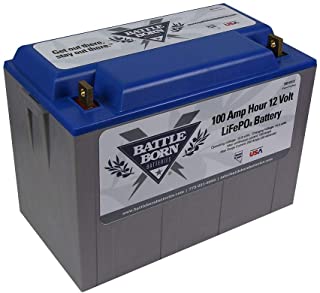
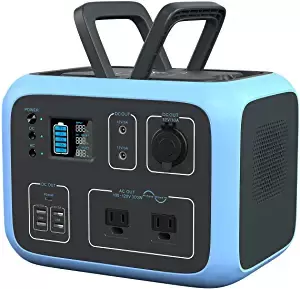
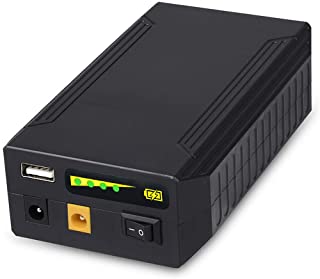
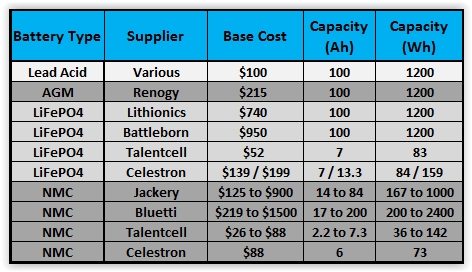
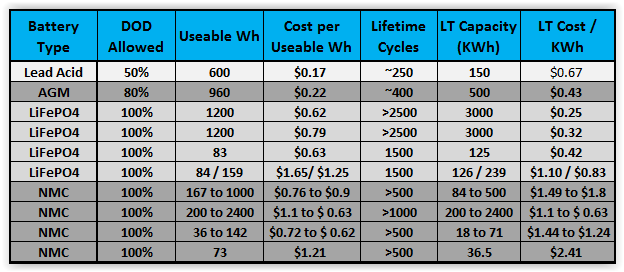
 A visual observer can operate all night long without worrying whether power will run out since visual astronomy needs little if any power at all. Not so for astrophotographers or those doing camera assisted viewing (EAA). Tracking mounts, cameras, dew heaters, computers, etc. all demand a continuous supply of power. How this demand is satisfied mostly depends upon whether we set up at home or in the field. At home we usually have access to a plentiful supply of AC power and AC transformer can supply the dc power needed for many but not all of our equipment. At a distant dark site or star party we most likely need to bring our own dc power with us. There are three key questions to address when thinking about power. First, how much power is needed for a nights activities? Second, how will we distribute the power to each device? And, third, which among the many power sources is best for our particular case? Before we consider how much power we need, let's first determine the proper metric. When assessing power needs most discussions focus on the number of amps a mount, camera, etc. uses. This is not surprising since battery capacities are given in amp-hours (Ahs). This leads to an assessment of the total number of amps used by our equipment times the number of hours we plan to use it, leading to an Ah capacity determination. But since most batteries are not voltage regulated their voltage will drop during use and the current drawn will increase to keep the power constant. So it is better to work in terms of the total power consumed since that, not the current, is constant (unless of course we change the power settings on a dew heater, camera cooler, etc.). Another point to consider is whether or not to use AC adapters which may come with our equipment. At home it is a simple matter to plug the AC transformer into a nearby outlet but in the field without access to an AC outlet an AC transformer is an inefficient way to produce the dc power needed. Most AC transformers and inverters waste 10% or more of our precious power. It is generally much better to stick with dc when in the field. This is especially true of power hungry laptops if you can find a dc power source which works with you laptop. There are two way to determine our power needs, measure it or estimate it. If possible it is better to measure the actual power consumed with our own particular setup and under our typical use conditions. It is fairly easy to measure the AC power during an actual session using a Kilowatt meter in line between the power supply and the AC transformer. To measure DC power requires splicing a dc power meter in line between your dc power source and your devices. I attached Anderson PowerPoles to the wires of an inexpensive watt meter placed in between the battery and the equipment being powered. This is how I was able to check the power consumption for my complete astrophotography setup turning on one item at a time and running for 20 to 30min to get a good average of the power requirement for each. An alternative is to use a volt meter to measure the current and voltage separately and calculate the power used. I was able to measure the current used by each of my mounts while tracking and during high speed slews with my digital volt meter. Because I was using a regulated voltage source at 13.8V, I simply needed to measure the current to determine the power used. It might be surprising to many but mounts do not draw as much power as one thinks. As the table shows , most mounts generally use less than 0.5 amps at 12V during tracking. Even when performing a slew in both axes at once, less than 1amp or 6-12W is typical of all but the largest mounts. When estimating power for a mount use the tracking power since slews will be infrequent during a session. However, when sizing the maximum current required use the High Speed (HS) slew current with a 25% margin to avoid mount stalls. The maximum current measurement is also needed to properly size any fuses in line and to calculate the wire gauge needed between the power source and the equipment. 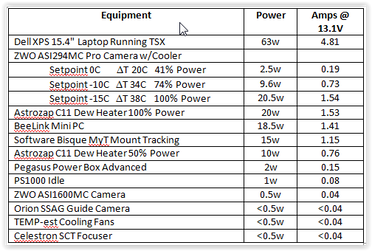 In addition to the mount, we need to determine the power requirements for all the other equipment we use. Once again, most would be surprised at how little power cameras, guiders, focusers and filter wheels require. In fact, focusers and filter wheels draw so little power and are active for so tiny a fraction of the observing session that they can be ignored as background noise. Computers, camera coolers and dew heaters are the biggest consumers of power. And, since coolers and heaters have variable settings the power they consume can span a wide range. The table below shows measurements for my astrophotography setup using the power meter built into my Jackery solar generator. The same measurements were also verified using the above mentioned method of an in line dc power meter. By far the 15.4" laptop is the biggest consumer of power and is typical of many similarly sized laptops. To minimize my power needs I have moved to using a mini-pc, Beelink U57, to run the software controling my equipment. I use my laptop to monitor the imaging session while wirelessly connected to the Beelink. That way my laptop's internal battery will last through most of my session before needing to plug it into my power supply greatly reducing its power needs. In contrast, the Beelink consumes less than a third the power of the laptop. If you have a tablet and can wirelessly connect to a mini-pc like the Beelink you can likely run for 10 hours on the tablet's internal battery. If you cannot or do not want to measure the power yourself, you can use the table above to make an estimate of your own power needs. While everyone's equipment is different, the difference in power consumption for similar equipment will not be dramatic. The items most likely in need of adjustment for each individual case are the dew heat and the laptop. Kendrik has a nice table showing the power and current for different sizes of dew straps which can be used to estimate different actual use cases. A typical astrophotography setup with a cooled camera and dew heater can be expected to consume somewhere between 30 and 50 watts not counting the computer. Computers are the big wild card and adding as little as 20w for a mini-pc up to 65w or more for a laptop depending upon the size and type. Once you have an estimate of your power needs you will need to determine how to distribute that power to your equipment. There are two basic ways. The first is to run individual power cables from the power supply directly to each device. This is the method that I used for 10 years with a 12V lead acid battery inside a plastic battery box equipped with a cigarette socket connection. To connect the individual dc power cables from the battery to the device I used a cigarette plug splitter. This is simple, inexpensive and easily adapted to varying numbers of connections but results in many power cables running from the supply to the mount and telescope. 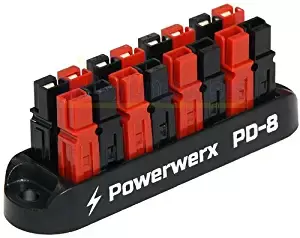 A more elegant option is to use a central power distribution hub at the mount from which to supply power to all the devices. Power is routed to the hub from the battery with a single cable and from there out to each individual device. Each output of the hub can be fused to protect the equipment from damage and can even be computer controlled. The hub can be attached to the telescope so that only a single power cable hangs from the mount. Alternatively the hub can be attached to the tripod underneath the mount to avoid adding additional weight to the mount. If the mount is equipped with through the mount cabling like my MyT, dangling power cables are easily avoided. One of the least expensive power hubs is a Powerwerx Power Distribution Block. This comes in 4 and 8 position configurations. It has multiple Anderson PowerPole connector pairs tied to a common buss bar. Simply connect a battery to one pair with a heavy duty 14AWG cable with a cigarette plug on the battery side and Anderson PowerPole connectors on the other side to provide power to the distribution block. From there power can be supplied to each device using individual cables with Anderson PowerPole connectors on one end and 5.5mm x 2.1mm dc connectors on the other end. DC extension cables can be used wherever longer connections are needed. I have made my own cables to specific lengths for each piece of equipment by using genuine Anderson PowerPole connectors and a simple crimping tool. One tip is to use the 30amp connectors even though none of our equipment will draw that much current because the 15amp connectors are too small to attach 18AWG or thicker wires. Also, I highly recommend the genuine Anderson PowerPoles rather than the more cheaply made copies which I have found to be lacking. Alternatively there are Chinese versions of the power hubs which have the advantage of including fuses on the distribution block for each power position. Even more sophisticated solutions are the power distribution hubs made specifically for astronomy with even more functionality than the Powerwerx type hubs. An example is the Pegaus Astro Pocket Powerbox Advance which I use. This has 4 12VDC outputs along with 2 variable dew heater outputs, 1 regulated adjustable dc output port and 4 powered USB3.0 ports. It has built in current and volt meters, can supply up to a total of 12A, has short circuit and reverse polarity protection, and functions as a stand alone device or with computer control. The Powerbox can be mounted on the OTA or at the base of the mount as pictured below. I use a heavy duty 18 gauge cable with a cigarette connector on one end and a 5.5mm x 2.1mm connector on the other end to supply power from the battery to the Powerbox. From there, power is routed to each device with the power cables included with the Powerbox. The ASIAir Pro and the PrimaLuceLab Eagle Core are other examples of astronomy specific devices which provide power and USB hubs. However, these also include a Raspberry Pi computer to also serve as a mini-pc at the telescope. These all-in-one solutions are designed to provide seamless integrated control of all the equipment and software needed for astrophotography. When designing the power distribution layout it is best practice to keep the power distribution cables as short as possible with the proper gauge wire to avoid voltage drops across them which just wastes power. Here is a voltage drop calculator which will help in selecting the right gauge and length of wire to minimize voltage drops. For instance a 22AWG wire 4 ft long expected to carry 3A of current will experience a voltage drop of 0.39V which will reduce the voltage at the equipment from 12V to 11.61V. Using an 18AWG wire instead will cut the voltage drop by more than half to 0.15V. The challenge becomes making cables with the tiny 5.5mm x 2.1mm dc connectors with wire gauges of 16AWG. 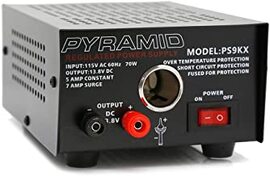 Once the amount of power needed has been determined and a power distribution plan is chosen, the next step is to decide which of the many power sources is best for ones own situation. Let's first consider the case where AC power is readily available but an AC transformer is not available for every piece of equipment. In this case a regulated AC to DC power supply is a good choice. An excellent example which I use in my home observatory is a Pyramid AC to DC regulated power supply. These come in different current capacities from 5 amps on up along with screw terminal connections and/or a cigarette lighter socket connection. The Pyramid supplies are voltage regulated to supply a constant 13.8V which works with all of my mounts and equipment without issue. I prefer to use the Pyramid instead of the AC power adapters that come with some of my equipment as it allows me to simplify my power distribution with less power bricks running all over the place. When in the field or at a star party we usually do not have access to AC power. In these cases a battery is the usual alternative. For many years flooded lead acid batteries were the only power option available. They have the advantage that they are cheap with a deep cycle flooded 100Ahr battery available for ~$100. But they are heavy, weighing ~60lbs, can only be discharged to 50% of rated capacity without damage, must be kept upright to avoid acid spills and need monthly upkeep. These days AGM batteries are more popular as they are sealed to prevent spillage and offer additional capacity with a depth of discharge (DOD) of 80% without damage to the battery. At a cost of $170 to $215 for a 100Ah battery they cost twice as much as lead acid batteries, also weigh ~60lbs and still need monthly upkeep. The 100Ah Renogy Deep Cycle AGM battery is just one example of these types of batteries. Recently lithium ion batteries have become more readily available. Be aware that there are competing lithium chemistries used with each having its particular advantages and disadvantages. The two most applicable to astronomy are the LiFePO4 and NMC. LiFePO4 is the less expensive of the two and is commonly found in RV and boating applications which can require daily charge and discharge cycles. Examples of these types of batteries include the highly rated BattleBorn and Lithionics 100Ahr batteries which have capacities of 1200Wh of energy. They weigh less than 30lbs and include an onboard battery management system (BMS) which protects the battery from overcharging, short circuits, overheating, etc. LiFePO4 can be fully discharged without damaging the battery and most manufacturers spec their LiFePO4 batteries at >2500 full discharge cycles before the battery begins to lose some of its original capacity. A full discharge cycle means the battery is taken down to 0% capacity and then fully recharged. Even after the ~2500 full discharge cycles the batteries will still have ~80% of their original capacity. Celestron has two PowerTank Lithium battery models which use LiFePO4 technology and come with capacities of 84 and 159Wh. These have a cigarette socket and 5.5mm x 2.1mm dc outputs, two USB charging ports and a power level display. There is a lot of confusion as to whether or not Lithium batteries can be fully discharged without damaging them. The confusion seems to stem from the fact that a battery can be a single cell, like a AA battery, or a multi-cell like a standard 6 cell lead acid battery. It is true that single cell batteries, whether LIthium or other chemistries, will be damaged if they are fully discharged. However, what we are talking about is not a single Lithium cell battery but instead a collection of cells designed to provide 12V and higher current capacity than a single cell can provide. Lithium batteries like those mentioned above and the ones to be discussed below are all collections of cells with a BMS designed to make certain that no cell is fully discharged even when the battery capacity level indicates that it is fully discharged or the battery shuts off. This is why the manufacturer's can rate them for 100% DOD without any damage. Of course, the life of any battery can be increased by using a lower DOD but the tradeoff is less useable power from that battery. The other popular Li chemistry is Lithium Nickel Magenese Cobalt Oxide or NMC for short. The advantage of NMC over LiFePO4 is its higher energy density, hence lighter weight for the same capacity. These batteries are commonly found in power tools, ebikes, electric vehicles and solar generators. Solar generators have become very popular for outdoor adventurers because of their light weight and high energy capacities which makes them a good choice for astronomy applications. Examples are the line of solar generators by Jackery and Maxoak's Bluetti. These highly rated generators come in models from 160Wh to 2400Wh and can supply 10 to 12A of current. Jackery and Bluetti also sell portable solar panels for recharging in the field. The solar generators are more than just bare batteries as they include a regulated 12Vdc output, a BMS, a pure sine waver inverter for AC power, multiple USB charging ports, a built-in MPPT solar charge controller, an AC charger, a display to monitor battery capacity, On/Off switches and an integrated carrying handle among other nice features. These all-in-one portable power stations are light weight as well with the 1000Wh model from Jackery weighing only 20lbs and the 500Wh model from Bluetti weighing under 14lbs. Celestron has an NMC battery with 73Wh capacity called the PowerTank Lithium LT. It has a regulated voltage output and USB charging capability as well but can only support a maximum of 3A while the all-in-one power stations can supply 9 -10A. If power needs are very low such as my setup with a Celestron 6SE and ASI224MC camera, a fairly small lithium battery like those from TalentCell work just fine. These can provide power for a full night. TalentCell offers a range of small and lightweight NMC batteries with capacities ranging from 36Wh to 142Wh with prices from $26 to $88. They recently came out with an 83Wh LiFePO4 battery rated for 1500 cycles to full discharge for $52. All of their batteries come with a wall charger and a 5V/2A USB port as well. The smaller capacity batteries can supply a maximum of 3A at 12V while the larger ones max out at 6A and also have a 9V outlet as well. I have the 100Wh model which which has worked well for my simple EAA setup as described above. I do not believe that the TalentCell batteries are voltage regulated. All battery types should not be left in storage fully discharged to avoid damage to the cells. On the other hand, while lead acid batteries should be stored fully charged, Lithium batteries should not be stored with a charge of more than 80 or 90% of capacity to prolong their useable life. Just top them off to their full capacity before taking them into the field for use. As we have seen the options for portable power sources run the gambit in terms of capacity, price, weight, size and features. What is important to one person may not be important to another. For someone with a limited budget the lowest cost option may be the best choice. For someone else the cost spread over the useable life of the battery might be the most important factor. And for still others an abundance of features might dictate the optimum choice. Table 1 below shows the different battery options available from different vendors, their base cost, and rated Ah and Wh capacities. Obviously not all options can be summarized in a single table. For instance, flooded lead acid and AGM batteries with smaller capacities and base costs are also available, however, the ones listed here are representative of the overall cost analysis which follows. One simple metric for comparison is cost per Useable Wh. This is simply the capacity times the maximum DOD allowed to avoid damage. Table 2 shows the maximum DOD for lead acid batteries is 50% which means that a 100Ah lead acid battery can only supply 50Ah or 600Wh of power to avoid damage to the cells. AFMs have a maximum DOD of 80% while LiFePO4 and NMC batteries have a maximum DOD of 100%. With this the Useable Wh for each battery can be calculated and is provided in the table which shows that a 100Ah LiFePO4 battery has twice the useable power of a flooded lead acid battery. One would have to buy and carry 2 lead acid batteries to a dark site to supply the same power as a single LiFePO4 battery with the same Ah rating. On the other hand, lead acid batteries are the cheapest on a cost per Wh basis. Another metric is the cost averaged over the total number of cycles during the expected lifetime of the battery. Table 2 shows the number of discharge cycles expected for each battery type. We can immediately see that traditional lead acid batteries are at a big disadvantage to all other battery types and that LiFePO4 batteries have the highest number of lifetime cycles. Of course the lifetime cycles can be increased for any battery chemistry if the battery is not discharged to the maximum DOD shown in the table. But that means that capacity is sacrificed for a longer battery life. The last column in Table 2 shows the cost averaged over the power one can expect from the battery over its lifetime. With this metric, lead acid batteries are no longer the cheapest option as LiFePO4 batteries with their much longer number of cycles are as much as 1/3 the cost per lifetime power of lead acid batteries. So what is the best battery choice. If the up front cost is the dominate factor, AGMs are the best choice since their cost per Wh is only slightly higher than flooded lead acid batteries while a 34% smaller AGM battery will supply the same total power of flooded lead acid battery. If longevity, weight and safety are the prime factors then the LiFePO4 batteries are the obvious choice by far but the upfront cost is significant. In this category, the Lithionics or Battleborn batteries provide the largest capacities while Talentcell is the best cost option for under 100Wh capacity. On the other hand, if the added features of the all-in-one power supplies are important, then one of the models from Jackery or Bluetti with capacities of 167 to 2400Wh are good options. Keep in mind that the all-in-one models include a BMS, a pure sine wave AC inverter, USB charging ports, an MPPT solar charging controller, a charger, a power meter and display, convenient power ports and more. They are also voltage regulated and hold their voltage all the way down to zero capacity. These additional features would add upwards of $300 to the total cost if bought along with one of the other battery options. And the all-in-one models come in a fully integrated, compact and rugged package. Personally I have made the switch to Lithium based solutions for field power. I like the light weight, voltage regulation, high capacity and added features of the Jackery 1000Wh model that I currently use. There are models both from Jackery and Maxoak Bluetti which will fit any budget and capacity requirement. For my lightweight and portable EAA setup which requires much less power I rely on my Talentcell 100Wh battery. Edit: I created a video showing how easy it is for you to measure your power needs yourself on my YouTube Channel Amazon links are Associate links from which I can earn a commission at no cost to you. If you would like to support my web site and its content please consider using my links when ordering products.
1 Comment
After years of sleeping first in a tent and then in the back of my van at star parties and dark sky excursions, I finally decided to go in style with an RV. My plan is to sit inside my nice cozy RV with my laptop and control my telescope, cameras, etc. wirelessly with WiFi. I bought a Beelink U57 mini-pc which sits at the telescope and runs all my software while I remotely log into the mini-pc with my laptop inside the RV. The mini-pc is headless (i.e. has no display to suck power) and therefore draws an order of magnitude less power than the laptop would running the same software. I can use the laptop as a terminal inside the RV and, with proper shielding, be able to view images on the screen unfiltered without disturbing anyone else with the light from my computer. Also, if I need to conserve power I can let the laptop go to sleep as I only need it to check in on the mini-pc's progress if I am doing a long imaging run. If I am doing EAA (camera assisted viewing), I will to use the RV's power to keep the laptop running during a session.
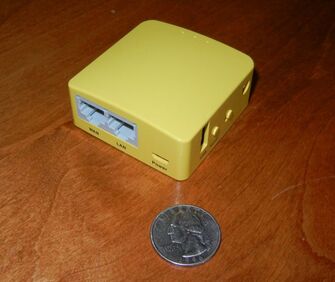
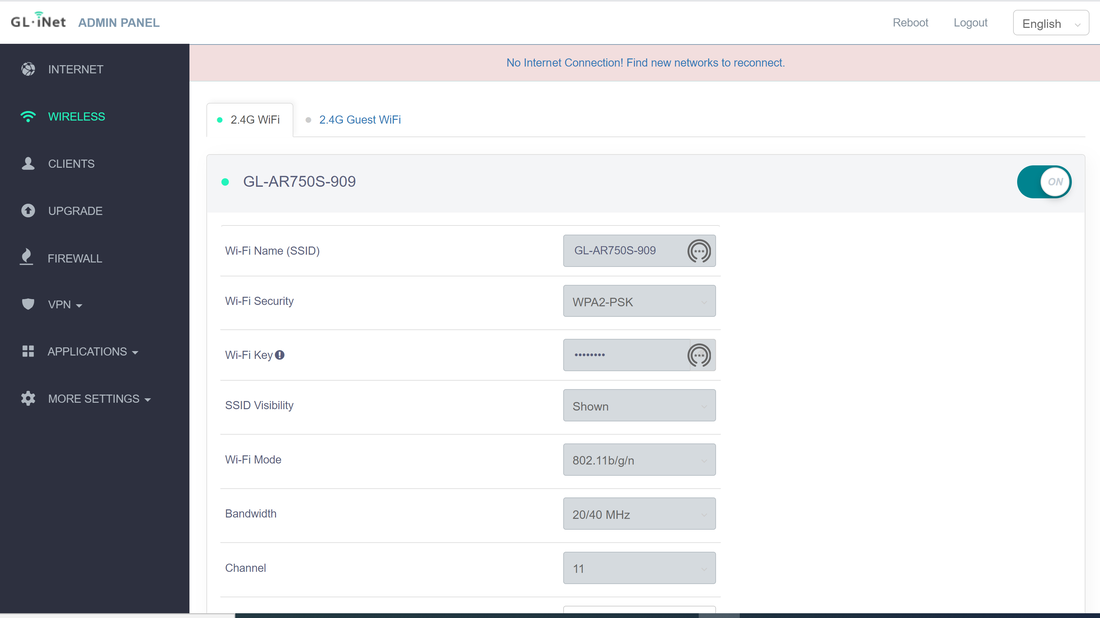
Up till now I set up inside an EZ Up shelter with side curtains and with the pc shielded so that the light is minimized. I use a 32ft active USB3.0 cable between the scope and the laptop for connectivity. I could do the same with the RV running the cable through a partially open window but I want to minimize the use of cables which are easily tripped over in the dark. Instead I decided to find a portable wireless router which can provide a reliable connection throughout the night from inside my RV to my rig outside. And since I may not always be able to park right next to my scope, the longer the range of the router the better. The router needs to run on dc and require as little power as possible. So when I read about the GL.iNET GL-MT300N-V2 Wireless Mini Portable Travel Router for less than $20 ($27 these days) I decided to give it a try. At this price I figured there was not much to lose. This mini router is less than 2.5" square and about 1" tall with a bright mango yellow plastic case weighing less than 2 oz.. It has 2 Ethernet ports, 1 USB2.0 port, a Micro USB port for input power and 128Mb of RAM. It uses 5V/1A so it can easily be powered by one of the USB ports on my mini-pc and draws less than a couple of watts of power by my measurements. It comes with an Ethernet cable and a USB2.0 to Micro USB cable which connect to my mini-pc, a Beelink U57 with an Intel Core i5-5257u Processor. It has LED lights to show that it is powered and has a reset button and a mode switch. The GL-MT300N-V2 only supports the 2.4G band at 300Mbps and not the faster 5G band. It can function as a portable router, mobile hot spot, WiFi repeater bridge or range extender. I only need it to function as as a portable router to set up its own WiFi network which I can connect to from my laptop inside my RV. The setup was simple and straight forward with the included instructions. You simply apply power to the router and it begins broadcasting a WiFi signal. You connect to the WiFi with the default password printed on the bottom of the router which is simple to change once connected. To access the router settings you simply connect to the IP address in the instructions. This will take you through a screen to choose your language, a screen to change your Admin Password and finally to the main page with access to an Internet, Wireless, Clients, Firewall, etc. pages where you can change settings for each of those if desired. For my application using this as a wireless router, the only thing I needed to change was the password. Closing out the connection to the router I was set. Then I simply connected the router to my Beelink mini-pc with the Ethernet cable and powered up the router with the Micro USB cable also connected to the mini-pc. Now I could see the GL-MN300N-V2 WiFi signal on my laptop and connected to it using the password I had just created. To connect between my laptop and the mini-PC I use TeamViewer but you can use Remote Desktop or any other such software.
Since I do not have my RV yet, I set about to test the quality and stability of the wireless connection with the GL-MT300N-V2 connected to my Beelink mini-pc inside my observatory and my laptop setup in the back yard at different distances from the observatory testing the connection at successively longer distances. Once connected, I observed how long it was able to maintain the connection while performing a dummy astrophotography run with the telescope tracking and the camera taking exposures of 1 minute duration while watching progress on my laptop. The objective was to find the maximum distance that a a continuous connection could be confirmed for at least 8hrs. At 75 ft I could not get a connection at all. At 65 ft I could connect to the wireless network but the connection would drop repeatedly. I was able to maintain a solid connection at a distance of 60 ft to the Travel Router inside the observatory without dropping for in tests of up to 8 hours. I repeated this test two more times and satisfied myself that I could reliably maintain a connection through the observatory walls at a distance of 60 ft. In addition to maintaining a solid connection I tried opening files and changing settings in The Sky X (TSX) running on the Beelink mini-pc. At 60 ft I did not see any issues of a sluggish or poor connection. Keep in mind that the quality and stability of the connection depends both upon the Travel Router's wifi strength and also on the strength of the wifi hardware inside my laptop. Other laptops or pcs may support longer or shorter distances than mine. Also while the wooden walls of the observatory are not the same as the fiberglass and aluminum walls of my RV I expect that I will be able to connect reliably to my telescope out in the open at a similar distance. Encouraged by the 60 ft distance I tested the connection from inside my house on a straight line of sight through glass doors to the observatory only 40 ft away. While I could make a connection it would always drop within an hour or less so I deem this unreliable for a connection through a pair of walls or other multiple obstacles.
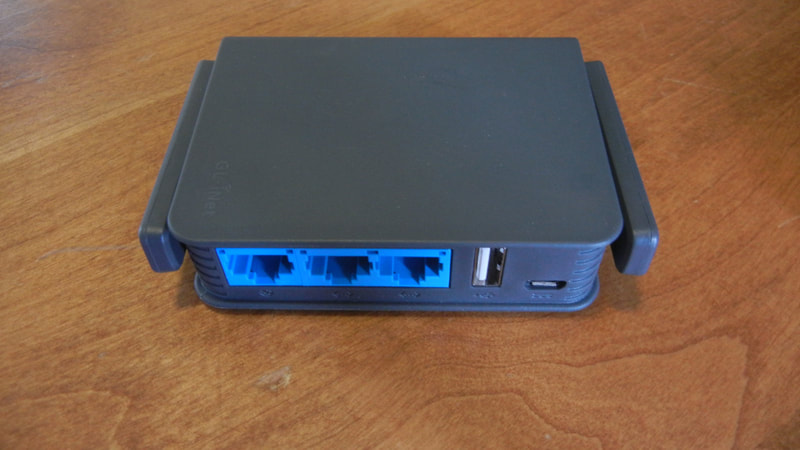
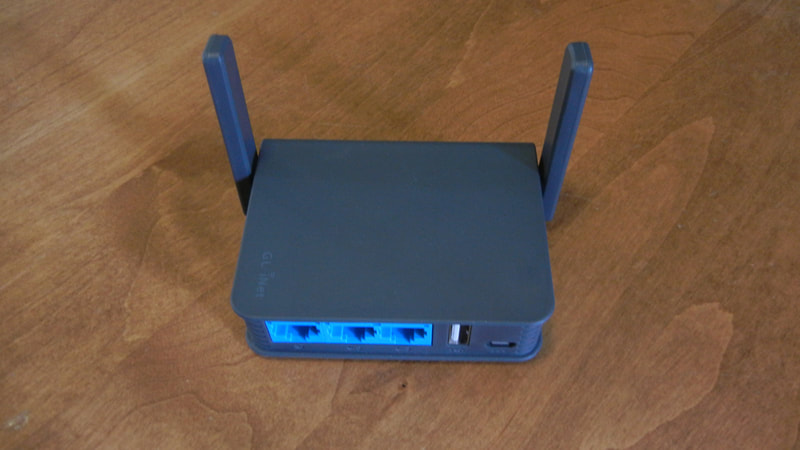
Although the GL-MT300N-V2 worked well for my application and I think it will serve my needs in the field I wanted to try a slightly more expensive router from the same company equipped with a pair of antennae to presumably provide greater distance capability along with 5G (433Mbps) for faster connection speed. The GL-AR750S-Ext travel router sells for $54.90 and comes with 3 Ethernet ports, a USB2.0 port and a micro USB port for power input. It also has LEDs for power, 2.4Ghz and 5Ghz WiFi signals, 128Mb of RAM, a reset button and a mode button, a micro SD card slot and 2 antennas which can be rotated from the compact travel position to 90 degrees during operation for better signal range. This router is also quite compact with dimensions of 3.9 x 2.7 x 0.9 inches with the antenna folded down and weighing only 3 ounces. It has over 1600 reviews on Amazon with 89% of them rated 4 or 5 and only 7% rated 1 or 2. Setup is the same as for the GL-MT300N-V2.
I performed the same tests as with the GL-MT300N-V2 above. In this case I could reliably connect at a distance of 100 ft from my observatory at 2.4G for repeated tests of 8 hours and longer. 100 ft is the maximum distance I can be from the observatory in my back yard so it is possible this will work at a longer distance. Using the faster 5G connection, although I was able to make and maintain a connection repeatedly at 100 ft for 6 hours or longer, several times I had trouble making the initial connection and multiple times the connection dropped around 6 hours. It is well known that the higher frequency of 5G does not have the range of the lower frequency 2.4G so this is not surprising. The higher frequency signal has more difficulty penetrating walls. Tests from inside my house confirmed that I could not obtain a reliable connection at 5G but could easily maintain a connection all day long at 2.4G. This is at a distance of about 50ft from inside my house to the router inside the observatory. So it is clear that the GL-AR750S-Ext can provide a wireless connection at a greater distance than the GL-MT300N-V2. This is not a surprise since that is obviously the point of the antenna. I did not test transfer speeds or other performance metrics as I merely want to be able to remotely control the mini-pc and keep an eye on an imaging run with the laptop remotely. I did test downloads of data which worked without a problem over this WiFi network but did not try downloading images as they are captured as that is not my objective. As I mentioned above, differences in the wifi antenna of the laptop or pc being used, local interference from neighboring wifi signals and even RF interference from electrical equipment like a microwave can change the distance at which a reliable connection can be made and/or cause connection disconnects. As far as my tests, I think either travel router will work well for my application with the GL-AR750S-Ext giving me a greater distance capability. I would recommend either so long as your situation is similar. Links are Amazon Associate links. |
Categories
All
Archives
January 2024
|

 RSS Feed