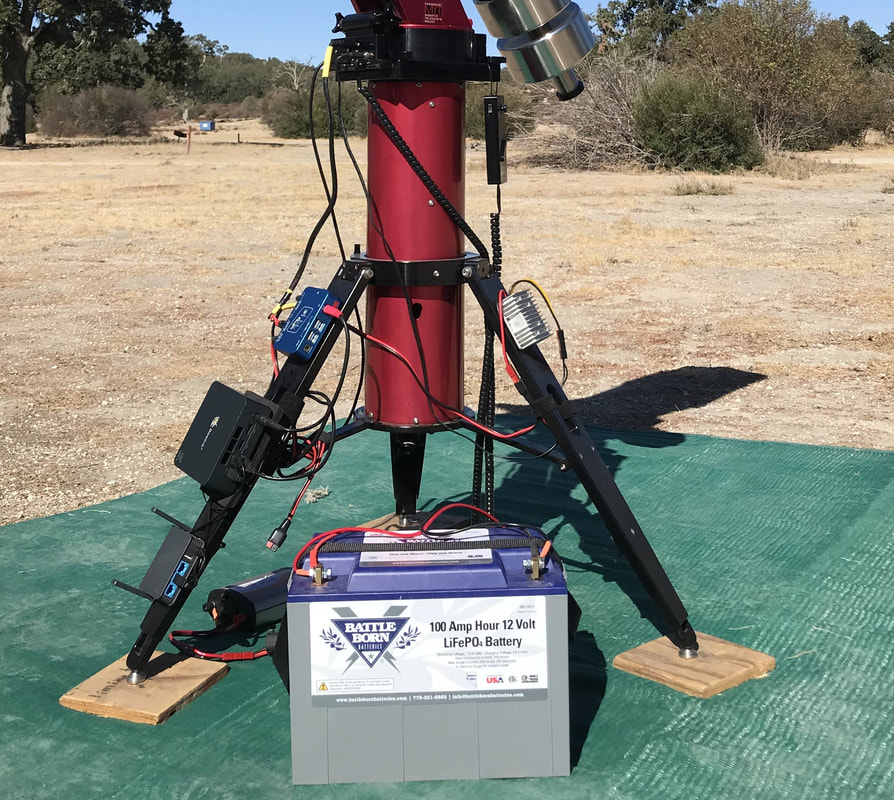
 Mini-pcs are becoming increasingly popular for both Electronically Assisted Astronomy (EAA) and astrophotography. This is because a mini-pc allows one to connect remotely to the telescope, mount, camera, and other equipment with a laptop, tablet or phone without being tethered by a USB cable. Remote may mean inside one's house while the telescope is out in the back yard or inside a small tent or EzUp where you can stay comfortably warm and away from annoying bugs when observing away from home. It may even mean sitting in your own house with your telescope set up at a distant remote observatory. In my case, it means being inside my house when observing at home with my equipment setup in the backyard observatory or inside my RV when at a star party or other remote site. Being untethered allows me to move freely from inside (house or RV) to the side of the telescope whenever I need to be close but then being able to return to the inside for most of the night. Utilizing a mini-pc at the telescope will also reduce the power required to keep everything running through the night. A mini-pc uses much less power than a typical laptop. If you connect remotely to the mini-pc with a laptop you can still save power since you do not have to have the laptop on all the time since it is only being used as a monitor to check in on the mini-pc from time to time. In fact, you can simply turn off the laptop once the mini-pc is up and running and leave it off until you are ready to shut down the session. A tablet or phone can be used instead of the laptop to remote into the mini-pc which gives more options in terms of saving power since these use much less power than a laptop. What is a Mini-PC? A mini-pc is a headless computer which comes in a small form factor typically 5" - 6" on a side by about 2" - 3" thick or even smaller. Headless means that it comes without a monitor, keyboard or mouse. This cuts down on the size, cost and power consumption, all important for astronomy applications. Since a mini-pc is a computer it will have a CPU, RAM, non-volatile memory, a GPU, USB and HDMI ports, a LAN port, WiFi, and Bluetooth capability. It will also come with an installed operating system such as Windows 10 or 11. The mini-pc can do anything a laptop can while running the applications needed for complete control of mounts, cameras, focusers, dew heaters, etc. This includes running image capture software, guiding software, planetary software, plate solvers, planning software and imaging session automation and control software like NINA or SGP. For instance, on my mini-pc I have The Sky X for mount/camera/focuser control and image capture, Sharpcap for EAA, Ph.D2 for guiding, All Sky Plate Solver and ASTAP for plate solving, Cartes du Ciel as my planetary software, and Sky Tools 3 Pro for planning. I recently added NINA which will take responsibility for overall control and sequencing of my astro-imaging sessions which still uses TSX, Ph.D and ASTAP. In general, a mini-pc is not expected to do the heavy lifting of post processing the photos captured during an astrophotography session, although it is expected to handle the live image stacking, dark frame subtraction and stretching typical in an EAA session. Usually, the burden of post processing astro images is tasked to a separate, more powerful and more expensive laptop or desktop computer. But, there is no reason it cannot be done on the mini-pc if configured to do so which requires a keyboard, mouse and monitor. Even when post processing is left to a separate computer, it is imperative to have a keyboard, mouse and monitor to attach to the mini-pc for initial setup and for analysis in case something goes wrong. In two years I have only had to pull out these once in the field and it turned out that the problem was operator error, not something wrong with the mini-pc or my WiFi router. Still, having these as backup is essential in the rare case that something goes wrong. 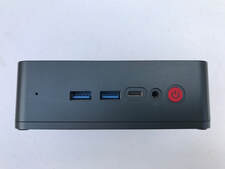 My Beelink U57 with 5th Gen Core i5, 8GB RAM and 256GB SSD My Beelink U57 with 5th Gen Core i5, 8GB RAM and 256GB SSD Choosing a Mini-PC When it comes to mini-pcs there are a seemingly endless number of options available which constantly change as new hardware components become available. New mini-PCs can be found for under $200 on models with Celeron and Core i3 processers to over $1000 for models with high end processers, GPUs and lots of memory. Keep in mind that even with the same models, prices fluctuate frequently both up and down. The correct choice depends upon one's particular application, future plans and pocketbook. Typically, the trade off in performance and price leads to mini-pcs used for astronomy costing somewhere between $200 to $500. Beelink is probably one of the most popular mini-pc manufacturers in this price range. Recently, inexpensive models from Mele Quieter have gotten a lot of notice on the Cloudy Nights forum as well. Intel NUCs (Next Unit of Computing), designed and built by Intel, are also quite popular and include some of the high end mini-pcs as these NUCs come in many configurations including kits which can be customized to the users requirements. 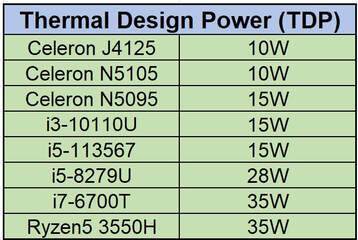 When choosing a mini-pc the first feature to consider is the CPU. At this point in time mini-pcs used for astronomy usually include a Celeron or Core i3 processer for the less expensive models or an i5 processer for the slightly more expensive models. Many people report success in astrophotography and even EAA with mini-pcs using Celeron processors. However, for high data rate applications as is the case with larger format cameras (20Mpixels or larger) or live stacking of very short exposures (less than 5 sec subs) with dark frame subtraction and flat frame calibration for EAA, the Celeron class of processor may not be up to the more challenging tasks. In these situations an i5 processor would be a safer choice while the added cost of an i7 processer might be better applied to more RAM or a larger and faster SSD. For planetary imaging requiring extremely high image capture rates one should consider at least an i5 and possibly an i7 processor with fast SSD storage. Celeron processors found in these mini-pcs include the Gemini Lake J4125 and the Jasper Lake N5095. For Core i5 processers the Tiger Lake 113567 and Coffee Lake 8279U are typical. In addition to processing speed and cost another attribute of CPUs to be considered is the Thermal Design Power (TDP) which is indicative of the maximum power that the CPU can generate. The higher the TDP the more power one needs in the field to keep the mini-pc running all night long. One of the desirable features of the mini-pc is its lower total power consumption compared to a laptop. The accompanying table shows the tradeoff in CPU capability and TDP. After the CPU the amount and type of RAM and mass storage is probably the next most important consideration. 8GB of RAM is sufficient for most situations and is fairly common in pre-configured mini-pcs, while 16GB can help when many applications are open at the same time. As far as mass storage one should consider 128GB to be the minimum choice in which case you may have to constantly download image files to another storage device after an imaging session. I opted for 256GB which allows much more margin, but even then I sometimes wish that I had paid the extra for 512GB. The choice will depend on your imaging/EAA habit and how often you are willing to transfer images from your mini-pc to your processing pc. Mass storage on the mini-pcs often used for astronomy typically have one of three types of mass storage including M.2 SATA SSDs, M.2 NVE SSDs or eMMC. The first two can be replaced while eMMC is soldered onto the motherboard and cannot be replaced. NVE SSDs use the PCIe interface which is much faster than the SATA interface used by SATA or eMMC devices. All will work but the M.2 NVE SSD is the better choice for high data rate applications. Probably the next most important consideration in choosing a mini-pc is the number and type of USB ports because of the need to connect our many astro devices to the mini-pc. Most mini-pcs in the price range being discussed usually provide at least 4 USB ports in some combination of USB2.0 and USB3.0. Some also provide a USB Type C port with even faster data transfer rates. Don't forget to reserve one USB port for a WiFi dongle when using a wireless keypad and mouse. On other hand, if like me, you have a USB hub like the Pegasus Power Box which you use to connect your astro devices, you will only need to connect the hub to the mini-pc, preferably over a USB 3.2 port for fastest transfer rates. Another choice is whether or not to choose a mini-pc with a fan or not. Fans consume additional power. And they can, in principle, cause vibrations although I have never witnessed any such problem with my mini-pc attached to the leg of my tripod. On the other hand, fans will keep the CPU cool so that it can operate at its highest speed whereas air cooled mini-pcs can get hot causing the CPU to throttle back. Beelink tends to incorporate fans into their models while MeLE Quieter does not. Many folks agonize unnecessarily over the fact that some mini-pcs require 19V power input instead of 12V. This is easily rectified with an inexpensive DC-DC boost converter which takes a 12V input and provides a steady state 19V output. The boost converters are ~95% efficient while the AC transformer typically supplied with any mini-pc is likely ~80% efficient. I find the easiest way to incorporate these into my setup is to attach Anderson Power Poles to the leads and use Anderson Power Pole to 5.5 x 2.1mm adapter cables to connect to my equipment. All mini-pcs include an ethernet port for wired connection, WiFi and BT capability, along with one or more HDMI ports. You will need one HDMI port to connect a monitor initially to set up the mini-pc and any time something goes wrong with your connection to the mini-pc and you need to trouble shoot the situation. Mini-pcs come with Window 10 or Windows 11 software already installed. Look for the Pro version which is required for some remote connection software like Team Viewer and Remote Desktop. 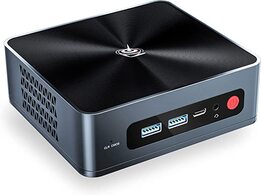 Beelink SEI8 Beelink SEI8 Mini-PC Models to Consider Below are a number of different mini-pc models currently available. Prices will vary and over time models will change, but this can be a good starting point. Beelink has a large following in the astronomy community judging from posts on CN and is the brand I have used and been happy with for the past 2 years. You can search through all their models on the Beelink Amazon store. A few examples are worth considering. The Beelink U59 Pro comes with a Celeron N5105 processor, 8GB of RAM, a 500GB M.2 SATA SSD, 4 x USB 3.0 and 1 x USB C ports, 2 LAN ports, 2 x HDMI ports, WiFi, BT, and Windows 11 Pro. It has a cooling fan and operates on 12V and is currently on sale for $219. You can add 8GB more RAM for another $25. The Beelink SEi8 has an i5-8279U processor, 16GB of RAM, a 500GB M.2 NVME SSD, 4 x USB 3.0 and 1 x USB C ports, 1 LAN port, 2 x HDMI ports, WiFi, BT and Windows 11 Pro. It also has a cooling fan and operates on 19V and also has an auto startup feature so that you can set it to automatically turn on at a set time each day. This model is currently on sale for $397. Compared to the model above you get a faster processor, twice the RAM and a faster SSD.  MeLE Quieter 2Q MeLE Quieter 2Q If you are looking for a fanless mini-pcs, the models from MeLE Quieter are becoming popular among amateur astronomers lately. Here are two worth considering. The MeLE Quieter 2Q uses the Celeron J4125 processor, 8GB of RAM, 128GB of eMMC storage, a Micro SD card slot of storage expansion, 4 x USB 3.0 ports, 1 LAN port, 2 x HDMI ports, WiFi, BT and Windows 11 Pro. It does not have a cooling fan and can also be configured for auto startup. This model is currently on sale now for $210. Like most mini-pcs there are upgraded versions of this model with up to 512GB of eMMC storage for an additional $90. The MeLE PCG35 has a Celeron N5105 CPU, 8GB of RAM, a 256GB NVMe M.2 SSD, a Micro SD card slot of storage expansion, 2 x USB 2.0 and 2 x USB 3.0 ports, 1 LAN port, 2 x HDMI ports, WiFi, BT and Windows 11 Pro. It does not have a cooling fan and can also be configured for auto startup. This model is currently available for $310. Both of these MeLE models require 12V input power. Intel NUCs can be found at the Intel Store for as little as $200 to well over $1000. An example is the Intel NUC 10i3FNHN which currently lists for $499 and includes an i3-10110U processor, 8GB of RAM, an 512GB of PCIe SSD, 3 x USB 3.2 ports, 1 Thunderbolt (Type C) port, 1 HDMI port, 1 LAN port, BT, WiFi, an SD card slot and Windows 10Pro. It requires 19V for power. 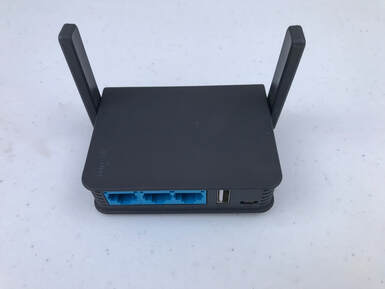 GL.iNet Slate Portable Router GL.iNet Slate Portable Router Mini-PC Operation Being small and light, a mini-pc can be mounted on top of the telescope which minimizes the length of cable runs between cameras, focusers, dew heaters, filter wheels, the mount and the pc. Often the mini-pc can be found mounted to the leg of the tripod or at the base of the mount. If the mini-pc has a cooling fan, this may be the best place to mount it to minimize the chance of vibrations in the optical system. This is my typical configuration since I have a Software Bisque Mount with through the mount cabling. In addition to the mini-pc some method to connect between a laptop/tablet/phone and the mini-pc is required. This involves a remote desktop application like Team Viewer, VNC Connect, Remote Desktop or one of the many others which are free and easy to use. These generally require that the mini-pc has the Pro version of Windows to work. The second requirement for remote connection is the ability to make a WiFi connection. At home this could simply be your home internet network assuming that you have a LAN line to connect to the mini-pc in the back yard. I use a Cat5 cable I strung out to my backyard observatory 10 years ago to connect from my laptop anywhere inside the house to my mini-pc outside on my home network. In the field or at home if you don't have a wired connection in the back yard, you will need to create your own WiFi network. This is simple to do with an inexpensive portable router. I have reviewed 2 such inexpensive routers from GL.iNet in an earlier blog which you can find here. A video version of my review can also be found here. I have been using the GL.iNet 750S Ext (Slate) for 2 years and could not be happier. I can stay connected from inside my RV to my telescope up to 100 feet away. At home I can use the Slate as a repeater and connect to my home internet without the need for a LAN cable connection. GL.iNet has another model capable of higher data rates called the Beryl for just a few dollars more which is worth considering. If you need help setting one of these up, I created a video showing how to do this step by step. Summary Having used my mini-pc for two years both at home and at many star parties I have been extremely happy that I finally made the move to untether myself. With one exception (operator error) I have not lost any time due to problems connecting or using the mini-pc. And, I have not noticed any problems when using it for astrophotography or EAA. Hopefully I have given you a helpful overview of the considerations required to set up your own remote connection so that you can make the right choice for your situation. The one possible downside of using a mini-pc is that it tends to keep me inside, even at star parties, instead of out under the night sky. I have had to remind myself that one of the great things about being at a star party is to be able to look up and appreciate the wonder of the Milky Way with my naked eyes. So, I make it a point to spend some time outside both viewing the night sky and talking with my fellow amateur astronomers instead of spending the entire night away from the action inside the RV. You can find a complementary video tutorial on this subject on my YouTube channel which you can find here www.youtube.com/watch?v=TRk2wsrOnNM Beelink Mini PCs amzn.to/48Vp3Lm
MeLe Quieter Mini PCs amzn.to/47KLXUK Intel NUCs amzn.to/47KM1ns GLi.Net Portable Routers amzn.to/4b1oamt Links are Amazon Affiliate links from which I can earn commissions at no cost to you. If you would like to support my web site and its content please consider using my links when ordering products.
0 Comments
|
Categories
All
Archives
January 2024
|
 RSS Feed