Over the years I have always used an EQ mount along with my Celestron 9.25" SCT, Celestron 14" SCT with Hyperstar or my Orion ED80 (for wide field images) when engaging in deep sky video. However, such setups are heavy, not easy to transport when traveling to a dark site or just setting up nightly in one's own back yard. Also, these scopes and mounts are fairly expensive, counted in the many thousands of dollars not including the video camera. In addition, polar aligning an EQ mount is not everyone's cup of tea, let alone accurately aligning it for long exposures.
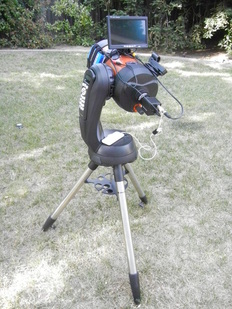
There seems to be a lot of interest lately in very light and highly portable Electronically Assisted Astronomy (EAA) setups which do not cost a fortune. Some are experienced astronomers who are downsizing as they are getting older and finding it more difficult to transport and set up heavy equipment. Some want a simple setup for public outreach. Others are new to astronomy and want to start with something simple to setup, easy to get started and relatively light on the wallet. To address this trend, I paired a Celestron SE6 which is a 6" SCT on an Alt-Az mount with two different types of low cost video cameras, a Revolution Imager 2 (R2) and a ZWO ASI224MC. 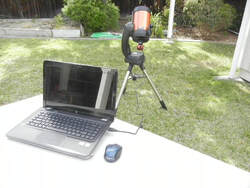
Why the choice of the SE6? Alt-Az mounts pose a fundamental challenge since they don't track along the Celestial Equator like and EQ mount does. This means that objects do not stay centered in the field of view (FOV) like they do in a polar aligned EQ mount. Field rotation, which causes stars to become elongated and blurs detail in extended objects like galaxies and nebulae, can limit exposures to as little as 10 seconds in some parts of the sky. The length of the exposure possible before field rotation becomes a problem depends on the focal length of the telescope, the Altitude and the Azimuth of the object being viewed, and the observer's latitude. You can read more on this in the "Quick Start Guide" section of this web site. Fortunately, recently released EAA software has the ability to extend exposures to several minutes without field rotation ruining the image.
Second, Alt-Az mounted scopes are typically much less expensive than EQ mounts which addresses the lower cost factor. The 6SE, which belongs to the Celestron Nexstar series of scopes typically sells for $799 including the mount, tripod, SCT and accessories. I have seen it on sale for $699. The 5SE, with a 5" SCT is $100 cheaper. Third the 6SE meets the objective of lightweight and portable with a weight of only 21lbs counting the mount, tripod and scope. The 5SE is only 17.6lbs. Because of this and the fact that the mount and scope are fairly compact, I was able to leave everything assembled and move it back and forth between my house and the yard easily and quickly. For transport to a dark site, the scope disassembles into three pieces (tripod, mount, SCT) and easily fits into the trunk or back seat of practically any car. A plastic accessory box serves to hold the camera and its accessories. Fourth, there is no requirement to polar align an Alt-Az mount which makes it much easier and faster to setup than an EQ. First, level the scope. Next, the Celestron Nexstar series of scopes has a Skyalign routine which requires sequentially locating three bright stars or planets using the included unity Red Dot Finder and the hand control to move the scope in Altitude and Azimuth. Each star must be centered in the FOV of the camera or an EP. Once all three have been found, Skyalign will determine the scopes orientation and even tell you which three objects you found. To obtain a good alignment, the three objects should be widely spaced and not in a straight line from one another. With the scope aligned, it will be able to GoTo nearly 40,000 objects in its on-board memory and will be able to place most objects in the FOV with a 12mm or larger EP. For video cameras with 1/3" CCDs, I found that some objects were just slightly out of the FOV due to the small size of the CCD chip, but typically they are outside the FOV in the same direction which makes it easy to make small adjustments with the hand control to get the object centered. With practice, the Skyalign GoTo alignment can be completed in less than 10min. Fourth, the 6SE comes with a 6" SCT which I think is sufficient for observing all of the Messiers and many of the Herschel objects with either of the two cameras listed above. An 8" version will show much more and is recommended if it is within budget since it only adds 3lbs to the total weight. The 5" version will still provide pleasing views for those on an even tighter budget.
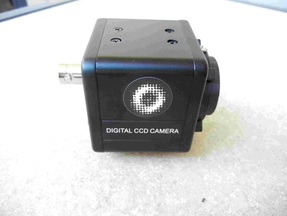
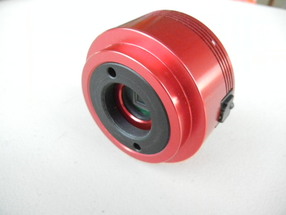
Why the R2 and the ASI224MC? Simply cost and performance. The R2 which comes as a kit costs $300 and the ASI224 is $349, making these two of the lowest cost options for EAA. Both perform extremely well, each offers advantages over the other and both are color cameras.
The R2 is an analog camera which comes as an all-in-one kit including a 7" LCD, Li Ion battery, focal reducer, UV-IR filter, hand control and cables. This is everything you need to get up and running immediately. And, it has a reasonably sensitive CCD which will provide pleasing images of many deep sky object. The camera settings are changed using the hand control and on screen menu display. Since it is an analog camera it can be hooked directly to the LCD or your own larger television set and does not need a computer to work. This makes the combination of this camera and the 6SE highly portable. On the other hand, with the addition of an inexpensive digital capture device the R2 can be connected to a computer to capture and process images. With free EAA software such as Sharpcap, the maximum exposure can be extended to several minutes as will be explained shortly. The ASI224MC is a USB camera which comes with a USB cable, C-Mount and T-mount adapters and an All-Sky lens for wide angle shots of the night sky. A computer is required to adjust the menu settings, view, capture and stack images live. A single USB cable connected to the computer, powers the camera, sends images to the computer and provides control of the camera menu. Sharpcap can also be used with the ASI224MC to do everything it can with the R2, plus it will control the camera settings as well. If you prefer, a version of the software package AstoLive is available free to anyone purchasing a ZWO camera like the ASI224MC. With a very low readout noise, the ASI224MC is well suited for stacking of many short exposure frames. And, if you decide to move up in cameras later, the ASI224 can be used as an autoguider. The ASI224MC will require the purchase of a focal reducer to improve image detail and one equivalent to that provided with the R2 can be purchased for less than $20.
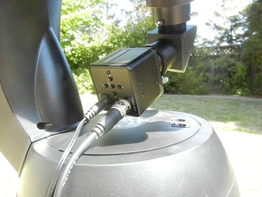
I attached the R2 to the SCT with a 1.25" diagonal to give enough space for the camera to clear the mount when pointed at the zenith. The Hand Control for the R2 is attached at the back of the camera when I view on the LCD. When I use a computer, I use a longer video cable and connect the Hand Control next to the video capture device at the computer. Using these two different methods enables me to have the Hand Control right next to me. For the LCD, I bent the mounting base to the curvature of the the optical tube assembly (OTA) and glued a piece of soft foam to the bottom of the mounting base to avoid scratching the finish of the OTA and held it in place with Velcro straps. I can change the angle of the monitor to compensate for different OTA orientations. I mounted the battery to the arm of the Nextstar SE mount and ran the power cable to the monitor and camera using the included power splitter cable. The mount can be run on its own internal batteries or with an external 12V battery. With this setup, I can leave everything connected and stored inside my house and very easily carry it outside and set it up, including the GoTo alignment in about 15 minutes.
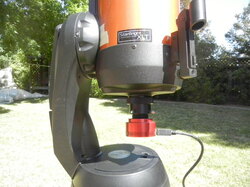
The ASI224MC can be attached directly to the visual back without a diagonal and will easily clear the base of the mount when pointing at the zenith. The ASI224MC requires the use of a computer and software to control the camera, view and save images. The included USB cable simply connects to one of the USB inputs on the computer. With the exception of the computer, this setup is even simpler than with the R2. But then, some folks do not want to have to deal with a computer, especially in the field.
When using a computer, the last important piece to this EAA setup is the free software, Sharpcap. Sharpcap not only allows one to view, capture and adjust the brightness and contrast of images live on the computer screen. It can also stack frames on the fly, translating and rotating successive frames to align them to the original frame. This greatly extends the exposure times possible with an Alt-Az mount into the many minute range. Sharpcap also has a histogram feature which enables stretching of the image to bring out more detail and darken the background sky. All of this on the fly, and for free.
So there you have it, two light weight and highly portable EAA solutions which won't break the bank. What are you waiting for, get going!
Another good option in highly portable and lightweight scopes for EAS is the Celestron Nexstar 6SE which is slightly more expensive but has a better mount than the regular 6SE. If you are interested you can click on the link below to take you directly to a supplier. As an Amazon Associate I can earn from qualifying purchases through my site with no additional cost to you which helps to defray the cost of this website.
2 Comments
|
Categories
All
Archives
January 2024
|
 RSS Feed