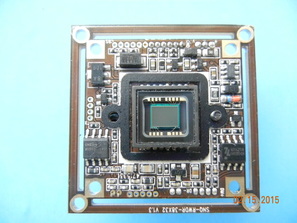
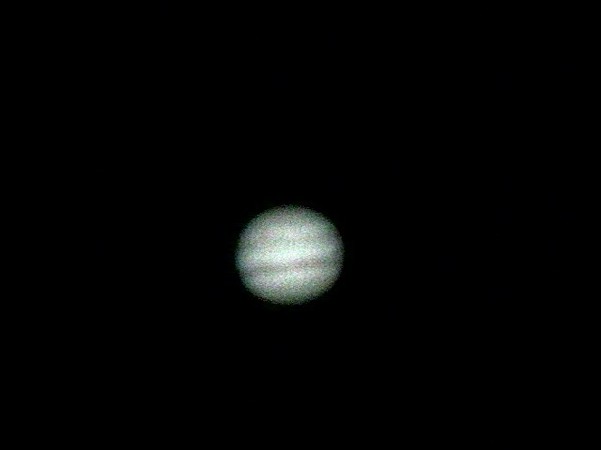
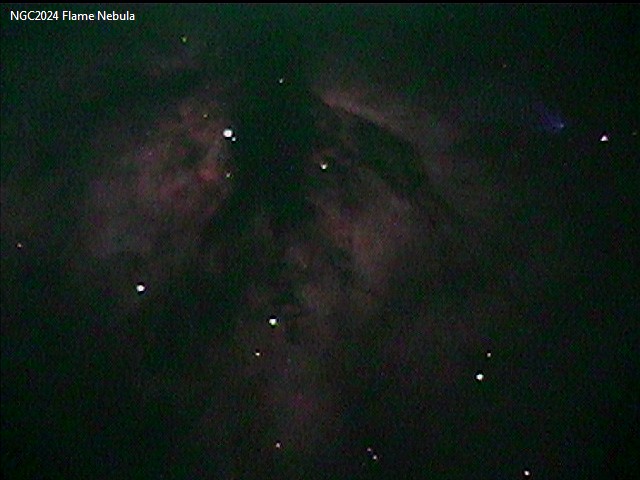
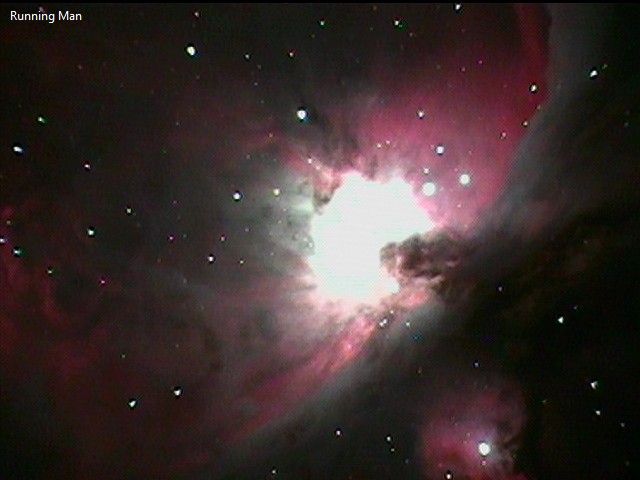
 I have to give credit for this discovery to "Photo444" and "DavidB in NM" who first suggested it in a post on the Cloudy Nights (CN) EAA forum in Jan 2015. You can find that discussion here. I bought a board camera myself soon after the initial posts for only $23 from Securitycamera2000.com which included free shipping. With it I built my own deep sky video camera for $35 which provides surprisingly good images. What is a board camera, you ask? With video security camera use on the rise it is now possible to buy the electronic board which has the CCD, Digital Signal Processor (DSP), and other electronic components without the external housing at one-third to one-half the price of a low cost security camera. You add your own custom housing and there you have a DIY camera ready for deep sky video. The board camera pictured above shows the CDD, a 1/3" Sony ICX638 NTSC Super HAD II. It has 768 x 494 effective pixels measuring 6.35 x 7.40 microns. The reverse side of the board has an RJ10 Digital Signal Processor (DSP), 10bit A/D converter, additional electronic components and connectors for camera control, power and video output.  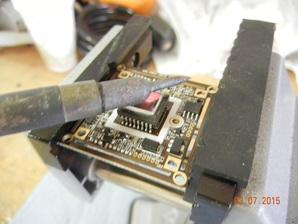 The board camera comes with everything you need to build your own video camera except the enclosure. Along with the 1.5" x 1.5" circuit board there is a 30" cable with connections for power (red) and video (yellow) and a 5 button in-line toggle switch to control the On Screen Display (OSD) for the camera's menu. One end of the cable has connectors which attach to sockets on the back of the board for power, video and camera control. The other end of the cable attaches to your video display (requires a BNC to RCA adapter) and 12VDC power (requires a 2.1 x 5.5mm power connection). It also includes a CS Mount Base to attach a C-Mount adapter or focal reducer, an S Mount Base (also called M12 Mount) to attach optional plastic wide angle lenses, two gaskets and some screws to attach the adapters to the board. The first thing you will need to do is to remove the IR filter which is glued onto the front glass of the CCD. This filter will block the all-important hydrogen alpha light from galaxies and nebulae if it is left in place making it much less sensitive. Removing the filter requires heating the top of the IR filter with a soldering iron until the filter slides off. The process will be easier if you hold the board in a vice. I used a 40watt iron, others reported success with a 30watt iron. The trick is to hold the barrel of the iron against the filter and not the tip as pictured. It should take 20 - 30 seconds to free the filter. I will admit, it took me several tries as I initially used the tip of the soldering iron, not the barrel. I also tried to grip the filter with needle nose pliers and ended up cracking the filter. None the less, I finally got the IR filter off without damaging the CCD. Once removed, you will have some residual optical cement on the glass which covers the CCD. This can be removed with a Q-tip and some alcohol. 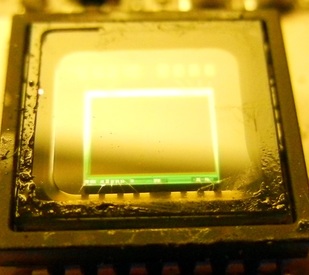 Residual optical cement visible at the edges. 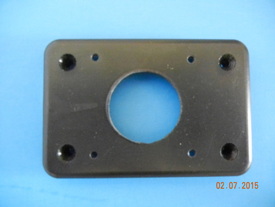 Next, you need to decide what type of enclosure to use for the camera. In the CN link above, one person machined a very nice cylindrical enclosure made out of delrin. Most, like myself, used a plastic hobby box. I chose to use a 3" x 2" x 1" hobby box that I bought from Radio Shack for $3.80. I drilled a 1" diameter hole in the center of the lid of the box to provide an opening for the CS Mount to fit through. I also drilled 4 smaller holes centered on the 1" hole for screws to attach the board camera to the lid of the enclosure. I made one last hole in the side of the box and added a rubber grommet for the cable to pass through. 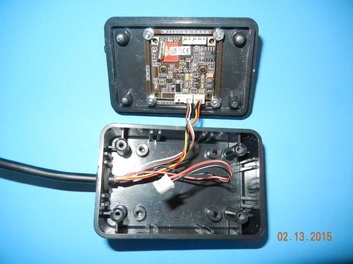 The next step is to attach the board to the front of the box. For this, I used long screws through the front cover of the hobby box and through the 4 holes at the corners of the board. Nuts on both sides of the board were used to hold it in place and to get the desired spacing of the CCD from the front of the 1" opening. After that, the CS Mount adapter needs to be attached to the board through the 1" opening using the included gasket and screws. Then feed the through the opening in the side of the base of the box and connect the power and video wires to their respective connectors on the back of the board. One of the three sets of wires will not be used as this is intended to control the Iris of a lens attached to the front of the camera which is not used for astronomy. Once that is done, you can attach the top of the box with the included four screws. Finally, I attached a C-Mount to 1.25" adapter to the CS mount and I was ready to go. The final cost, including hardware to attach the camera to the box was just under $35. Obviously, you can customize this any way you want. One person even added a fan on the back of the hobby box to cool the CCD. For most deep sky objects you will need a focal reducer which can be attached to the front of the 1.25" adapter. 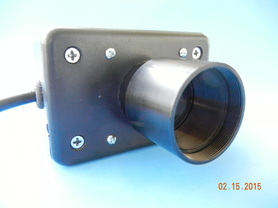 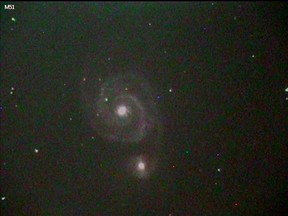 So how does the camera work? Surprisingly well. I tried out the camera on the back of my 9.25" SCT with a 0.5X focal reducer that I bought on Ebay from China for $25 (which included a C-Mount to 1.25" adapter) for a focal length of f/5. The images shown here are from my suburban backyard. I was easily able to capture images of several galaxies (M51, M81, M82 and NGC2403) with exposures ranging from 8.5 to 17sec. The maximum exposure for this camera is 17sec. I also was able to capture images of M1 and NGC2024 (Flame Nebula) with 17sec exposures. M42 was even easier to capture because it is so bright that it only took 4.2sec to get a very colorful image. To show how versatile the camera is, using a 2.5X Powermate from Televue, I was able to capture the Great Red Spot and bands of Jupiter with a 2ms exposure - I'm sure that if I captured and stacked multiple images it would look much, much better. I would say, for anyone who likes DIY projects and wants to try out video astronomy on the cheap, this would be the way to go. The camera can be used to replace your EP, but it can also be used on a finder scope or even, as some have reported, as a guider. Unfortunately, this particular board camera has been sold old and appears to no longer be available from SC2000. However, AVS offers a version of this same board camera but with the addition of a second circuit board with power and video connectors along with some additional hardware for $39.99. It can be found here: http://www.astro-video.com/diy-camera-module-board.html. In the meantime, keep looking on the CN forum for the next big discovery for DIY astro-video cameras.
 © 2015 Curtis V. Macchioni
4 Comments
2/11/2018 11:34:35 pm
I appreciate everything you have added to my knowledge base.Admiring the time and effort you put into your blog and detailed information you offer.Thanks. 9/1/2018 09:19:48 pm
*Youre so cool! I dont suppose Ive read anything like this before. So nice to find somebody with some original thoughts on this subject. realy thank you for starting this up. this website is something that is needed on the web, someone with a little originality. useful job for bringing something new to the internet! 10/19/2018 09:38:45 pm
Leave a Reply. |
Categories
All
Archives
January 2024
|
 RSS Feed