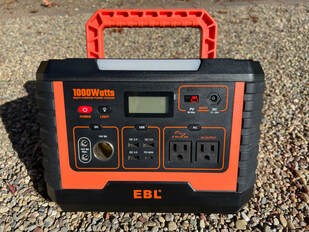
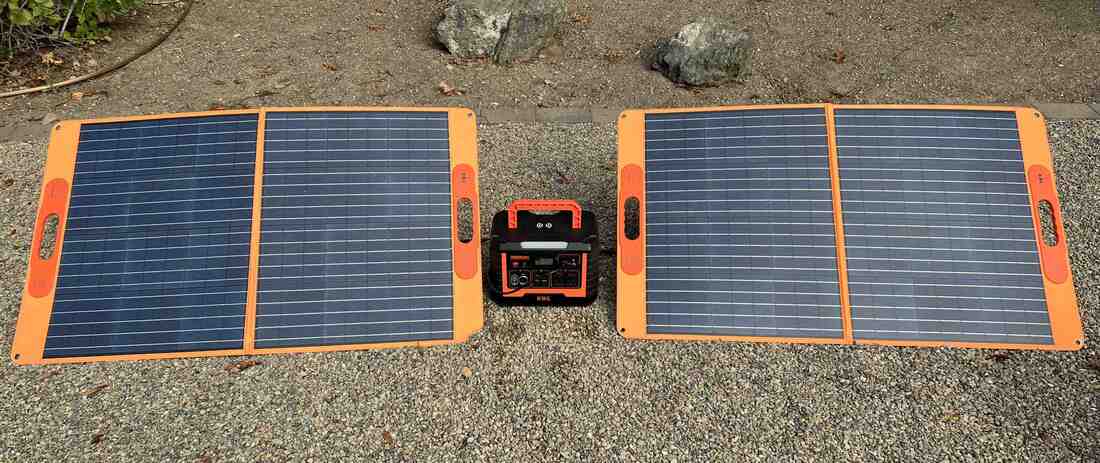
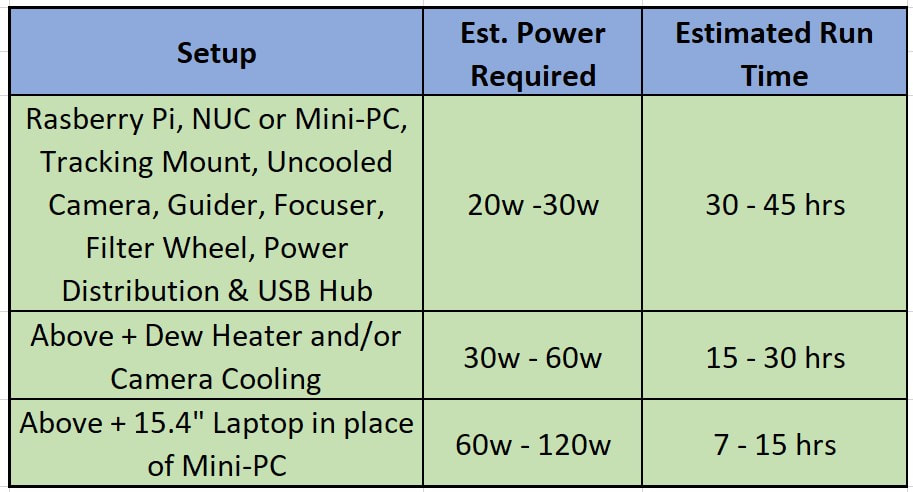
 After posting reviews of the Jackery 1000 and the Bluetti AC50S power stations I thought I was done with the world of all-in-one power solutions for the field. But, this past summer I was contacted by EBL and asked if I would be willing to review one of their portable power stations, the Voyager 1000. I must admit that I had never heard of EBL so I did some homework and found that they have been around since the 90's as a supplier of all kinds of batteries (AA, AAA, C, D, 9V, alkaline, Ni-Cd, Li, etc.) as well as battery chargers. Apparently they decided to participate in the recent trend in the market and have come out with four different capacity portable power stations of their own that I think are worth considering. In addition to the 1000Wh model that I tested they also have a 500Wh model ($470), a 500Wh model ($419), a 300Wh model ($179) and two newly introduced larger capacity models using LiFePO4 cells, the 1843Wh model ($899) and the 2097Wh model ($999). These are some of the lowest cost portable power stations from a well known battery manufacturer. EBL also has 100W and 200W solar panels to charge the power stations away from home. A quick check over the specs and features of their Voyager power station had me intrigued, but the phenomenal price, ($470) is what made me decide to accept their offer and conduct my own review. More on that later. I received their Voyager 1000 power station along with two 100W solar panels near the end of July. I followed the same procedure as I have for all my other reviews of batteries and power stations which is to first conduct bench tests to verify the capacity and re-charge times followed by several months of testing in my home observatory and finishing with a field test at a star party. So let's begin. 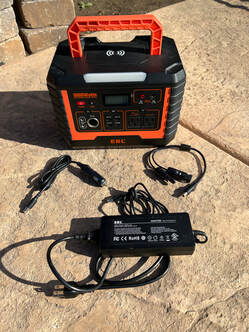 Basic Features of the EBL Voyager 1000 The first thing I noticed is the solid construction of the power station. The Voyager is made of ABS plastic and has rubber bumpers on all four corners to protect it from damage from the inevitable occasional collision with an obstruction when loading and unloading for travel. For additional cushioning It also has four rubber feet on its bottom along with the complete list of product specs. With dimensions of 15.67" x 10.31" x 10.79" and a convenient sturdy handle the Voyager packs a lot of energy at 1000Wh into a small and highly portable package. I very much like the fact that the handle folds down flat unlike another major supplier of power stations so that you can stack other things on top when packing for a trip. All of the controls and ports are located on the front of the Voyager for ease of use. At just 18.7lbs the Voyager is almost 7lbs lighter than its competitor, the Jackery 1000. The Voyager 1000 is rated to supply 999Wh of power in any combination of DC, AC and USB power. As is common with portable power stations, it has a standard cigarette lighter socket for DC connections, but it also has two 5.5mm x 2.1mm DC ports as well. All are rated at 8A each (8A max all three combined) and 12V. The 5.5mm x 2.1mm ports are very convenient for us amateur astronomers since this is the industry standard electrical connection on most astronomy equipment. I had no trouble with my cigarette plug coming loose from the cigarette lighter socket during months of testing, but it is nice to have the option of the other DC power ports. For AC power a pure sine wave inverter capable of 1000W steady state (2000W Max) is built in with two AC ports. This is convenient if one needs to use AC power for their laptop or prefers to power their mount with an AC adapter. My wife used this to power her laptop on a recent boondocking trip in our RV. There are plenty of USB ports to re-charge phones, tablets and even laptops. The Voyager has 3X 3.0 Quick Charge USB A ports capable of 18W of power and a Power Delivery (PD) port with 60W of output. I used these to recharge my phone during my 4 days of field testing. And, there is a 10W wireless charger on the top of the power station. As is typical the EBL power station has an MPPT solar charge controller built in to accept power from one or more solar panels. I like the fact that this one has both an 8mm input and a Power Pole input to provide extra capability for different connectors you might find on solar panels and AC chargers. The Voyager comes with a 150W AC charger and a car adapter cable to charge the unit from the car's cigarette power port. The maximum charging power input is 150W so that two 100W solar panels is probably the maximum you would want to use since any power beyond 150W will not be used by the Voyager. Pass through charging is a nice feature common to most power stations which means that you can use any of the power ports while the unit is being recharged either with solar or the AC power adapter. You will find a master power button and individual power buttons each for DC, AC and USB power on the front of the unit. There is also a small LCD display which shows the percentage state of charge (SOC) in increments of 1%, along with the instantaneous power being consumed and/or the power being charged. This is helpful to keep track of the time remaining to power your devices. The Voyager also has a flashlight feature on its front which provides a nice bright light as needed, which is not typically something we use at star parties but will be helpful on camping trips. Like all Li power solutions the Voyager has an internal BMS which protects the internal cells from being over discharged, over charged or shorted. The BMS will shut the output down when 100% of the useable capacity has been depleted. EBL uses LiNiMnCoO2 (NMC) cells just like most of the other portable power stations because of its high power to weight ratio. EBL warrants their Voyager for 12 months and, although they do not specify the number of full discharge cycles to expect, this is typically 500 for NMC. Operating temperatures are similar to other power stations with a discharge temperature range of 14 to 113 deg F (-10 to 45 deg C) and a re-charge temperature range of 32 to 104 deg F (0 to 40 deg C). 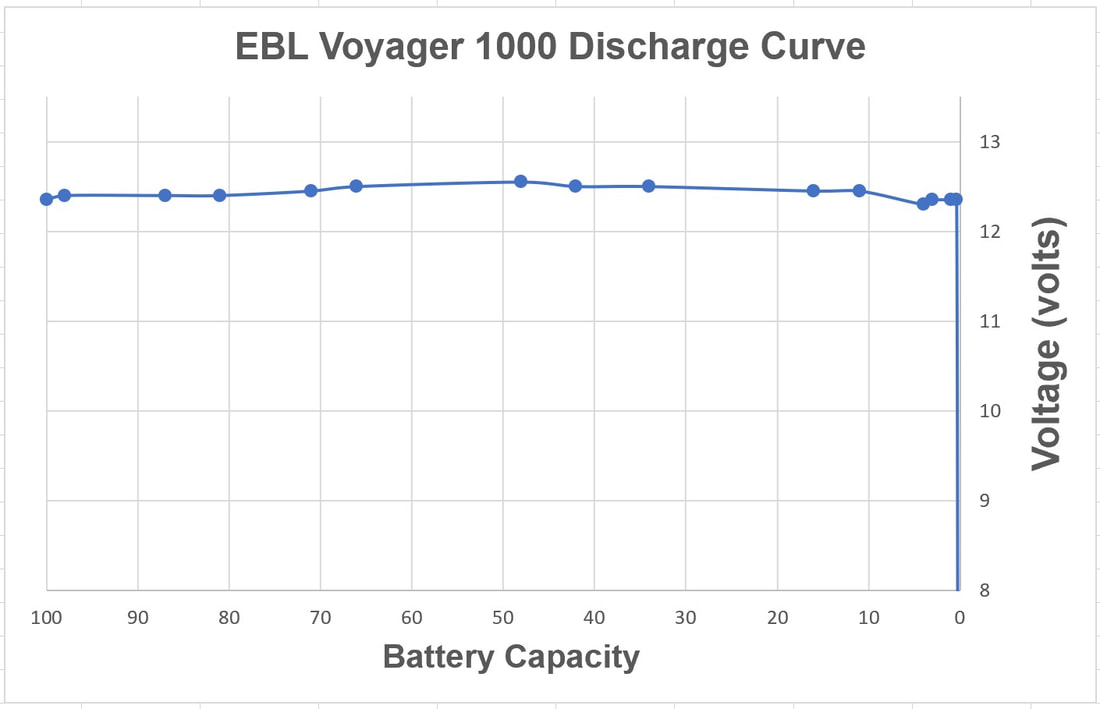 Bench Test Results As with my other power supply reviews the very first test is a bench level test to check the actual capacity versus the manufacturer's spec. Usually these are quite close with the actual power available being within 90% of the spec. with the internal BMS accounting for some of the difference between spec and actual power measured. After charging the Voyager to 100% SOC I attached the DC output to a load tester and set the discharge current to the maximum of 8A. Typical for an NMC power station, the output voltage is regulated. With no load the output voltage was 12.9V. With an 8A load (or a 5A load) the output voltage was maintained at 12.4V for the duration of the test. I repeated this test 3X to check for consistency and found that the average capacity was 912Wh (909, 921, 920, 898) or 73.3Ah (72.9, 73.8, 73.9, 72.7 ). As you can see the repeatability is excellent and the overall capacity is ~92% of the manufacturer's spec which is typical of these solar power stations. For comparison I measured a total capacity of 908Wh for my Jackery 1000 power station. During the discharge test I periodically measure the output voltage to confirm the quality of the voltage regulation and to see at which point the output drops below 12V. You can see from the plot that the voltage is well regulated at 12.45 +/-0.1V all the way until the BMS cut off the output. One thing that I noticed while discharging the Voyager 1000 was that the SOC meter on the unit appeared to read high. Since I recorded the Voyager's SOC meter reading and the Wh and Ah during the discharge tests I could compare the SOC reading to the actual SOC knowing the actual capacity (916.7Wh) determined from the three full discharge tests. What I found is that the SOC meter tracks to the manufacturer's specification of 999Wh within 5% or less. However, since the actual capacity was 917Wh, the meter is reading ~10% higher than the actual remaining power between meter readings of 60% and 10% SOC. For comparison, the SOC reading on my Jackery 1000 was within 3% of the actual SOC all the way to cutoff. Another bench level test is to verify the maximum current that each of the DC output ports can support. In this case the manufacturer specs 8A max but I was able to push the output to 10A without any apparent issues. I do not suggest that you run your Voyager above the spec of 8A as I only do this test to ensure it will work at 8A without any problem. Once fully discharged the next bench test was to re-charge the unit with the included AC adapter. Like the discharge test, this one was conducted 3X and the result was a very repeatable 7.7hrs (7.7, 7.7, 7.55) to go from 0% SOC to 100% SOC. One interesting thing to note during the re-charge cycle is the fact that the SOC meter on the front panel indicated 99% SOC at 6.5hrs but it still took 1.2 hours more to reach 100% SOC. This was very repeatable as well. Curious to know whether this was real, I charged the Voyager until the meter just reached 99% and then did a full discharge test. This time, my load tester measured a total of 743Wh which is just 81% of the measured capacity. This means that when the SOC meter just reaches 99% of capacity it still has another 173Wh to go before it is fully charged. The numbers all add up since at ~1.2hrs at 150W will pump an additional 180Wh of energy into the power station to reach a full charge. The moral of the story is, when charging let the BMS shut down the charging input to be certain a full charge is achieved. While for astronomy applications in the field it is always better to use DC power directly rather than to use an AC inverter sometimes we just need AC power. So, I measured the efficiency of the Voyager's AC inverter by using it to power a fan through a full discharge cycle. I measured the AC power output using a KilaWatt meter. After adjusting for the slight power consumption in the meter itself I found that this inverter is ~93% efficient in converting DC to AC which is excellent. Solar Recharging When we are out in the field we do not usually have AC power available and have to rely on solar panels to recharge our power supply. As I mentioned in the introduction, EBL also supplied 2 of their 100W Apollo solar panels which I used to recharge the Voyager. The dual charging inputs (8mm & Power Pole) makes it easy to use solar panels from any number of other vendors if you want. With full sun in late summer I was able to fully recharge the Voyager in 9.5hrs which is longer than the 7hrs indicated on the EBL website. This would indicate that I was not getting the full 150W of charging input power that I was getting from the AC charger. Unlike AC charging, solar charging depends upon the amount of sunshine, angle of the sun relative to the panel and the temperature of the panel so one can expect a wide range of recharge times under different conditions and times of the year. I fully expect that this time would come down if I had run the test during the summer when the sun was higher in the sky. Backyard Observatory Testing Before taking the Voyager into the field I used it over a period of 3 months to power my equipment in my home observatory. This provides an opportunity to get used to its controls and operation and to find out if there are any glitches or incompatibility issues with my equipment. At home I have a Celestron C11 Edge mounted on a Software Bisque MX mount. I use a DC-DC voltage converter to boost the voltage from 12V to the 48V that the MX requires. For astro-imaging I use a ZWO ASI1600MC uncooled camera and a ZWO ASI224MC camera for guiding. When needed I use a dew strap to keep dew from forming on the corrector plate. I use a Celestron motorized focuser and a pair of fans from Deep Space products to help cool down the optical tube in the early evening. A Beelink Mini-PC runs all of the astronomy software to control all of the equipment and imaging runs. I can connect to the Beelink wirelessly via a GL.iNET wireless router with a separate laptop from which I can control everything and keep track of progress. Power is distributed to all of the equipment at the scope, but not the laptop, through a Pegasus Power Box Advanced power and USB hub. Power is supplied to the Pegasus from the Voyager using its cigarette port. Total power consumption varies from ~30 to ~50W. I had no issues running this way for the 3 month duration of the testing. 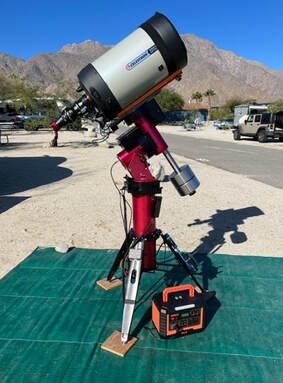 Field Testing The field test is my favorite part of the review which is where I get to take the unit out to a dark site during a star party to see how it performs in real world conditions. In this case I took the EBL Voyager with me to the Nightfall star party in Borrego Springs, CA. The Voyager supplied all of the power for my setup which consisted of the same equipment as at home, except that my Celestron C11 was mounted on a Software Bisque MyT mount instead of the MX. Because of the desert climate I had no need for the dew heater. In total, my power load, excluding the laptop which was powered separately, was ~38W. Over 3 nights I powered all of this without recharging the Voyager for a total of 20.6hrs with enough power remaining that I could have powered this setup for a total of ~24hrs before needing to recharge. Now, everyone has a different setup so how long can you expect the EBL to power your particular rig? I have put together a chart which breaks down typical setups and an estimate of the accompanying power consumptions into three groups. A low power setup would consume 30W or less and would include pretty much any scope and mount combination along with a Raspberry Pi, Mini-PC or Intel Nuc to run all of the software and hardware. It would also include an uncooled camera along with a guide camera, a motorized focuser, cooling fans and maybe even a filter wheel. It might also include a power distribution hub, powered USB hub or combination like my Pegasus Power Box. With a setup like this one could expect the Voyager to supply enough energy to run for at least ~30hrs. That could be enough for 2 or even 3 full nights without the need to recharge the Voyager. For those who use a cooled camera and possibly a dew heater, the power consumption can rise to as much as 60W. In this case, the total run time would be cut in half but still allow for a full night or 2 short nights of imaging. For those who run their equipment with a 15.4" laptop instead of a lower power consuming mini-pc, etc., the power required jumps to between 90 and 120W depending upon the particular laptop model, how long the monitor is kept on and what other power conservation approaches are taken. In the extreme case of 120W, one might expect to have enough energy to run for ~7hrs before needing to re-charge. EBL Voyager 1000 Summary Overall I was very happy with the performance of the Voyager 1000 during my 3.5 months of testing. The Voyager performed as expected providing consistent steady power for all of my equipment right down to BMS shutoff at 0% SOC. For $499.99 including a $380 coupon on Amazon the Voyager is nearly half the cost per watt-hour as many of the other power solutions on the market. That's just $0.50 per Wh of energy. Between its performance and cost this all-in-one power station should provide stiff competition in this market. I will reiterate that from the outside the Voyager is well designed and well put together. I will leave it to other reviewers to do a tear down review so that we can see if it is equally well made on the inside. What I like: 1. Price. With the current coupon on Amazon the Voyager 1000 sells for $499.99. That's $0.50 per Watt-hour compared to $0.95 per Watt-hour for the Jackery 1000. 2. Two 5.5mm x 2.1mm DC power ports consistent with the standard power ports on most astronomy equipment. 3. Compact, light weight design with rubberized bumpers on all four corners. 4. Sturdy folding handle which allows for better stacking for a trip. 5. QC 18W USB power ports for faster charging. 6. All ports and controls on the front for easy access. 7. MC4 to 8mm charging cable included. What I dislike: 1. 1 year warranty compared to 2 years for its competitors. 2. DC output is limited to 8A compared to 10A for its competitors. However, for typical astronomy applications, 8A or ~100W is more than sufficient. 3. EBL should specify the number of full discharge cycles expected. 4. EBL needs to fix the SOC meter so that it more accurately reflects the SOC both during discharge and charge cycles. Amazon links are Affiliate links from which I can earn commissions at no cost to you. If you would like to support my web site and its content please consider using my links when ordering products.
The EBL Voyager 2097Wh, 1843Wh,1000, 500 and 300 Power Stations along with their Apollo 100W and 200W solar panels can be ordered from the Amazon links below. These are some of the lowest priced portable power stations on the market. EBL 2097Wh Model with LiFePO4 cells amzn.to/426PnA3 EBL 1843Wh Model with LiFePO4 cells amzn.to/482rwD2 EBL 1000 amzn.to/47A5vuZ EBL 500 amzn.to/422l1i6 EBL 300 amzn.to/3Sq27Pi EBL 100W Portable Solar Panel amzn.to/3U3IFc0 EBL 200W Portable Solar Panel amzn.to/3u6FEgu You may also want to watch the video review of the EBL Voyager 1000 which I posted on my YouTube channel which can be found here www.youtube.com/watch?v=7ZldEI-GMHU
0 Comments
Leave a Reply. |
Categories
All
Archives
January 2024
|
 RSS Feed