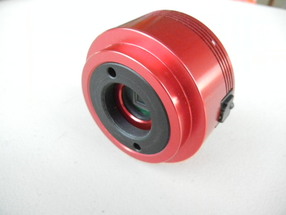
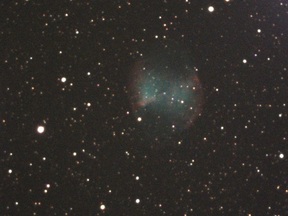
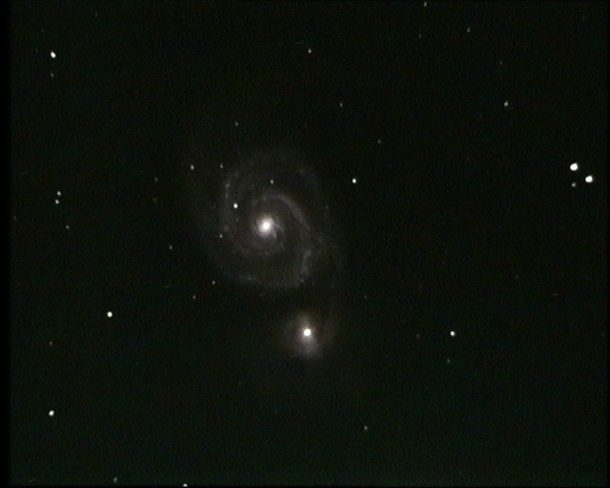
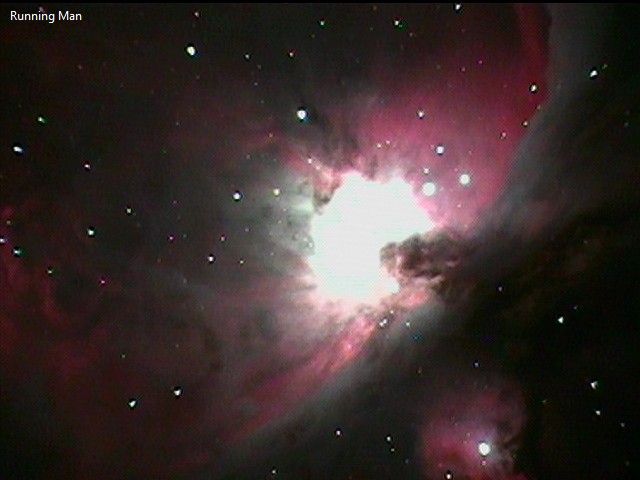
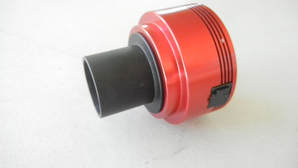
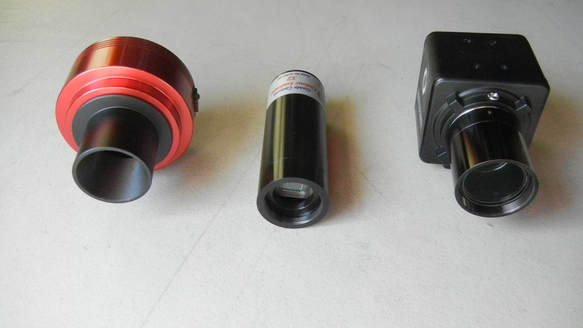
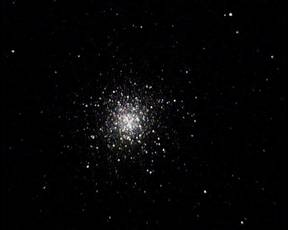
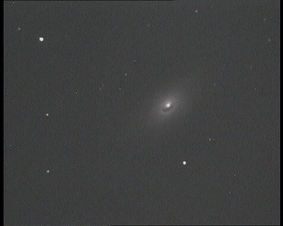
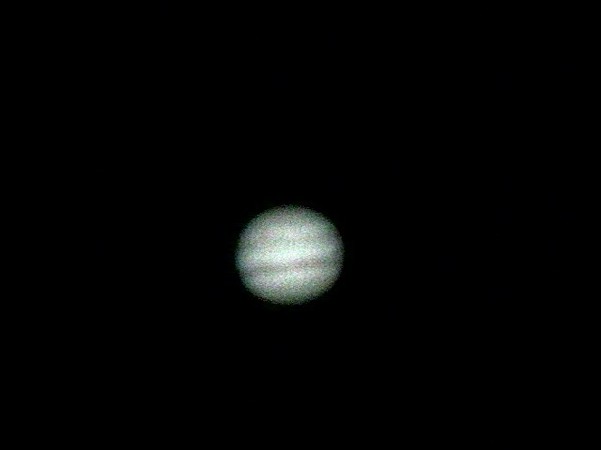
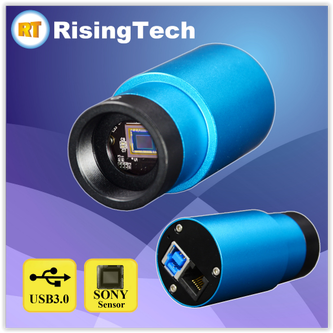
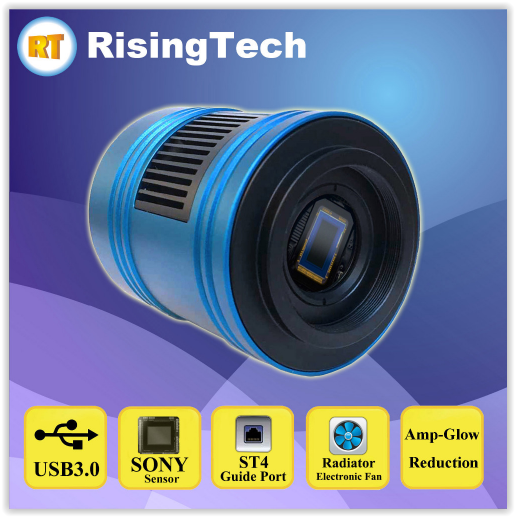
 ASI224MC ASI224MC Nearly two years ago I obtained my first USB camera, an ASI224MC sold by ZWO. ZWO had introduced this camera in July 2015 for $350 and it was an immediate hit with the EAA crowd for good reason. The ASI224MC uses a 1/3" format Sony IMX224 color CMOS sensor with 1.27 Million 3.75 micron square pixels. This provides round, pin-point stars with high resolution unlike typical analog video cameras which have rectangular and much larger pixels. With a high sensitivity rated at 2350mV this Exmor sensor combined with an extremely low read noise of 0.55e to 3e means (depending upon the gain) the camera is well suited to live stacking of many short exposure images. This is very helpful for Alt-Az mounts where single frame exposure lengths are limited by field rotation to around 30sec. When combined with the powerful and free Sharpcap software this camera shows great detail in a wide range of deep sky objects. Since this is a USB camera and not an analog camera, a computer is required to operate the ASI224. A single USB cable from the camera to the computer is all that is required for both camera power and control. One less cable to deal with and to potentially snag on the mount compared to analog cameras is a pleasant advantage. Sharpcap is probably the most commonly used software for the ASI224 and it provides control over all of the camera menu settings. It provides for image display, capture, histogram stretching, dark frame subtraction and on-the fly alignment and stacking among other nice features. Sharpcap can be downloaded from the ZWO web site along with the native driver necessary to connect the camera to the computer. To use other software you will have to load the ASCOM driver also available on the ZWO website. Camera settings include an exposure range of 32micro-sec to 1,000sec which makes the camera highly capable for both planetary and deep sky viewing. The camera has a gain setting range of 0 - 450. Lower gain provides higher dynamic range while higher gain provides the lowest read noise. Typically, people report working with gains in the range of 300 - 350. This camera also has the capability for 2x2 binning which makes the pixels effectively 7.5 x 7.5 microns, increasing the sensitivity and speed of the camera at the cost of resolution. 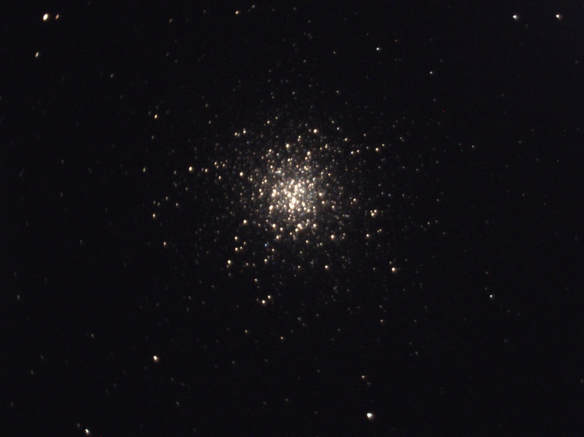 ASI224MC: M13 8sec 350 Gain, Celestron 6SE @~f/4.5 at Dark site ASI224MC: M13 8sec 350 Gain, Celestron 6SE @~f/4.5 at Dark site With a sensor diagonal of 6.09mm, the ASI224 has a field of view and magnification factor similar to a 6mm eyepiece. This can make it challenging to place a faint object in the field of view unless the mount's GoTo alignment is very good. The ASI224 comes with a 2m USB cable to connect the camera to a computer along with a 1 1/4" nose piece adapter to connect the camera to the telescope like any eyepiece. It also comes with an f/2 all sky lens with a 151 degree field of view for detecting meteor showers. This must be removed before attaching the 1 1/4" nose piece. The ASI224 is also designed to work as an autoguider when used with a program like PhD. As such, it has an ST4 guide port and comes with a 2m cable to connect to the mount. While the camera comes equipped with a 1 1/4" nose piece to fit inside a standard 1 1/4" focuser like any eyepiece, the camera can also be inserted into a 2" focuser since the camera body has a 2" diameter collar in the front. This is helpful to achieve additional in-focus when using Newtonians and Dobsonians which are not designed for astrophotography. In addition, the front of the ASI224 has an M42 x 0.75 thread making it ready to be used with T-adapters. 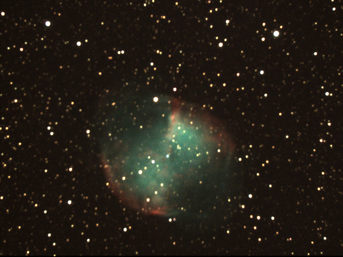 ASI224MC: Celestron 9.25" SCT @ f/4.5, M27 Dumbbell Neb. 6 x 20sec Stack Gain 350. Dark Site ASI224MC: Celestron 9.25" SCT @ f/4.5, M27 Dumbbell Neb. 6 x 20sec Stack Gain 350. Dark Site The ASI224C was upgraded in April 2016 with anti-amp glow circuitry. Amp glow is caused by the heat produced in the read out circuit of the sensor during long exposures and is common in analog video cameras. It produces a bright glow at the edge of the image making that part of the object appear over-exposed. Short exposures and/or dark frame subtraction are commonly used to eliminate or minimize the impact of amp glow. With the ASI upgrade this is no longer necessary. The USB connection was also upgraded from USB2.0 to USB3.0 to support better download rates. In addition, the price of the ASI224 has been reduced to $249.99 as other cameras with the IMX224 sensor have become available. A cooled version of this camera, the ASI224MC-C was available for a while and sold for $599, but has since been discontinued. As can be seen from the images here, the ASI224MC camera performs very well for all sorts of deep sky objects. It produces nice round, pin point stars and has very good color saturation. All images were captured using Sharpcap and have had no post capture image processing. What you see here is what you would have seen on my computer screen live. 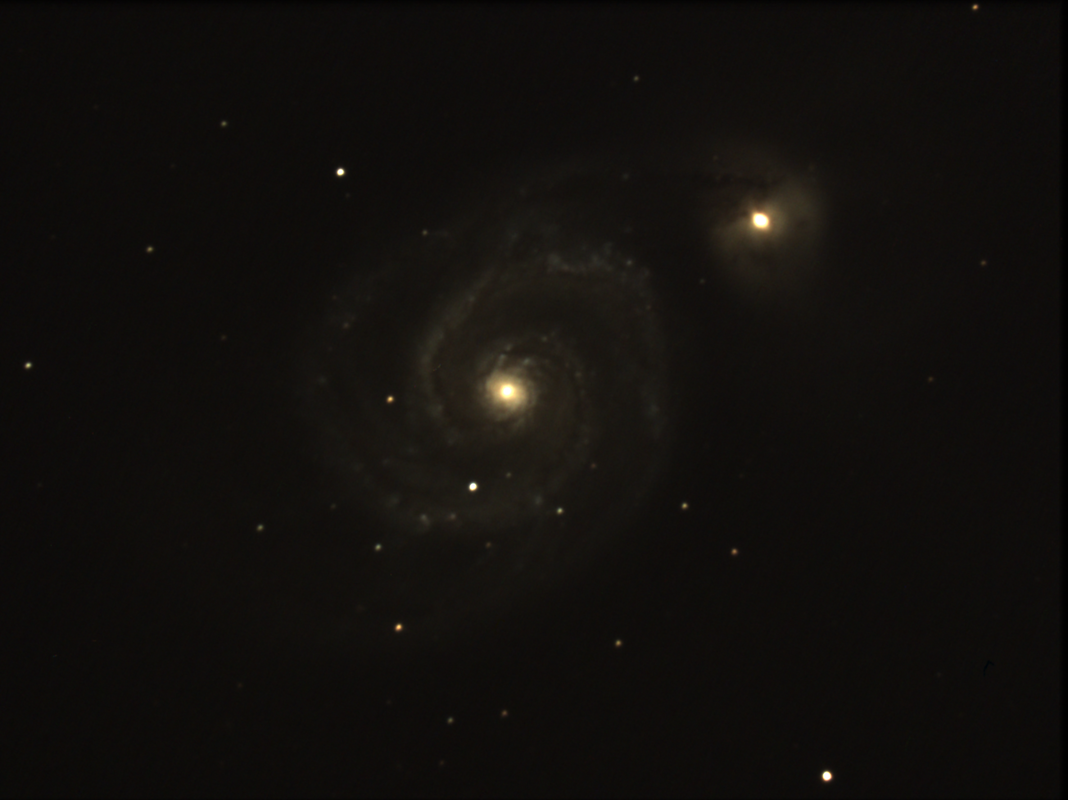 ASI224MC: Celestron 9.25" SCT @ f/4.5, M51 Whirlpool Galaxy 74x 5 sec Stack Gain 350. Dark Site  QHY224C QHY224C With the popularity of the ASI224MC, many other camera suppliers have introduced versions of their own with the IMX224 sensor in the last couple of years. QHY makes and sells a cooled camera with the Sony IMX224 sensor for $669. It's 2-stage regulated TEC cooler can cool to 40deg. C below ambient. It also has the anti-amp glow circuit, a USB 3.0 computer interface and a 128MB image buffer to prevent lost frames when capturing images with a high frame rate. This camera has exposure settings of 7micro-sec to 400sec and the same read noise as the ZWO camera. With the active cooling, the QHY camera body is significantly larger than the ZWO but it also has an M42 x 0.75 thread making it ready to be used with T-adapters. 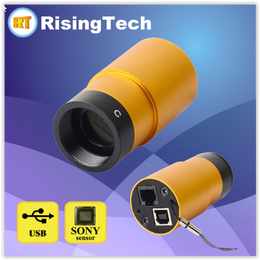 Model GPCMOS Model GPCMOS While ZWO and QHY make their own cameras with the Sony IMX224 sensor, there are many other retailers who appear to re-brand cameras from a Chinese company called Touptek and sell them under their own label. These include three cameras from Rising Tech in China, and one each from Mallincam in Canada and the U.S., Orange County Telescopes in the U.S. and Altair Astro in the U.K. Rising Tech sells three versions of the IMX224 based camera. The USB 2.0 version, Model GPCMOS, comes without the amp glow reduction and sells for $162 making it the cheapest IMX224 based camera currently on the market. This camera also has a lanyard which can be used as a safety strap to attach the camera to the scope. Model G3M224C has the USB 3.0 connection and the amp glow reduction circuit for $245 and has a slightly larger body than the GPCMOS camera. However, both models are small bullet shaped cameras which can fit well inside a focuser making it easier to achieve focus with Newtonian telescopes which are not designed for astrophotography. Model G3-1200KPA also has both the USB 3.0 and the amp glow reduction, but comes with a cooling fan for $295. The G3 also has a much larger camera body and has M42 X 0.75 threads making it straightforward to attach a t-adapter to the camera. All cameras come with camera control software called Rising Sky, which appears to be a re-branded version of Toupsky camera control software. Toupsky has many of the same features found in Sharpcap such as image display and capture, on the fly stacking, dark frame subtraction, histogram stretching, etc.
 Mallincam's IMX224 camera is called the Skyraider AG1.2c, and comes with a USB 2.0 computer connection, MallincamSky software which looks like re-branded Toupsky software for $250. The Skyraider camera body has built in cooling fins to facilitate passive camera cooling and also has a lanyard which can be used as a safety strap to attach the camera to the scope. The web site makes no mention of amp glow reduction so I assume it does not have it. The bullet shaped front also enables this camera to fit further into a focuser making it possible to achieve focus where some of the larger cameras cannot. 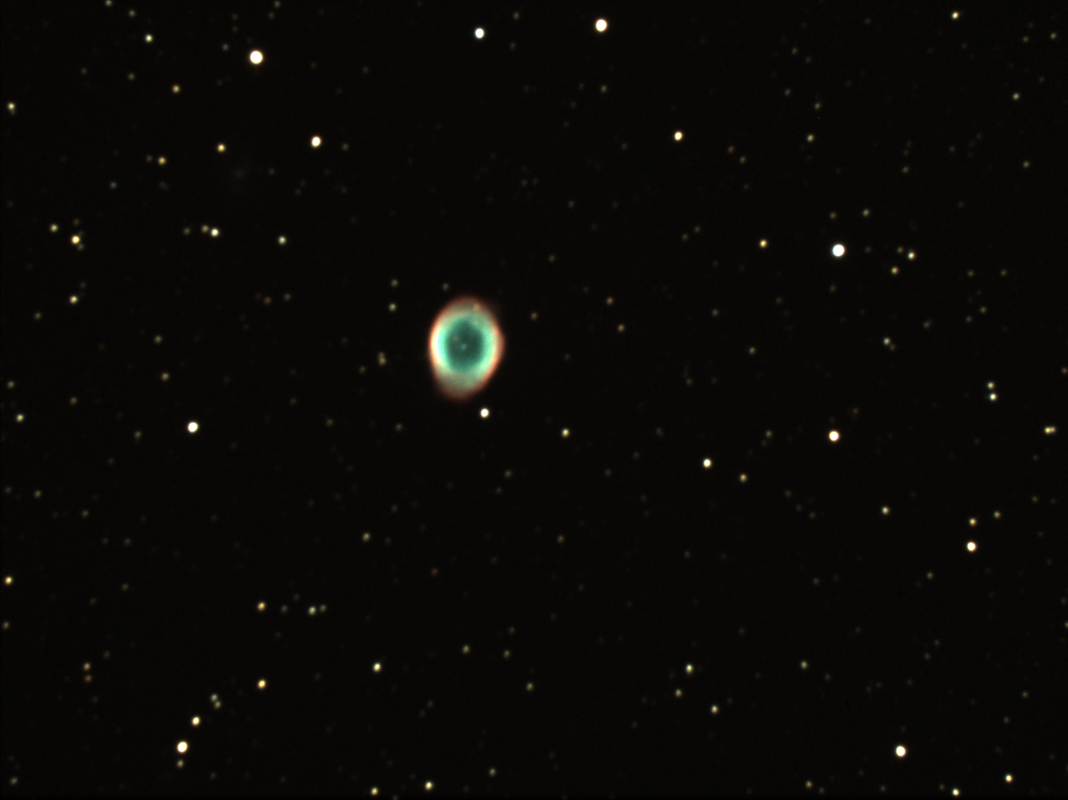 ASI224MC: Celestron 9.25" SCT @ f/4.5, M57 Ring Nebula 6 x 20sec Stack Gain 350. Dark Site 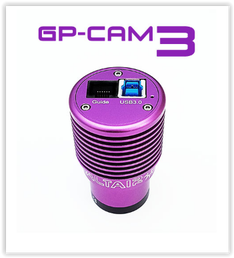 Altair Astro's GPCAM3 224C has a USB 3.0 computer interface and comes with a UV-IR filter and AltairCapture software. The camera body has cooling fins and the same bullet shaped front as some of its competitor. The GPCAM3 sells in the U.K. for £249. It also comes with a 1 year license for the Pro Version of Sharpcap. Orange County Telescopes sells the Revolution Imager 224 (R224) but does not hide the fact that this USB 2.0 camera is manufactured by Touptek. The R224 makes no mention of the amp glow circuitry, comes with the ToupSky software and sells for $250. The R224 is another of the bullet style cameras. It comes with a UV-IR filter, a 0.5X focal reducer and a soft carrying case for the camera, cables and accessories. 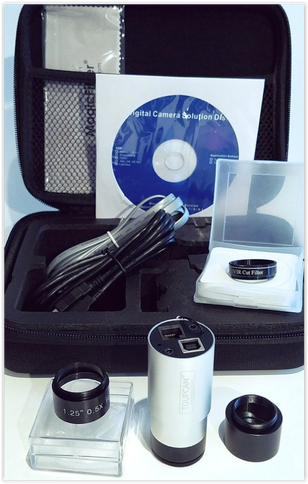 Revolution Imager224 Revolution Imager224 Maximum exposures are 1,000sec for all of these cameras, but the stated minimum exposures vary. While several of the camera suppliers do not specifically mention the read noise, I believe these all have the same read noise specs which are determined by the CMOS sensor itself. All of these cameras come with a 1 1/4" adapter to connect the camera to a 1 1/4" telescope focuser and a USB cable to connect to a computer. They also all have the standard ST4 guide port to use as an autoguider and guide cable. Some come with additional adapters and some also have T-threads to attach T-thread adapters. All should work with the Sharpcap software but may need the ASCOM driver to do so. Any of these cameras should function well as a low cost camera for real time viewing of the deep sky with the added advantage as an autoguider if and when you move on to a more expensive camera. 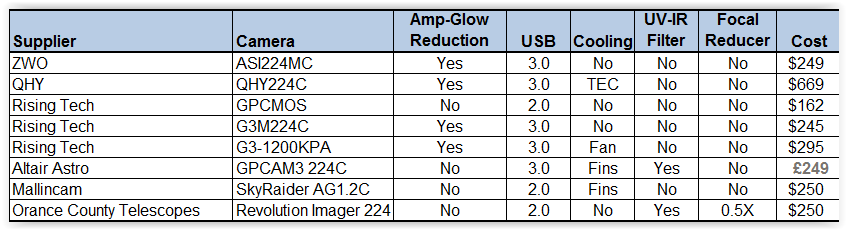
3 Comments
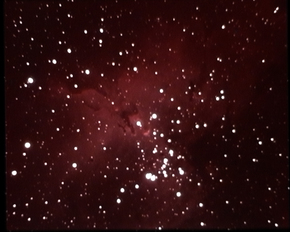
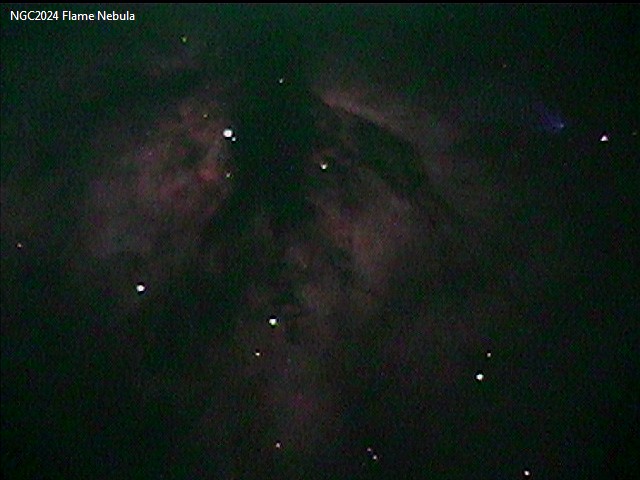
 Newtonian and Dobsonian telescopes are commonly used for astronomy because of their relatively low cost and fast focal ratios, typically f/5 or faster. Dobsonians are just Newtonian optical tubes on an Alt-Az mount after the style made popular by John Dobson. There is a critical consideration when choosing a Newtonian for deep sky video astronomy, Electronically Assisted Astronomy, or Near Real Time Viewing, whichever you call it. Newtonians and Dobs, unlike Schmidt Cassegrains and refractors, do not have a lot of in-focus travel which is required to focus analog cameras like the Revolution Imager, Mallincam Xtreme, Strellacam, Samsung, etc, or digital USB cameras like those from ZWO, Atik, Rising Tech,etc. This is especially the case if using a focal reducer to speed up the optical train and/or achieve a large field of view. When there is not enough focus travel, modification of the optical tube may be required to achieve focus with a camera. Fortunately, there are many Newtonians and Dobs which are able to achieve focus with a camera without the requirements for scope modification. These are often, but not always, sold as imaging Newts. The table below shows a list of Newts and Dobs that have been reported on Cloudy Nights as compatible for use with various cameras without modification to the scope. There are certainly many more than listed here, but these are the ones I am currently aware of. They span the range from 100mm aperture to 305mm and all are fairly fast even without a focal reducer. Several of these scopes have also been verified to work with a focal reducer without the need for any modifications. This is shown in the "Focal Reduction" column. 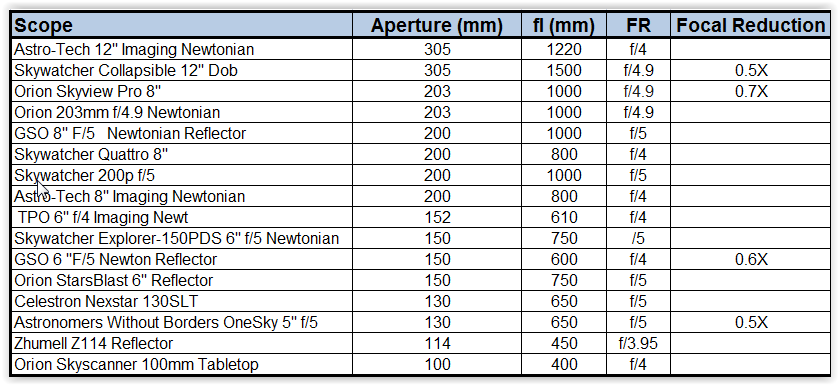 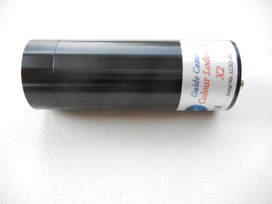 Starlight Xpress Lodestar X2C Starlight Xpress Lodestar X2C When a Newtonian scope does not have enough in-focus travel to work with a video camera, there are two options. First, modify the scope by moving the primary mirror closer to the secondary. Some truss tube collapsible scopes make this easy to do with a specific configuration for imaging which brings the primary mirror closer. But the solid tube Newtonians do not have this option and require mechanical modification to bring the mirror closer. Many have done this modification to make their existing Newts compatible for use with cameras. It will require re-doing the collimation, but Newts seem to require frequent collimation anyway. If shifting the primary mirror position is not something that you are comfortable with, there is another option. There are many bullet style cameras with 1 1/4" diameters either their full length or enough of it that they can fit further down the focuser, bringing the camera's imaging sensor close enough to focus, even with the addition of a focal reducer. Examples include the Starlight Xpress X2C, Revolution Imager IMX224, and the Rising Tech IMX224. It has been reported that this works with the 8" f/6 and 12" f/5 GSO Dobsonians along with a 16" f/4.5 Meade Lightbridge Truss Dob. These can even achieve focus with a 0.5X focal reducer by using a 2" negative profile adapter like this one from ScopeStuff which allows the camera body to slide even further inside the focuser. Even though cameras like the Mallincam Micro Ex, LnTech300, Revolution Imager 1 are not bullet shaped, they are small enough to fit down inside a 2" focuser allowing these cameras to achieve focus with many Newts. However, with both the bullet style cameras and these small rectangular cameras, be careful that they do not slip down and contact the secondary. The 1/4" x 20 mounting bracket found on the Micro, etc. is useful as positive stop to prevent this from happening. 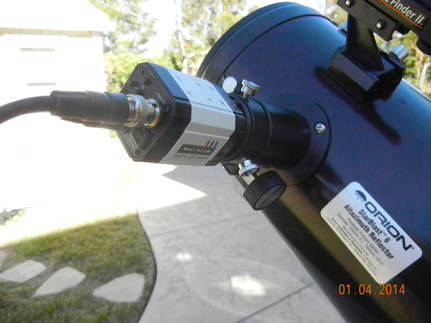 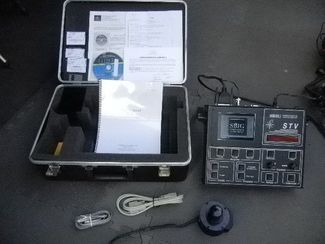 It has been nearly 20 years since SBIG in Santa Barbara introduced the STV for the tidy sum of $1995. This video camera was marketed as both a deep sky video camera and a stand alone guider. At its heart is a Texas Instruments TC-237 1/3" format B&W CCD sensor with 656 x 480, 7.4micron square pixels. In retrospect, for its time, the STV was revolutionary. From my research it the first video camera to be capable of deep sky video without modification, years before the Stellacam, Mallincam, Samsung, Mintron or Watec cameras. Not only that, it came with an amazing list of features which we now take for granted in our CMOS based video cameras but which did not become widely available until the past few years. This includes, exposures up to 60 minutes, manual gain (1x or 2x), thermo-electric cooling, 1x1, 2x2 and 3x3 internal binning, internal stacking and alignment of successive frames called "Track & Accumulate" and an optional 5.3" LCD monitor. In addition, it had an internal filter wheel with a green filter to act as a "neutral" density filter when viewing the moon, and an opaque filter to support internal automatic dark frame subtraction. An optional color filter wheel was also available for color imaging. The unit came with 2MB of internal memory to save up to 14 images which could be downloaded to a computer later. The camera came with a rather large control module with buttons and knobs to scroll through the camera menu and adjust camera settings. The settings were viewed on a small, two line LCD display. An optional 5" LCD monitor showed the live images. Accessories included a very thorough manual, a 110VAC to 12VDC transformer, RS232 cable to connect the control module to a computer, RJ11 auto-guide cable, red screen shield for the LCD monitor, 1.25" nose piece adapter, software for remote operation of the camera via a computer, and copies of CCDSoft and CCDSharp. Additional options included an eFinder tube assembly with a focal reducer to turn the camera into a stand alone guider, the previously mentioned color filter wheel, adapters for 35mm cameras and a hard carrying case with custom cut foam. 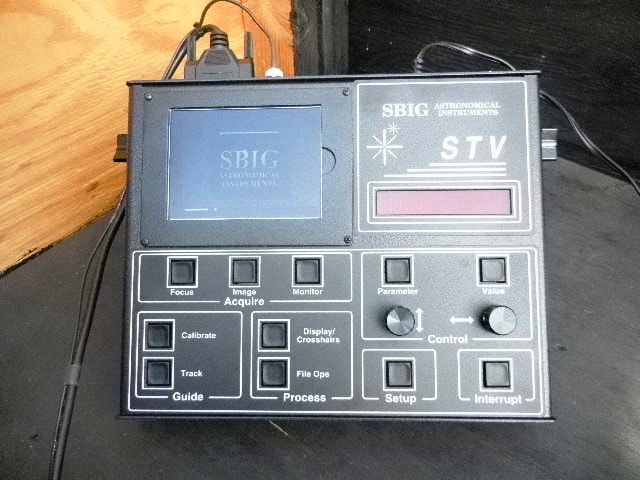 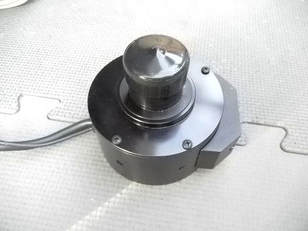 I have seen some surprisingly good images of galaxies and nebulae taken with this camera and posted on the internet. So, as a student of deep sky video history, I recently purchased one of these cameras on Cloudy Nights to see what it could do for myself. First of all, everything is big from the camera, to the control box to the power supply. I guess this is not a surprise given the state of the art of electronics 20 years ago. Second, a short read of the quick start guide in the manual enabled me to begin taking images in quickly. The controls are quite easy and mostly intuitive. When in the imaging mode, the two round knobs on the front panel are used to adjust the brightness and contrast of the image as viewed on the LCD. To capture images with this camera, I used the video out port on the control module and fed the signal through a video capture device to my computer which was running Sharpcap software. I used Sharpcap to view and capture the images shown below. So far I have only tried the camera with an ES 127mm, f/7.5 Apo refractor, but have been pleasantly surprised with the results. I have used the camera both with and without a generic 0.5X focal reducer and without any filters. I will note, the images as they appear on the SBIG LCD monitor are noticeably better than the images on my computer screen. I use the same video cable and Pinnacle Dazzle 100 to send the signal to my computer as I do with all my other analog video cameras, so I am guessing the difference is due to the output on the SBIG control module. Since it is the Christmas season, Orion is an obvious target. Below is a single frame, 10sec image of M42 taken with a gain of 1X. While the core is blown out, we can see significant detail in the nebulosity. Next is a 30sec single frame image of the Flame Nebula. The 5.6mag variable star NSV16638, which is just on the edge of the top of the image makes it difficult to avoid washing out the nebula but I was still able to see it clearly. The HorseHead nebula is difficult to see in a light polluted back yard, especially without filters, but this 60sec image shows it quite well. 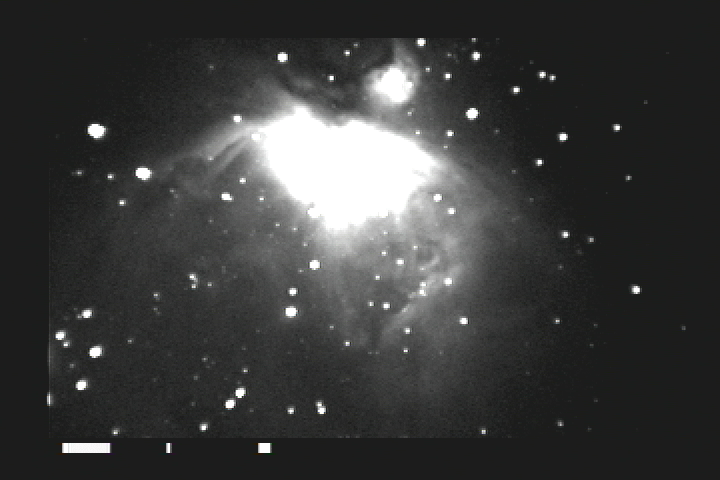 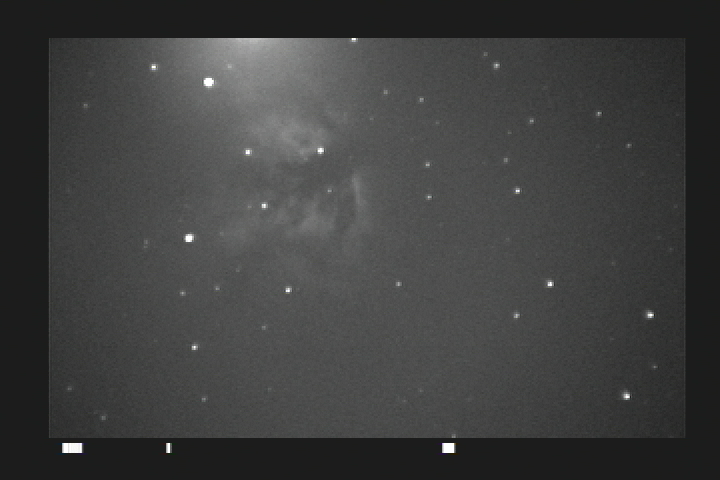 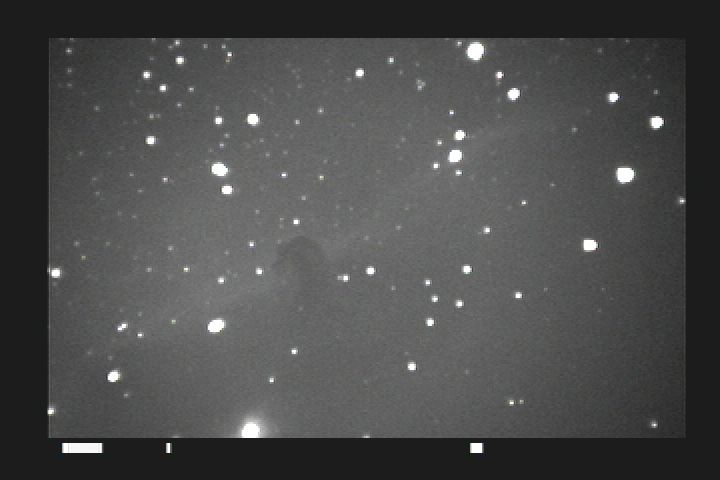 One of my favorite galaxies this time of the year is M82, the Cigar Galaxy. The STV had not trouble bringing out the split in this galaxy even at a few tens of seconds. The image shown here used the Track & Accumulate feature, aligning and adding 5 x 30sec frames for a total of 150sec. Notice how nice and round the stars are and compare this to the elongated stars in the 60sec single frame of the HH Nebula. I would say that the T&A feature works quite well, and this was available almost 20 years ago. Next are two 60sec single frame images of M82, the first without the internal dark frame subtraction and the second with dark frame subtraction. Notice the dramatic difference. And, I did not even have to get up and cover and uncover the scope to do this. It was all automatic one I check yes in the camera menu for dark frame subtraction. Since this CCD sensor is nearly 20 years old, I have no way of knowing if this is typical of the number of hot/warm pixels when the sensor was new. Nevertheless, dark frame subtraction is able to take care of the objectionable noise. All in all, I am very impressed with what this camera can do. When I realize that this camera had all of the extra features in 1999 that most cameras/software did not have until recently I am even more impressed by SBIG. If not for the much older vintage (1996) and smaller format (1/3") CCD (TC-237), this system would still be a competitive analog video performer today. Not to mention, that many people still use this as a stand alone auto guider for their long exposure imaging. No wonder I had a tough time getting someone to part with this. Next time I have clear dark skies, I will see if I can improve the images, especially the star bloat with filters. And, I would like to try the camera out on my 9.25" SCT which will pull in more light than the 127mm refractor. 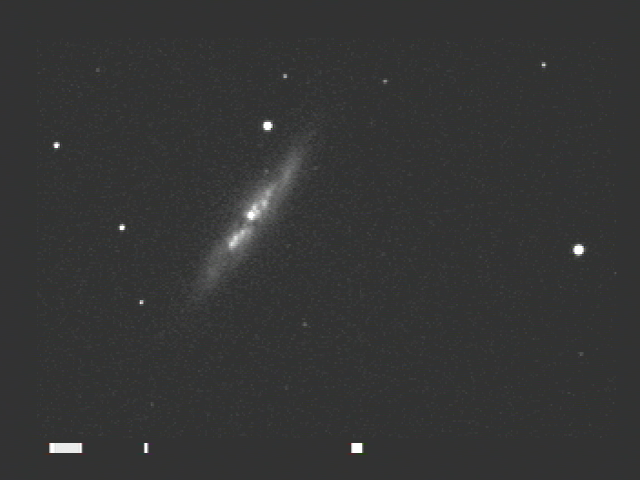 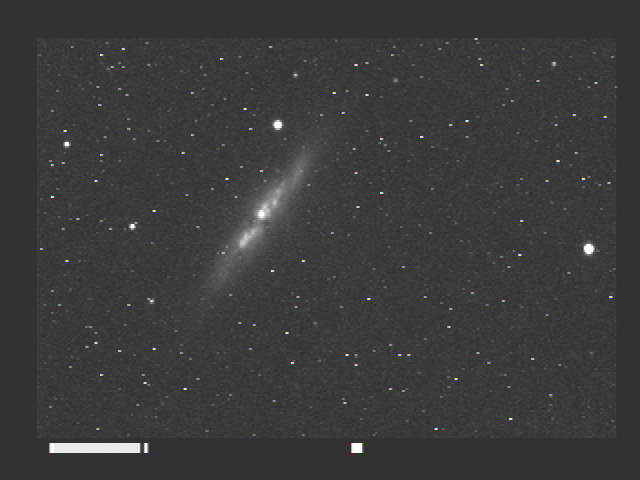 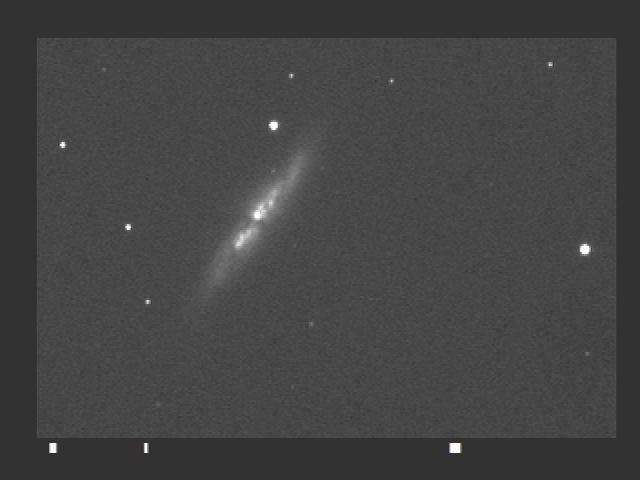 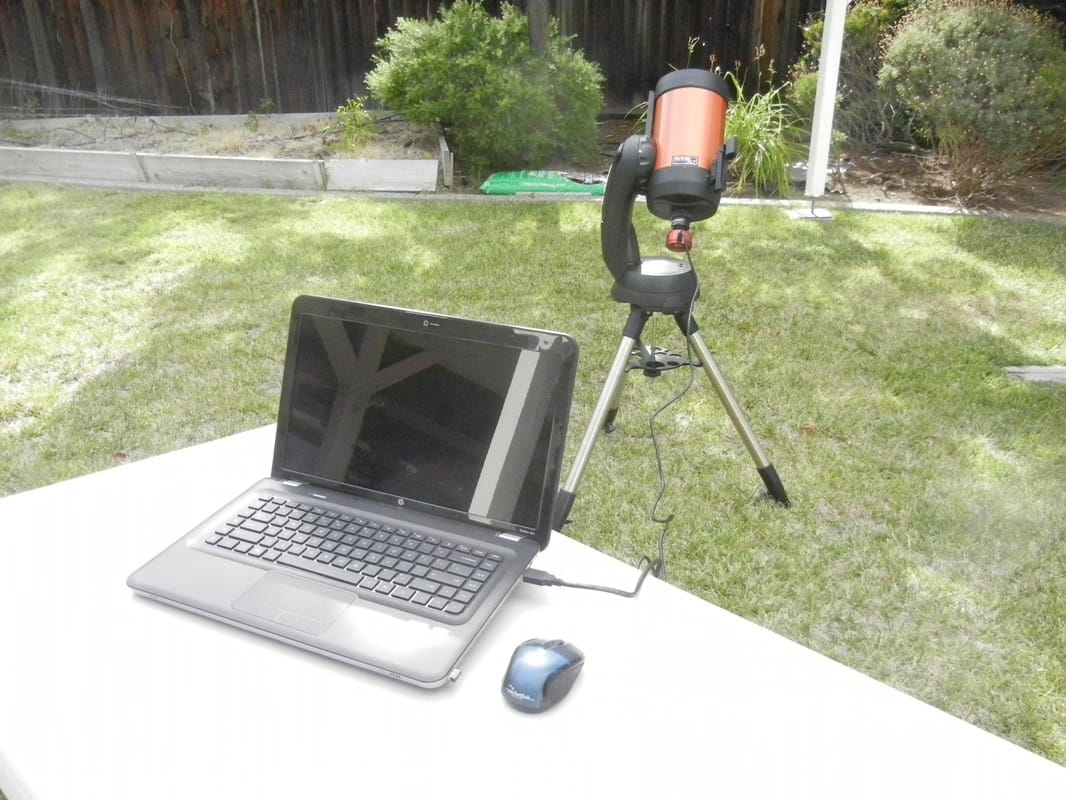 The question of which type of video camera one should buy for deep sky astronomy, an analog camera like one of the Revolution Imagers or Mallincams, or a digital camera like a ZWO ASI224 or one of the other IMX224 based cameras often comes up. The simple answer is that it all depends upon personal preferences and objectives. Below I will outline the main differences between the two types of cameras. I own and use both types of cameras myself so I am trying here not to be biased one way or another, nor trying to conclude which one is best as this depends upon the individual. I am just stating the facts as best as I know them from my own personal experience. For clarification I will note that all cameras are actually analog since the chips used, whether CCD or CMOS, accumulate electrical charge proportional to the number of photons of light that strike them. This charge is converted in the camera to a digital count in an analog to digital converter. Additional processing of that digital information takes place inside the camera circuitry. The "digital" cameras then output a digital signal, whereas the "analog" cameras convert that digital signal back to an analog signal which they output. 1. Cost The least expensive digital cameras that one would likely use for near real time deep sky video are the IMX224 based cameras like the Mallincam AG1.2c ($250), Altair Astro GPCAM2 - ($279 Canadian), Generic GCMOS available from a number of non-Astronomy companies on AlieExpress (~$200) and the ASI224 from ZWO at $299. They come with everything needed to get started (camera, USB cable, nose piece) except a focal reducer which can be found on Ebay for $15 for a 0.5X version and a computer which is required to power, control and view images from the camera. If you already have a computer you are set. If not, you will need at least $150 more for a low cost laptop. Other digital cameras used for deep sky video from ASI, Starlight Xpress and Atik range up to $1000 and include larger and more sensitive sensors with more pixels for higher resolution and faster acquisition times. Some come with thermoelectric cooling to minimize background thermal noise. And the Starlight Xpress and Atik cameras come with their own control and imaging software. The least expensive analog cameras are the Mallincam Micro and the Revolution Imager which can be obtained for $100. But then one must add a focal reducer for $15 on Ebay for a 0.5X version, a power/video combo cable and power adapter, both also available on Ebay for around $15 or from any camera which sells security cameras. If you have a television with an RCA video input, you can use it as your monitor or you can purchase a 9" LCD monitor on Amazon for around $60. Make sure it can display in a 4:3 format as the 16:9 format will cause round objects like the moon to appear oblong. The Revolution Imager comes as a kit for $300 which includes the camera, nose piece, all cables, a rechargeable Li-Ion battery, focal reducer, 7" LCD monitor, IR filter, hand remote and carrying case. The Mallincam kit includes the camera, nose piece, all cables, focal reducer with an additional spacer, 7" LCD monitor, hand remote. More expensive analog cameras like the Mallincam Xtreme or Xterminator are available for prices ranging up to $1800 and include larger and more sensitive sensors, thermoelectric cooling and computer control. 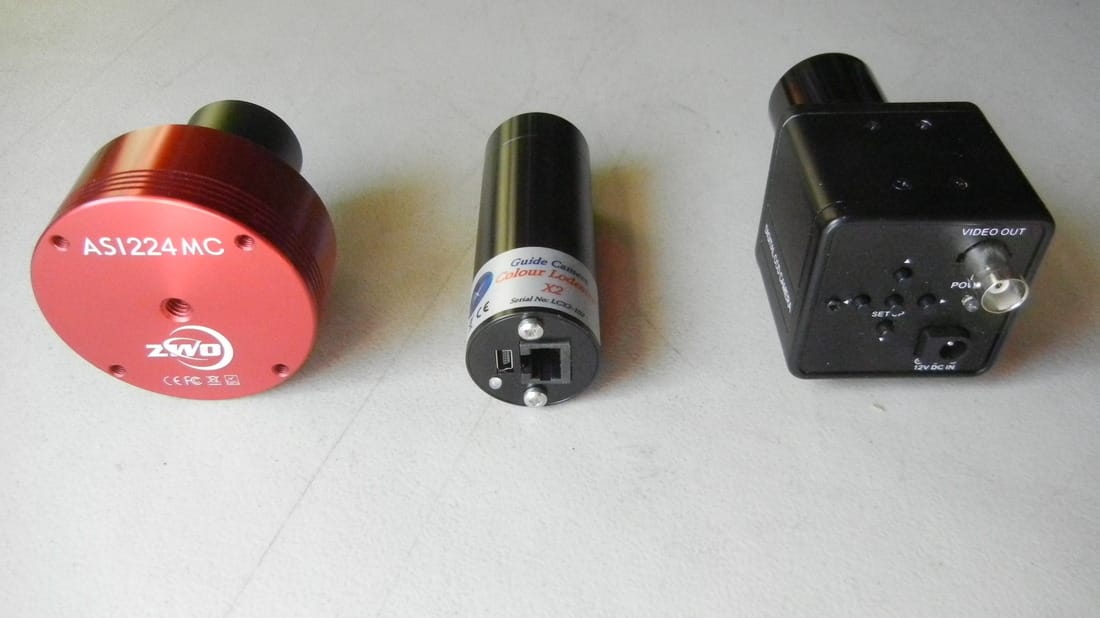 2. Resolution Analog cameras have a lower resolution than digital cameras since they typically use sensors with fewer than 600k pixels while most digital cameras have 1.3Mega pixels or more. Also, the pixels in digital cameras tend to be smaller (3.75 to 6.45 microns) than those in analog cameras ( 5 to 9.8 microns). In addition, the pixels in analog cameras are not square while those in digital cameras are square. Thus, by using smaller and square pixels, the stars in digital camera images will look round while those in analog cameras usually do not. Images from digital cameras can also handle more zoom because of the higher pixel count. That is not to say that images from analog cameras are objectionable, just that those from digital cameras generally have more of a picture quality to them. 3. Sensitivity In general, but not in all cases, the sensors used in analog cameras are more sensitive than those used in digital cameras. This, along with the larger pixels typical for analog cameras means that shorter exposures are required with most analog cameras for the same image brightness. This puts less strain on the requirements for the mount and the degree of polar alignment required. Thus, analog cameras are a good choice for those with expensive mounts, or with less interest in spending the time and effort to obtain a very good polar alignment. 4. Cabling Digital cameras need only 1 cable for power, camera control and video output. Analog cameras need at least two cables, one for power and one for video output. However, combo video/power cables are quite common and allow for a single cable running from the camera to the computer or monitor. Another option with video cameras is to use a rechargeable Li-Ion battery attached to the scope or mount with Velcro and a very short power cable from the camera to the battery. Then only a separate video cable needs to be run from the camera to the computer or monitor. The Revolution Imager kit ($300) comes with a rechargeable Li-Ion battery and short power cable. 6.8Ah Li-Ion batteries or larger can be found on Amazon( $20) along with short power cables (<$10). 5. Power Both analog and digital cameras draw very little current, less than 500mamps, unless they have active cooling. In that case, they will draw up to about 2amps. Digital cameras like the cooled versions of the ASI224 or ASI1600 require an extra power cable and a 12VDC 2amp power source for cooling while cooled analog cameras like the Mallincam Xtreme need no extra power cable or supply. 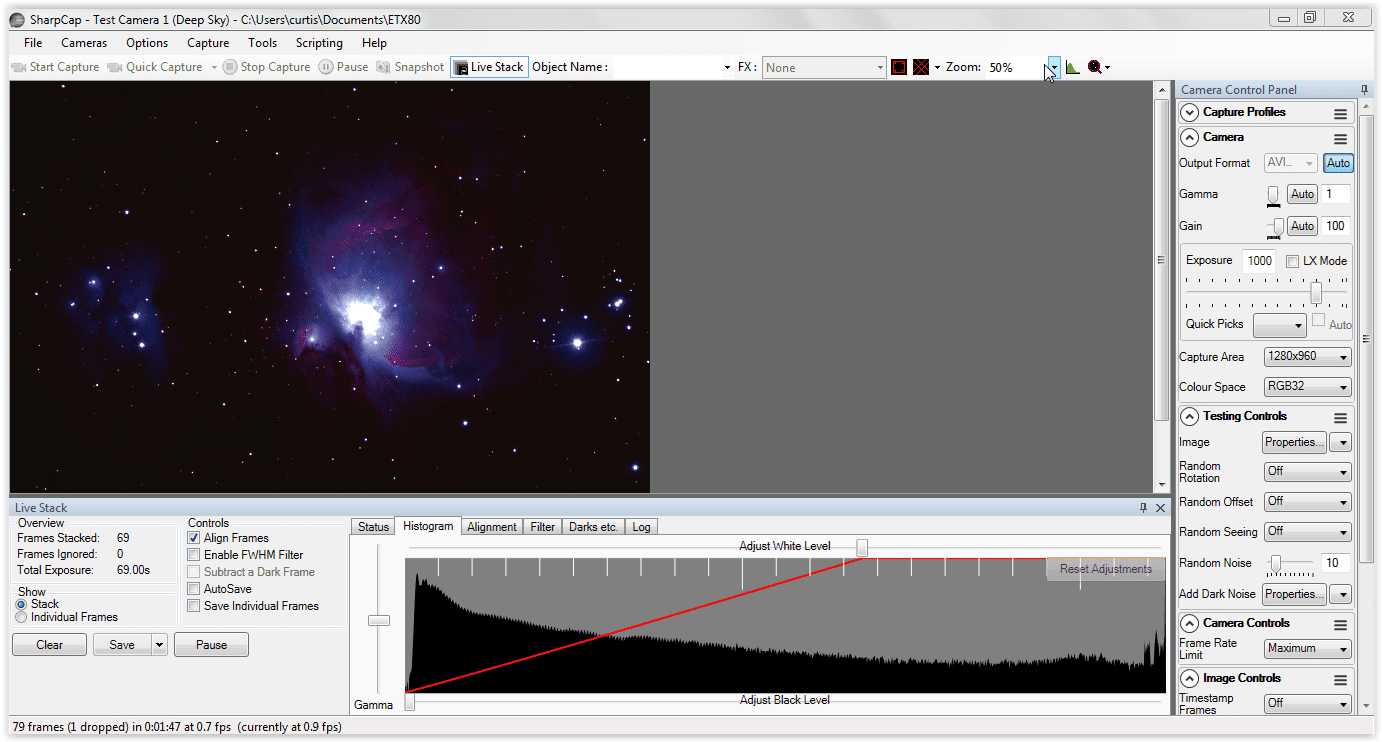 6. Camera Control
Digital cameras are controlled through the included USB cable with software on the computer. Digital cameras like the Mallincam AG1.2c, AltairAstro, Generic GMOS ICMX224 cameras, ATIK Infinity and Starlight Xpress Ultrastar or Lodestar come with proprietary software for complete control of the camera menu. Analog cameras and the ZWO digital cameras do not come with their own software. However, ZWO cameras can be controlled with freeware like Sharpcap. Analog cameras have 5 buttons on the back of the camera for control of the camera menu, but these buttons are small and can be difficult to manipulate in the dark and cold and do not allow remote operation. Alternatively, analog cameras can also be controlled with a wired remote. The Mallincams use a separate cable attached to the back of the camera with a hand remote control (costs extra unless camera is purchased as a package). The Revolution Imager uses a UTC hand controller (costs extra unless camera is purchase as a kit) which is connected in line with the video cable so it does not require an additional cable to hang from the camera. Some analog cameras, like the Mallincams can also be controlled through a computer with an optional computer control cable and the free Mallincam Camera Control software. There are also DIY instructions on Cloudy Nights to add wired hand or computer control as well as wireless control of analog cameras. 7. On the Fly Image Processing On the fly image processing including stacking (some with frame to frame rotation and translation for precise registration, histogram adjustments), dark frame subtraction and image capture is available with both analog and digital cameras depending upon the software used. The software included with the Mallincam AG1.2c, AltairAstro, Generic GMOS ICMX224 cameras, Atik and Starlight Xpress cameras will perform on the fly image processing. Sharpcap will perform all of the same functions for analog cameras and digital cameras. To use software like Sharpcap with an analog camera, a video capture device ($30) is required to connect the camera video output to a computer ($150), but no additional cable is needed. So, if you defintely do not want to use a computer for EAA, your only choice is an analog video camera. If you want high resolution, you will have to choose one of the high end digital cameras like the Atik Infinity, ZWO 1600 or Starlight Xpress UltraStar. Entry level cameras can be obtained for under $300 including all necessary accessories for both the analog and the digital versions. 
Over the years I have always used an EQ mount along with my Celestron 9.25" SCT, Celestron 14" SCT with Hyperstar or my Orion ED80 (for wide field images) when engaging in deep sky video. However, such setups are heavy, not easy to transport when traveling to a dark site or just setting up nightly in one's own back yard. Also, these scopes and mounts are fairly expensive, counted in the many thousands of dollars not including the video camera. In addition, polar aligning an EQ mount is not everyone's cup of tea, let alone accurately aligning it for long exposures.
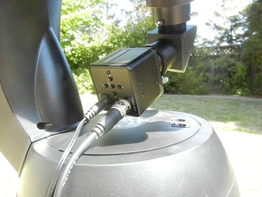
There seems to be a lot of interest lately in very light and highly portable Electronically Assisted Astronomy (EAA) setups which do not cost a fortune. Some are experienced astronomers who are downsizing as they are getting older and finding it more difficult to transport and set up heavy equipment. Some want a simple setup for public outreach. Others are new to astronomy and want to start with something simple to setup, easy to get started and relatively light on the wallet. To address this trend, I paired a Celestron SE6 which is a 6" SCT on an Alt-Az mount with two different types of low cost video cameras, a Revolution Imager 2 (R2) and a ZWO ASI224MC. 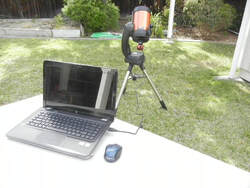
Why the choice of the SE6? Alt-Az mounts pose a fundamental challenge since they don't track along the Celestial Equator like and EQ mount does. This means that objects do not stay centered in the field of view (FOV) like they do in a polar aligned EQ mount. Field rotation, which causes stars to become elongated and blurs detail in extended objects like galaxies and nebulae, can limit exposures to as little as 10 seconds in some parts of the sky. The length of the exposure possible before field rotation becomes a problem depends on the focal length of the telescope, the Altitude and the Azimuth of the object being viewed, and the observer's latitude. You can read more on this in the "Quick Start Guide" section of this web site. Fortunately, recently released EAA software has the ability to extend exposures to several minutes without field rotation ruining the image.
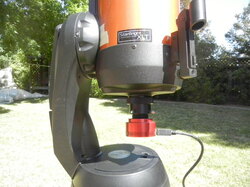
Second, Alt-Az mounted scopes are typically much less expensive than EQ mounts which addresses the lower cost factor. The 6SE, which belongs to the Celestron Nexstar series of scopes typically sells for $799 including the mount, tripod, SCT and accessories. I have seen it on sale for $699. The 5SE, with a 5" SCT is $100 cheaper. Third the 6SE meets the objective of lightweight and portable with a weight of only 21lbs counting the mount, tripod and scope. The 5SE is only 17.6lbs. Because of this and the fact that the mount and scope are fairly compact, I was able to leave everything assembled and move it back and forth between my house and the yard easily and quickly. For transport to a dark site, the scope disassembles into three pieces (tripod, mount, SCT) and easily fits into the trunk or back seat of practically any car. A plastic accessory box serves to hold the camera and its accessories. Fourth, there is no requirement to polar align an Alt-Az mount which makes it much easier and faster to setup than an EQ. First, level the scope. Next, the Celestron Nexstar series of scopes has a Skyalign routine which requires sequentially locating three bright stars or planets using the included unity Red Dot Finder and the hand control to move the scope in Altitude and Azimuth. Each star must be centered in the FOV of the camera or an EP. Once all three have been found, Skyalign will determine the scopes orientation and even tell you which three objects you found. To obtain a good alignment, the three objects should be widely spaced and not in a straight line from one another. With the scope aligned, it will be able to GoTo nearly 40,000 objects in its on-board memory and will be able to place most objects in the FOV with a 12mm or larger EP. For video cameras with 1/3" CCDs, I found that some objects were just slightly out of the FOV due to the small size of the CCD chip, but typically they are outside the FOV in the same direction which makes it easy to make small adjustments with the hand control to get the object centered. With practice, the Skyalign GoTo alignment can be completed in less than 10min. Fourth, the 6SE comes with a 6" SCT which I think is sufficient for observing all of the Messiers and many of the Herschel objects with either of the two cameras listed above. An 8" version will show much more and is recommended if it is within budget since it only adds 3lbs to the total weight. The 5" version will still provide pleasing views for those on an even tighter budget.
Why the R2 and the ASI224MC? Simply cost and performance. The R2 which comes as a kit costs $300 and the ASI224 is $349, making these two of the lowest cost options for EAA. Both perform extremely well, each offers advantages over the other and both are color cameras.
The R2 is an analog camera which comes as an all-in-one kit including a 7" LCD, Li Ion battery, focal reducer, UV-IR filter, hand control and cables. This is everything you need to get up and running immediately. And, it has a reasonably sensitive CCD which will provide pleasing images of many deep sky object. The camera settings are changed using the hand control and on screen menu display. Since it is an analog camera it can be hooked directly to the LCD or your own larger television set and does not need a computer to work. This makes the combination of this camera and the 6SE highly portable. On the other hand, with the addition of an inexpensive digital capture device the R2 can be connected to a computer to capture and process images. With free EAA software such as Sharpcap, the maximum exposure can be extended to several minutes as will be explained shortly. The ASI224MC is a USB camera which comes with a USB cable, C-Mount and T-mount adapters and an All-Sky lens for wide angle shots of the night sky. A computer is required to adjust the menu settings, view, capture and stack images live. A single USB cable connected to the computer, powers the camera, sends images to the computer and provides control of the camera menu. Sharpcap can also be used with the ASI224MC to do everything it can with the R2, plus it will control the camera settings as well. If you prefer, a version of the software package AstoLive is available free to anyone purchasing a ZWO camera like the ASI224MC. With a very low readout noise, the ASI224MC is well suited for stacking of many short exposure frames. And, if you decide to move up in cameras later, the ASI224 can be used as an autoguider. The ASI224MC will require the purchase of a focal reducer to improve image detail and one equivalent to that provided with the R2 can be purchased for less than $20.
I attached the R2 to the SCT with a 1.25" diagonal to give enough space for the camera to clear the mount when pointed at the zenith. The Hand Control for the R2 is attached at the back of the camera when I view on the LCD. When I use a computer, I use a longer video cable and connect the Hand Control next to the video capture device at the computer. Using these two different methods enables me to have the Hand Control right next to me. For the LCD, I bent the mounting base to the curvature of the the optical tube assembly (OTA) and glued a piece of soft foam to the bottom of the mounting base to avoid scratching the finish of the OTA and held it in place with Velcro straps. I can change the angle of the monitor to compensate for different OTA orientations. I mounted the battery to the arm of the Nextstar SE mount and ran the power cable to the monitor and camera using the included power splitter cable. The mount can be run on its own internal batteries or with an external 12V battery. With this setup, I can leave everything connected and stored inside my house and very easily carry it outside and set it up, including the GoTo alignment in about 15 minutes.
The ASI224MC can be attached directly to the visual back without a diagonal and will easily clear the base of the mount when pointing at the zenith. The ASI224MC requires the use of a computer and software to control the camera, view and save images. The included USB cable simply connects to one of the USB inputs on the computer. With the exception of the computer, this setup is even simpler than with the R2. But then, some folks do not want to have to deal with a computer, especially in the field.
When using a computer, the last important piece to this EAA setup is the free software, Sharpcap. Sharpcap not only allows one to view, capture and adjust the brightness and contrast of images live on the computer screen. It can also stack frames on the fly, translating and rotating successive frames to align them to the original frame. This greatly extends the exposure times possible with an Alt-Az mount into the many minute range. Sharpcap also has a histogram feature which enables stretching of the image to bring out more detail and darken the background sky. All of this on the fly, and for free.
So there you have it, two light weight and highly portable EAA solutions which won't break the bank. What are you waiting for, get going!
Another good option in highly portable and lightweight scopes for EAS is the Celestron Nexstar 6SE which is slightly more expensive but has a better mount than the regular 6SE. If you are interested you can click on the link below to take you directly to a supplier. As an Amazon Associate I can earn from qualifying purchases through my site with no additional cost to you which helps to defray the cost of this website. 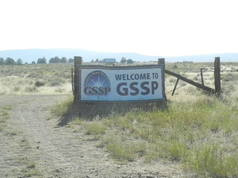 If you live in California, Oregon or Nevada and have not already attended the Golden State Star Party, I highly recommend it. Why? Simply put dark skies, lots of other like minded astronomers and interesting side trips to keep one busy during the days. GSSP is held every summer between mid-June and mid-July to overlap the closest new moon. It runs for 5 days and 4 nights on Wed. through Sun. or Sun. through Wed. In 2017 it will be held Wed. June 21 through Sun. June 25, with the new moon on Fri. night. GSSP is held in northeast California in the town of Adin, population 272 at Latitude 41deg 8’ 7.35”N, Longitude 120deg 58’ 42.95” W at an altitude of 4310ft. The star party takes place on the Frosty Acres Ranch, a cattle ranch with a dirt surface broken by tufts of range grass and the occasional dried cow patty. 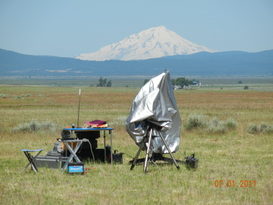 GSSP is 226 miles north-east of Redding, Ca, 102 miles south-east of Klamath Falls, Ore and 153 miles north-west of Reno, Nv. This puts it more than 100 miles from the nearest large light dome which makes for very dark skies with SQM readings typically 21.64 to 21.83. The Milky Way glows brightly and is an awesome sight away from city lights. In addition to dark skies, this site has clear vistas in all directions, including a nice view of Mt. Shasta covered in snow to the north-west. In addition to the dark skies GSSP is home to between 300 and 400 astronomers and their families, along with telescopes of every kind. There are experts who are willing to share their knowledge to beginners and other experts alike. It seems like they bring every type of telescope, mount, camera and accessories known to the industry. This makes for a great opportunity to see and even try out equipment before you buy. This star party is family friendly - my son started attending at age 9 and looks forward to going back when he can. 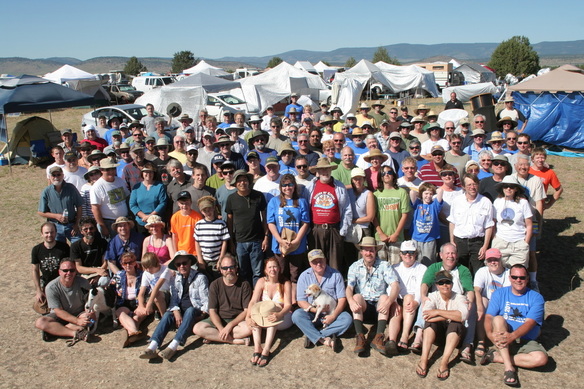 There are some important things you need to know if you plan to attend. Registration for the 2017 start party will begin in January 2017 on-line at www.goldenstatestarparty.org/. The fee for 2016 was $75 for the 5 days and 4 nights which includes the on-site shower truck with showers and sinks, porta potties, a hospitality tent, a battery charging station and the final morning pancake breakfast. There are usually two evening barbeques and t-shirts which require additional charges. Activities include guest speakers, a raffle, a swap meet, a telescope walk about which included 2 home-made bino telescopes this year, and 4-5 telescope dealers. 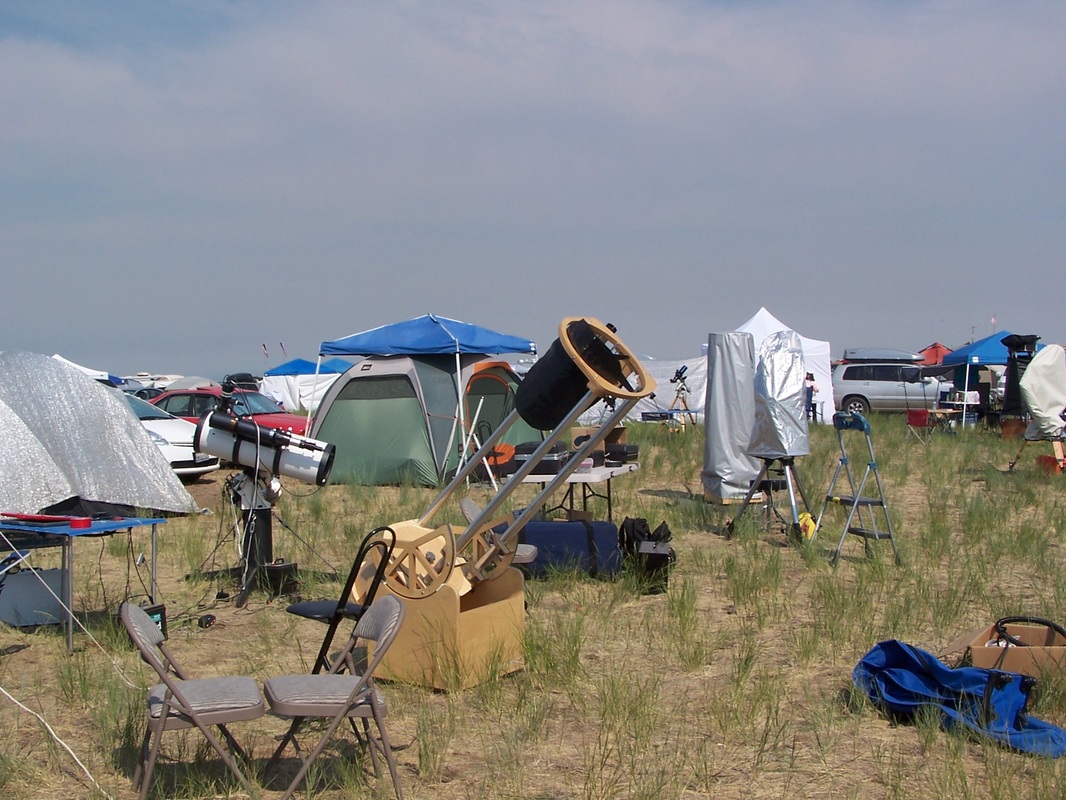 You should also know that day-time temperatures are typically in the high 90s and there is no shade. Make sure that you have plenty of water and bring some form of shade such as an EZ-Up or Aluminet to stay "cool" during the day. And bring a cover for your scope and strong stakes for your tent or EZ-Up since it typically gets windy in the afternoon. Nights are pleasant with lows in the low 50s or 40s. In the 6 years I have attended, I think we were rained out 4 nights total. The skies are usually very clear, but as with any place, it all depends upon the weather. Since this star party is held in the summer, it doesn't really get dark until around 10PM and then the sun comes up around 5:30AM. Seems short, but I have never felt I did not have enough time under the stars, especially since there are 4 nights to view. 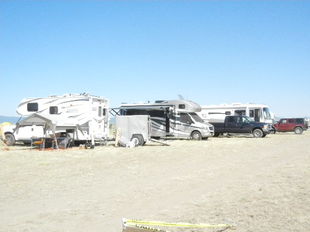 You have to bring your own sleeping accommodations as this is a camping star party. You will see lots of tents, campers of every size and shape, along with small and very large motor homes. I have camped in a tent, slept in my van and stayed at a nearby hotel. As for the hotels, there's one in Adin and one in the other nearby town of Bieber but both are annually booked and having waiting lists so don't count on them. Be prepared for the early sun rise and note that it starts to get hot inside a tent or car by 8AM which can make it hard to sleep in. It's a good idea to have sun shade material like Aluminet to help keep your accommodations as cool as possible. 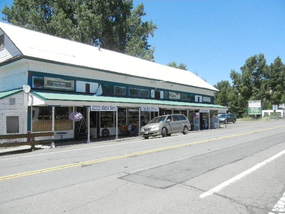 You may cook your own food, but no open fires are allowed. You can also sign up for the barbeque nights or drive to one of the nearby towns for dinner. The town of Adin is 10min from the site and has a small general store and one hamburger/ice cream shop. The general store will have typical grocery items, bags of ice, water and even wine. They also have a deli counter which is great for lunch. The Oney serves hamburgers/hot dogs and ice cream, and also has barbeque chicken and ribs on Fri. and Sat. There is also a gas station/convenience store in Adin. The nearest restaurants and full service grocery store are about 30min west of Adin. The nearest big city, Susanville, is 67miles to the south east where you will find a Walmart, pharmacies, Radio Shack, full service groceries, restaurants and two movie theaters. The movie theater is a nice place to cool of and catch an afternoon nap. 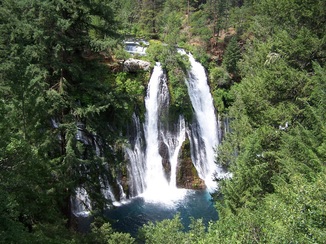 Plan day trip or two to get out of the direct sun. There is a community pool in the town of Bieber, 15min to the west. In recent years, either the town of Bieber or Adin has held a community fund-raising festival with food and music during the star party. I think they time it when there are 300 - 400 more folks in town. There are some great day trips to nearby outdoor adventures. Lassen National Vulcanic Park is 82 miles away and offers Manzenata Lake and lots of hiking trails, as well as, Mt. Lassen. 50 miles due west near the town of Burney is Burney Falls, one of the prettiest waterfalls in California. It also has some nice hiking trails. If you go, you can plan to have lunch or dinner in the town of Burney or pick up some groceries as it is only 10min away. On the way to Lassen is the Hat Creek Observatory home to an array of Radio Telescopes. To the north is Lava Beds National Monument with lava tube tunnels you can walk through. And, the entire area around Adin is nestled next to the Modoc National Forest. So, there is lots to do during the day if you just want to get away. If you haven't been to the Golden State Star Party, I strongly suggest you give it a try in you live within driving distance. I don't think you will be disappointed. 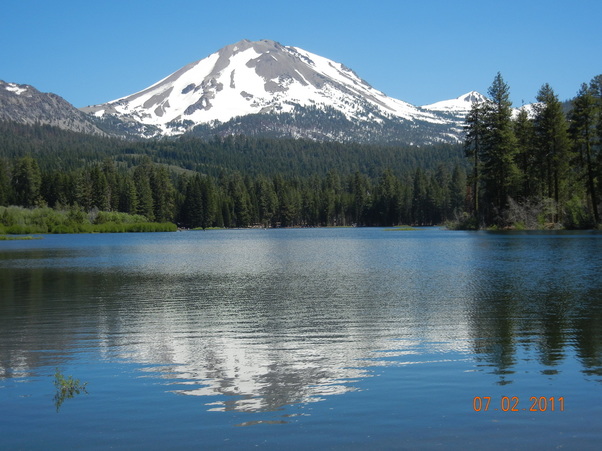 
A beginner getting into video astronomy typically purchases a camera with a few essential accessories such as power and video cables and a nose piece adapter. However, this leaves it up to the individual to research and purchase additional important accessories such as a focal reducer, filters, a monitor and a 12V power source. For many of us this is not a problem, but for some it is a hassle and can be downright confusing considering the different decisions that have to be made and the fact that these have to be purchased from many different sources. This may discourage some making them choose to move onto something else.
Fortunately, last year an astronomy supplier in Southern California, Orange County Telescopes (OCT), put together a complete package with all the necessary pieces required to get started with no hassle and at a reasonable cost of $300. The package was called the Revolution Imager and it contained an Lntech 300 PAL video camera, power and video cables, a 0.5X focal reducer, an UV-IR filter, a 1.25" C-Mount adapter, a 7" LCD monitor, a hand-held camera remote control, a 12V Li ion battery with charger and a convenient shock resistant carrying case. Here, in one complete package, was everything needed to get started viewing planets, galaxies, nebulae and other deep space wonders except the telescope and mount. The Revolution Imager apparently was a hit with beginners, as well as, those who already had a video camera but wanted something simple for themselves or for use at public outreach events. Eventually the packages sold out as production of the Lntech 300 came to an end. 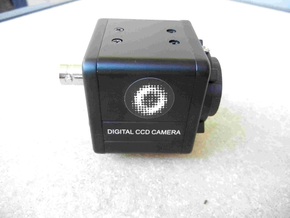
Fast forward to May 2017 and OCT has once again put together an all-in-one package after finding a replacement for the original camera. The new package comes with all the same accessories as before and still sells for $300. It is called the Revolution Imager 2 (R2). The new camera uses the same Sony ICX811 PAL 1/3" CCD as the Lntech 300 which is one of the more sensitive CCDs used in video cameras today. It outputs video with a resolution of 720 x 576.
 M13 9.25" SCT Backyard 5sec M13 9.25" SCT Backyard 5sec
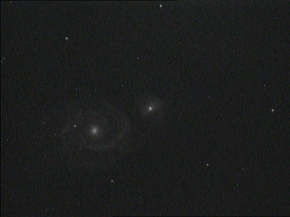
So how does the R2 camera and all of the accessories perform? In my opinion, quite well. I tested the R2 from my backyard with both a Celestron 9.25” SCT on an equatorial mount and a Celestron 6” SCT on an Alt-Az mount and obtained very nice images of globular clusters (M3, M5, M13), galaxies (M51, M63, M64, M66, M87, NGC5907) and the planetary nebula M57 with both setups. I initially viewed images directly from the camera on the included 7” LCD monitor and powered both the camera and monitor with the included Li Ion battery. Later, I used the free software, Sharpcap, to save single frame images to share as I am doing here. I also used the live stacking feature available in Sharpcap to obtain even more spectacular detail by extending the exposure time beyond the camera’s maximum of 30sec. (5 sec exposure with 6 frame averaging, called DNR).
 M64 6" SCT Backyard 5sec x 6 Frame Avg. M64 6" SCT Backyard 5sec x 6 Frame Avg.
At a recent in town star party I brought the R2 package including LCD monitor attached to the top of the 6” SCT to share its capabilities with members of our local astronomy club. I used the camera without a computer, using only the camera’s own internal menu which I controlled with the included wired hand control and the monitor’s brightness and contrast controls to obtain the best looking images on the screen. Beginners and old-times alike were impressed with the images that we could see of DSOs on the LCD monitor with the R2.
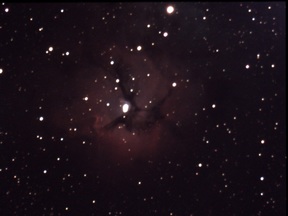
I also had a chance to try out the camera on the 6” SCT on the Alt-Az mount at a dark site and it provided amazing images of most of the above DSOs along with some really colorful nebulae such as M8, M16, M20 and M27.
a
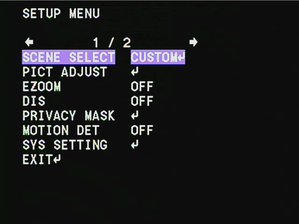
Like all analog video cameras that are really security cameras re-purposed for astronomy, the menu of the R2 can be confusing. But, to get started one really only has to focus on 3 main menu items and ignore all the rest. First is the exposure which has a maximum of 5sec (256X) and steps down by factors of 2 from there, i.e. 2.5sec (128X), 1.25sec (64X) etc. Below 1/25th sec (2X) the exposure settings are shown as 1/50, 1/100, 1/250 … 1/100000. For DSO you will want to stick with exposures somewhere between 64X and 256X. The shortest exposures are useful for planets, the moon and the sun (with appropriate solar filters, or course). To change the exposure select the “Scene Select” menu item "Custom" to get to “Shutter/AGC” where I suggest you start with “Fixed” mode to set both the exposure and the gain. Gain ranges from 6dB to 44dB. In my case, 30 or 36dB seemed to be optimal settings to boost signal without creating a washed out background. Exposure and gain settings will vary with sky conditions, location and telescope so you will have to experiment to find what works best for you. The third setting which is important to take advantage of is the within-camera frame averaging, or DNR. This can be adjusted from 0 to 6 and has the effect of averaging successive frames to smooth out the background and sharpen detail. So, if exposure is set to 5sec and DNR is set to 6, the camera will output an image after 5 sec, but will output an updated and improved image every additional 5 sec. After 30 sec the image will look the same at successive refreshes. If using an Alt-Az mount or a poorly polar aligned equatorial mount, you may not be able to use the maximum DNR and avoid star trailing. Experiment with this also. What do I like best about the R2? 1. The camera is a very good performer, providing some of the best images I have seen from a camera in the $300 or under price range. 2. The included 4.8AmpHour Li Ion battery is small and light weight yet can run both the camera and LCD monitor for 5 hours on a full charge. It will certainly power the camera alone for more than a full night's observing. For $50 you can buy a 9.8AmpHour battery for longer running time. 3. Everything comes neatly packaged with most cables already connected between components to minimize confusion. Just 4. OCT has an excellent reputation for prompt customer service. What do I think could be better? 1. The included battery has fairly short cables which can make it a challenge depending upon where you place the battery relative to the camera and monitor. OCT tells me they have a new battery with a longer power cable. 2. For some, the video cable is shorter than they would like. OCT sells a 25ft power/video cable for $12.99. When I mount everything on top of my SCT, the video cable is actually a bit longer than I need. 3. The LCD monitor is not a high end monitor, so you may want to upgrade to a nicer and larger monitor. You can use your existing television so long as it has a composite video input, which most still do. Is the R2 worthwhile? Absolutely! It is a very well thought out and assembled package. Like I said above, it has everything you need to add to your existing telescope to get started viewing the very first night. Can you buy better accessories than the ones supplied in the package? Certainly, and many prefer to go the route of sourcing the individual components themselves to save some money or to upgrade to better components. But this requires a bit more knowledge of what to buy and how to put it all together. And you will have to purchase many of these components on-line from multiple sellers. OCT has taken all of the hassle and uncertainty out of the process. And their web site has detailed instructions on how to assemble everything, a FAQ section, a guide to the camera menu and suggested starting settings for planetary and DSO objects. In addition, Mike Fowler at OCT has a good reputation for providing telephone support to help get you started. If you are interested in this camera below is a direct link to purchase it online along with the battery and 9" LCD monitor that I use myself. Links are Amazon Associate links. You can also purchase from Orange County Telescope or many other astronomy retailers. Revolution Imager2 Just as there are many different analog video cameras, there are also many different camera menus. And, because all of the currently available analog cameras have their basis in security cameras, there are many functions in the menus which are not in the least relevant to use for deep sky astronomy. Both of these can confuse the heck out of someone new to the hobby and cause a frustrating first night with a new camera.
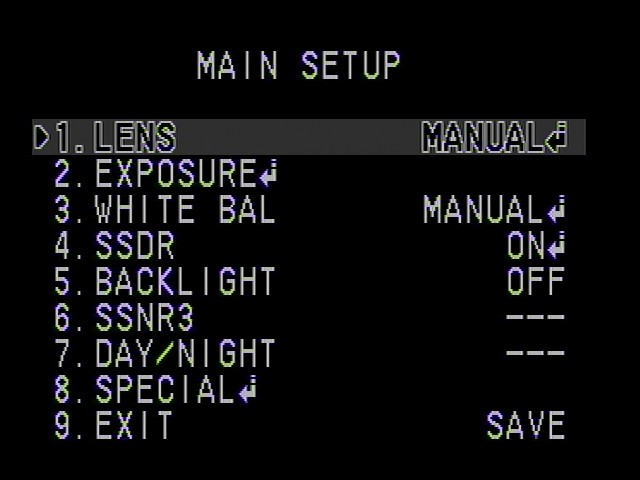
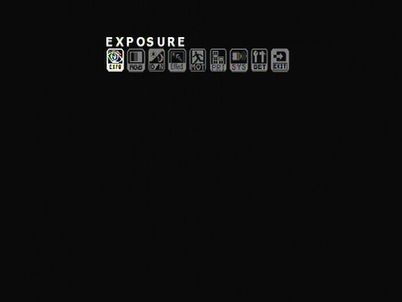 Fortunately though, many cameras in the Mallincam line (Jr, Jr Pro, Xtreme, X2, Xterminator) have the same menus. And, the MC Micro Ex, Super and the Lntech 300 have identical menus since they are based upon the same security camera (Lntech 300). Likewise, the AVS DSO-1 and MKIV cameras also share identical menus with each other, which are almost the same as the Lntech 300 as well. Even where the menus are decidedly different, like the Xtreme, and the Samsung, they all share most of the most important and common functions. This blog will concentrate on the menus of the Lntech 300 (MC Micro Ex & Super) and AVS DSO-1 & MKIV to help explain how to navigate through what initially may appear to be a complex and un-intuitive maze. Much of the discussion is still relevant to cameras like the Xtreme or Samsung, but the functions may have different names and may be located in different parts of the menu or sub-menu. First stop, the main menu page of the Lntech 300 which, as was said above, is identical to the MC Micro Ex and Super cameras and very similar to the AVS DSO-1 and MKIV. There are 9 main sections in this camera menu:
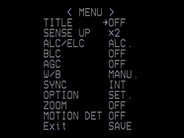
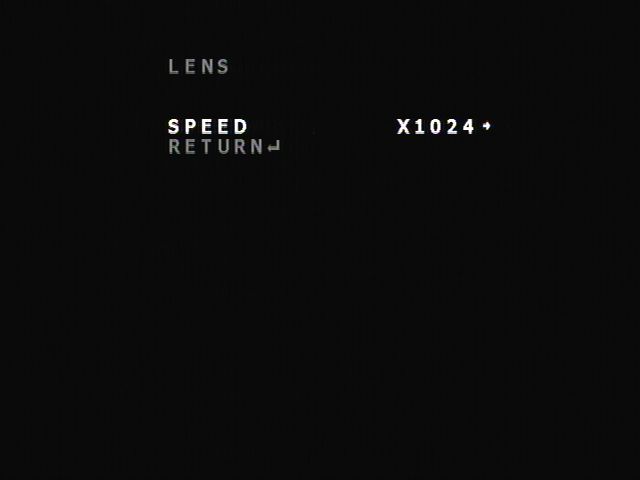
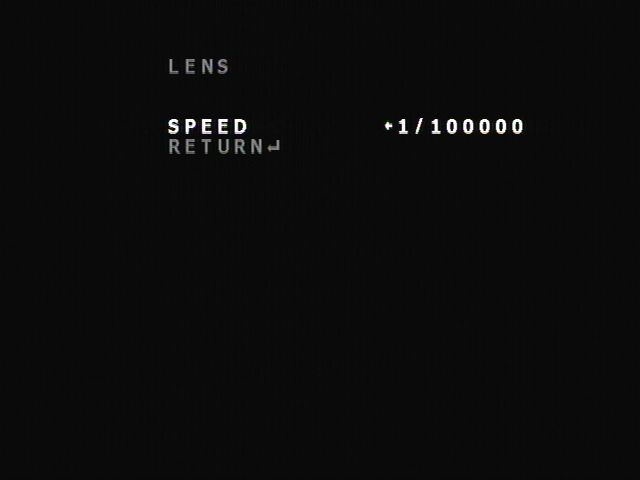
The title in parentheses shows the short-hand title at the bottom of each icon on the main menu page. Just to add to the possible confusion, these titles are not always the same. Also, AVS made some firmware changes to their cameras to add additional features which will be discussed below. They also used the title Procamp instead of Enhance for the System Icon and the title TSTBARS for the Privacy Icon. Nonetheless, they are the same menu items. Here is a quick run through of the Main Menu sections. Exposure: This is where the exposure time is set, the automatic gain control (AGC) is turned on or off, and the in-camera brightness control is set (not to be confused with the brightness control on a monitor or in the video capture device, if used). This section of the menu will be visited frequently. Color: This provides different ways to control the color balance of the camera (ATW, AWC, Manual, Push). You may choose to set this once and leave it alone, or adjust it with different sky conditions and filters or different DSOs. Day/Night: You will set this to "Day" and never need to change it unless you want to view images in Black and White. In that case, set it to "Night". Effect: This is another menu item which you likely will not visit frequently. It allows the image to be mirrored horizontally or vertically or rotated. This is helpful if you want to orient the image on your screen to match that in a sky chart. There also is a Sharpness adjustment (0 -49) which can be set once and mostly forgotten. Try something in the range of 10 -25 and see what you like. With the AVS cameras they also have a Freeze function to freeze an image, a Digitial Zoom from 1 to 10X and a Stabilizer function (I haven't played with the Stabilizer function so I am not sure what it does yet). These can be ignored until you have developed a good understanding of the other important camera features. Motion: For security camera applications, this is used to let the camera know that it should begin to record an image. This is not used for any of the Ln type cameras. For MC cameras with TEC such as the Xtreme and the X2, there is a function in the main menu called "Motion Detect" which when turned on activates the TEC. Privacy: For security cameras this is used to mask off different areas of the field of view. For astronomy it is not typically used except to make a set of video cross-hairs which are useful for mount alignment. You can find a description of how do set up the cross-hairs here. Enhance: Like Exposure, this is a menu section you will frequent. Here you can adjust Gamma, turn on in-camera stacking/averaging (if available) and set your display to CRT or LCD mode. System: There is only one feature here that you should ever attempt to change and that is the Title function, which allows you to overlay video titles on the frame. The Com ID and Baud Rate should not be changed from the camera defaults as they are set for the external control of the camera. If these are changed, you will not be able to communicate with the camera with a remote control if you have one. Also, do not change the language unless you can read Chinese characters. Snyc should be left set to Inter. Exit: This section of the menu is one of the places to save changes and exit the camera menu. Initialize will set the camera back to its default settings, but some have reported that they see no change when they tried this. So, for a beginner, you can simply focus on the Exposure, Color and Enhance menu items until you develop some skill with the camera. How does one navigate through the menu? Use the center center button of the 5 button camera control (or software emulator if using pc or BT control) to select a setting or menu item, or to pull up a sub-menu if that item has one. Use the Up/Down buttons to move up and down in the menu. Use the Left/Right buttons to change selection choices. At the bottom of each menu screen or sub-menu screen there is a choice to "Exit", "Exit and Save" or "Return". "Exit" exits that portion of the menu without saving any change you may have made. "Exit and Save" exits that portion of the menu but saves the changes you have made. "Return" returns you to a higher level of the menu while saving any changes you made. Now a little more detail about the most frequently used menu items. 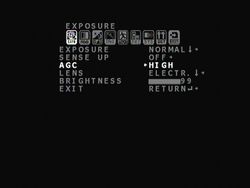 Exposure A normal person would think that you would set the length of the frame integration time by selecting the "Exposure" option which appears first in this menu section, but that is not the case. This should be set to "Normal" with only a few exceptions. The other choices here: BLC- Back light compensation, WDR- Wide Dynamic Range and HLI - Highlight Inversion are not relevant to deep sky video and can be ignored. "Sense Up" can also be used to control the length of the image exposure but will adjust other camera settings in an auto mode which is not preferable. For this reason, set "Sense Up" to OFF. "AGC" can be set to OFF, LOW, MEDIUM or HIGH. For AVS cameras, this will show up as OFF, 12dB, 28dB and 45dB. Higher AGC will increase the camera's gain, just like the ISO setting in a DSLR camera. This will bring out more detail with shorter exposures, but at the price of background noise. AGC can also cause the appearance of Amp Glow (another form of noise) in many cameras as well, but not all (like the AVS cameras and the Lntech 300 PAL). If you have an Alt-Az mount, or do not have a good polar alignment on your EQ mount, AGC can help avoid star trailing by keeping the exposure short and still bring out detail. On cameras with in-camera stacking/averaging like the Lntech 300, Micro, Super, DSO-1, MKI4 and APU-1, AGC must be on in order for the in-camera stacking/averaging function to work. "Lens" is where the length of the exposure can be adjusted. AVS cameras call this "Int" for Integration. Set this to "Electric" not "DC Iris". For deep sky objects, exposures (called Speed in Lntech and Micro, Super cameras, and Time in AVS cameras) are 2x, 4x, 8x, ... 1024X where each X is 1/60th of a second for NTSC cameras and 1/50th of a second for PAL cameras. So for an NTSC camera this range is 1/30th second to 17.07 seconds. For the Sun, Moon and planets there are exposures of 1/60th second to 1/100000 second. Do not use the Auto mode as it is used in conjunction with Sense Up. "Brightness" has a range of 0-99 and is not to be confused with the Brightness setting on a monitor or in the video capture software. This setting, along with the AGC setting determines how much gain the camera chooses. The Brightness is a threshold level, the higher it is set, the more gain at a given AGC setting. Setting this to a low value like 2 would effectively turn off the gain even if AGC is set to High. Setting it to 99 results in the maximum gain when AGC is turned on.
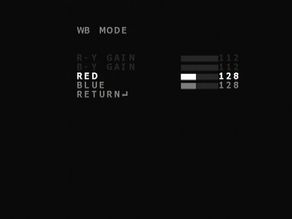 Color Here you can adjust the color settings to get the color you think most appropriate. There are four choices, AWB, ATW, Manual and PushX but only the first three are relevant to astronomy. Auto White Balance (AWB) adjusts to keep the color neutral. If there is too much of one color, it tries to reduce that. With ATW (Auto Tracing White Balance) the camera readjusts its white balance each time it detects a change in the ambient color temperature automatically. It works by assuming that the brightest parts of the scene are white objects and will try to correct these objects so that they appear white. Both of these have gain settings for Red and Blue adjustable over a wide range. Manual is just that. You set the Red and Blue levels to what you like. If you are using image capture software which has a histogram, you can adjust the Red and Blue levels so that the histogram colors line up. You can adjust the color settings once during the viewing session and forget about them. 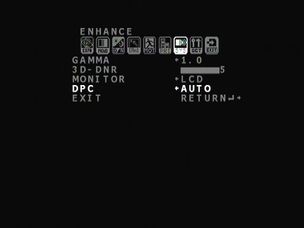 Enhance You may come here frequently to change Gamma and/or 3D-DNR. Gamma stretches the image allowing more detail to be visible but may tend to wash out the background sky. The nice thing about Gamma is that changes are visible immediately on the screen. The range is 1 (High) where there is no stretching to 0.3 (Low) with the maximum stretching. 3D-DNR has a range of 0 to 5. When set to N = 1 through 5 the camera will take that number of images and average them together to reduce noise. The averaging is done for each pixel over successive image frames (temporal averaging) and also for each pixel and the other pixels adjacent to it within a single frame (spatial averaging). Therefore, the higher N is set, the better the noise reduction. However, this means it will take N x Exposure setting to see the final image. So, if 3D-DNR is set to 5 and exposure is set to x1024 for a PAL camera, the final image will appear after 5 x 20sec = 100 sec. The Monitor setting needs to match the type of monitor used, LCD or CRT, and can be set once and left alone. Dead Pixel Averaging (DPC) eliminates dead pixels by averaging over adjacent pixels and should be set to Auto and left alone. 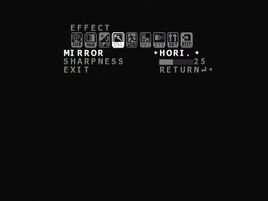 Day/Night As I said above, just set this to Day for color or Night for B&W and forget it. Effect You should visit this the first time you set up and set Sharpness to 20 and leave it there while you learn about the other menu items. Once you have those down, revisit and try different Sharpness values to see what you like best. Motion and Privacy Ignore these at first. Later you can add cross-hairs in the Privacy menu. System The only thing here you will want to adjust is Title to put titles on you image in case you are broadcasting on Night Sky Networks or want to save a picture with the label. But again, you will not use this while you are first learning how to work with the camera and can ignore it till later. You should not change any of the other settings located here. 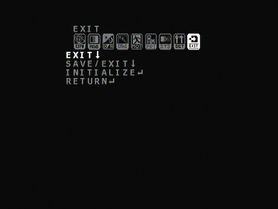 Exit
Use this to save settings and exit the menu. You can also do that within the other top level menu sections. I hope this is helpful to anyone new to deep sky video or these particular cameras. While there are a lot of different menu features, it really only comes down to a small handful which are commonly changed within a single night. © 2015 Curtis V. Macchioni 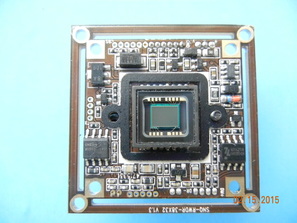 I have to give credit for this discovery to "Photo444" and "DavidB in NM" who first suggested it in a post on the Cloudy Nights (CN) EAA forum in Jan 2015. You can find that discussion here. I bought a board camera myself soon after the initial posts for only $23 from Securitycamera2000.com which included free shipping. With it I built my own deep sky video camera for $35 which provides surprisingly good images. What is a board camera, you ask? With video security camera use on the rise it is now possible to buy the electronic board which has the CCD, Digital Signal Processor (DSP), and other electronic components without the external housing at one-third to one-half the price of a low cost security camera. You add your own custom housing and there you have a DIY camera ready for deep sky video. The board camera pictured above shows the CDD, a 1/3" Sony ICX638 NTSC Super HAD II. It has 768 x 494 effective pixels measuring 6.35 x 7.40 microns. The reverse side of the board has an RJ10 Digital Signal Processor (DSP), 10bit A/D converter, additional electronic components and connectors for camera control, power and video output.  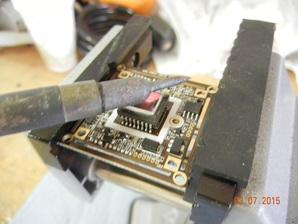 The board camera comes with everything you need to build your own video camera except the enclosure. Along with the 1.5" x 1.5" circuit board there is a 30" cable with connections for power (red) and video (yellow) and a 5 button in-line toggle switch to control the On Screen Display (OSD) for the camera's menu. One end of the cable has connectors which attach to sockets on the back of the board for power, video and camera control. The other end of the cable attaches to your video display (requires a BNC to RCA adapter) and 12VDC power (requires a 2.1 x 5.5mm power connection). It also includes a CS Mount Base to attach a C-Mount adapter or focal reducer, an S Mount Base (also called M12 Mount) to attach optional plastic wide angle lenses, two gaskets and some screws to attach the adapters to the board. The first thing you will need to do is to remove the IR filter which is glued onto the front glass of the CCD. This filter will block the all-important hydrogen alpha light from galaxies and nebulae if it is left in place making it much less sensitive. Removing the filter requires heating the top of the IR filter with a soldering iron until the filter slides off. The process will be easier if you hold the board in a vice. I used a 40watt iron, others reported success with a 30watt iron. The trick is to hold the barrel of the iron against the filter and not the tip as pictured. It should take 20 - 30 seconds to free the filter. I will admit, it took me several tries as I initially used the tip of the soldering iron, not the barrel. I also tried to grip the filter with needle nose pliers and ended up cracking the filter. None the less, I finally got the IR filter off without damaging the CCD. Once removed, you will have some residual optical cement on the glass which covers the CCD. This can be removed with a Q-tip and some alcohol. 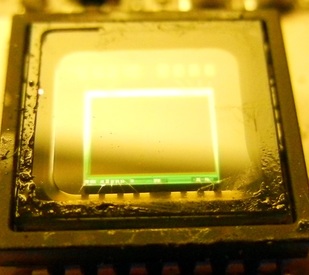 Residual optical cement visible at the edges. 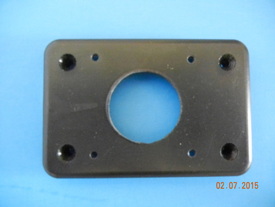 Next, you need to decide what type of enclosure to use for the camera. In the CN link above, one person machined a very nice cylindrical enclosure made out of delrin. Most, like myself, used a plastic hobby box. I chose to use a 3" x 2" x 1" hobby box that I bought from Radio Shack for $3.80. I drilled a 1" diameter hole in the center of the lid of the box to provide an opening for the CS Mount to fit through. I also drilled 4 smaller holes centered on the 1" hole for screws to attach the board camera to the lid of the enclosure. I made one last hole in the side of the box and added a rubber grommet for the cable to pass through. 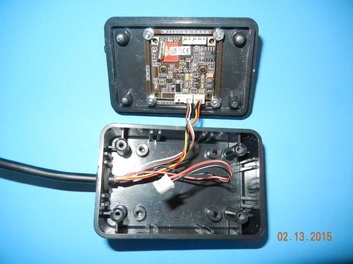 The next step is to attach the board to the front of the box. For this, I used long screws through the front cover of the hobby box and through the 4 holes at the corners of the board. Nuts on both sides of the board were used to hold it in place and to get the desired spacing of the CCD from the front of the 1" opening. After that, the CS Mount adapter needs to be attached to the board through the 1" opening using the included gasket and screws. Then feed the through the opening in the side of the base of the box and connect the power and video wires to their respective connectors on the back of the board. One of the three sets of wires will not be used as this is intended to control the Iris of a lens attached to the front of the camera which is not used for astronomy. Once that is done, you can attach the top of the box with the included four screws. Finally, I attached a C-Mount to 1.25" adapter to the CS mount and I was ready to go. The final cost, including hardware to attach the camera to the box was just under $35. Obviously, you can customize this any way you want. One person even added a fan on the back of the hobby box to cool the CCD. For most deep sky objects you will need a focal reducer which can be attached to the front of the 1.25" adapter. 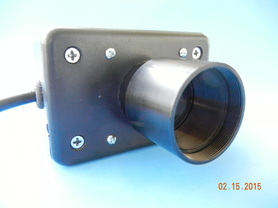 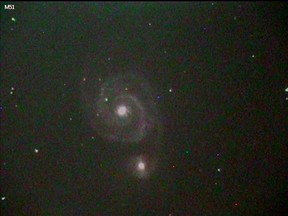 So how does the camera work? Surprisingly well. I tried out the camera on the back of my 9.25" SCT with a 0.5X focal reducer that I bought on Ebay from China for $25 (which included a C-Mount to 1.25" adapter) for a focal length of f/5. The images shown here are from my suburban backyard. I was easily able to capture images of several galaxies (M51, M81, M82 and NGC2403) with exposures ranging from 8.5 to 17sec. The maximum exposure for this camera is 17sec. I also was able to capture images of M1 and NGC2024 (Flame Nebula) with 17sec exposures. M42 was even easier to capture because it is so bright that it only took 4.2sec to get a very colorful image. To show how versatile the camera is, using a 2.5X Powermate from Televue, I was able to capture the Great Red Spot and bands of Jupiter with a 2ms exposure - I'm sure that if I captured and stacked multiple images it would look much, much better. I would say, for anyone who likes DIY projects and wants to try out video astronomy on the cheap, this would be the way to go. The camera can be used to replace your EP, but it can also be used on a finder scope or even, as some have reported, as a guider. Unfortunately, this particular board camera has been sold old and appears to no longer be available from SC2000. However, AVS offers a version of this same board camera but with the addition of a second circuit board with power and video connectors along with some additional hardware for $39.99. It can be found here: http://www.astro-video.com/diy-camera-module-board.html. In the meantime, keep looking on the CN forum for the next big discovery for DIY astro-video cameras.
 © 2015 Curtis V. Macchioni  Having to deal with multiple cables running to the video camera can be a pain. One each for power, video and camera control. Plus, you may have others for control of the mount, focuser and guide scope. Now there is a way to get rid of one of these cables, the camera control cable, at least with some cameras. Astro-Video Systems introduced optional Bluetooth (BT) control for two of its astronomy cameras, the DSO and the MKIV this year. The BT adapter is available as a package or sold separately for $59. To control the camera with BT, just down load either the Android or PC application from the files section of the AVS Yahoo group. According the Matt at AVS, the Android BT application will work with an Android phone or tablet running Android v2.3 or higher. Unfortunately, at this time it cannot be controlled with iPhones or tablets. It is supposed to have a range of 100ft, but I can only verify that I have had it working at 40-50ft with success. 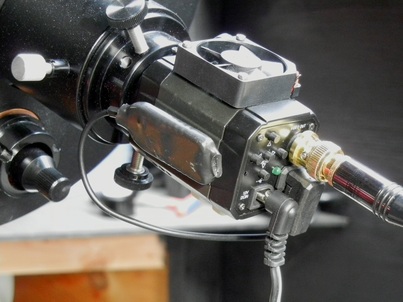 The adapter connects to the "Auto Iris" port on the back of the camera. The receiver/transmitter portion of the BT adapter can be attached to the camera body with Velcro or an elastic band. This is ideal for Hyperstar or Fastar applications on an SCT. That way only the power and video out cables need to run across the field of view. The picture below shows the BT cable dangling, but in actual use I secure it to the camera body so it does not block any incoming light. I do notice that in the Hyperstar position, the metal dew shield can reduce the effect range of the BT signal if the scope and camera are pointed away from me.  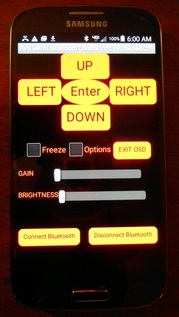 I have used the Android application extensively on my Samsung Galaxy S4 phone and have found it to be much better than using a wired PC control. The Android application was written by Charles C, who often posts on the EAA forum on Cloudy Nights. It emulates the 5 buttons on the back of the camera, which means you will still need to see the On Screen Display (OSD) on your monitor to know where you are in the menu. In addition, the MKIV application has sliders to control the Gain (this is not the AGC which must be controlled through the camera menu) and Brightness control sliders . It also has a Freeze frame button and an Exit OSD button. The DSO cameras do not have these additional function buttons since the camera firmware and hardware does not support these features. The Exit OSD button allows one to save all the changes made in the camera menu and exit the OSD with the touch of a single button. This eliminates the need to scroll down to the EXIT/RETURN/SAVE&EXIT command. It also saves and exits without clearing the camera video memory, allowing operation to resume from where it left without interruption after changes were made. Using the SAVE&EXIT command from inside the OSD "flushes all camera video memory buffers and may also trigger some protection circuitry , which leads to a white screen and having to wait for up to 3 minutes to fill up the video buffers again and display a new image". 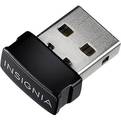 BT remote control can also be used with a pc. If your computer is not already BT ready, you can purchase an external BT adapter like the one I got from Best Buy for less than $25. The PC application also emulates the 5 camera buttons so that you can change the camera settings while watching the OSD on your computer monitor. 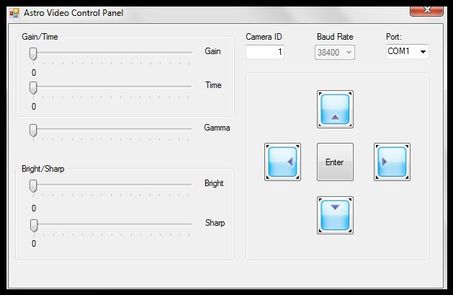 It is also possible to modify cameras like the Lntech 300 and Mallincam Micro to add BT capability. You can read Charles C's post on CN here to find out how to make the modification. Be forewarned, if you modify the camera you will void the manufacturer's warranty.
|
Categories
All
Archives
January 2024
|
 RSS Feed