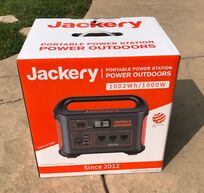
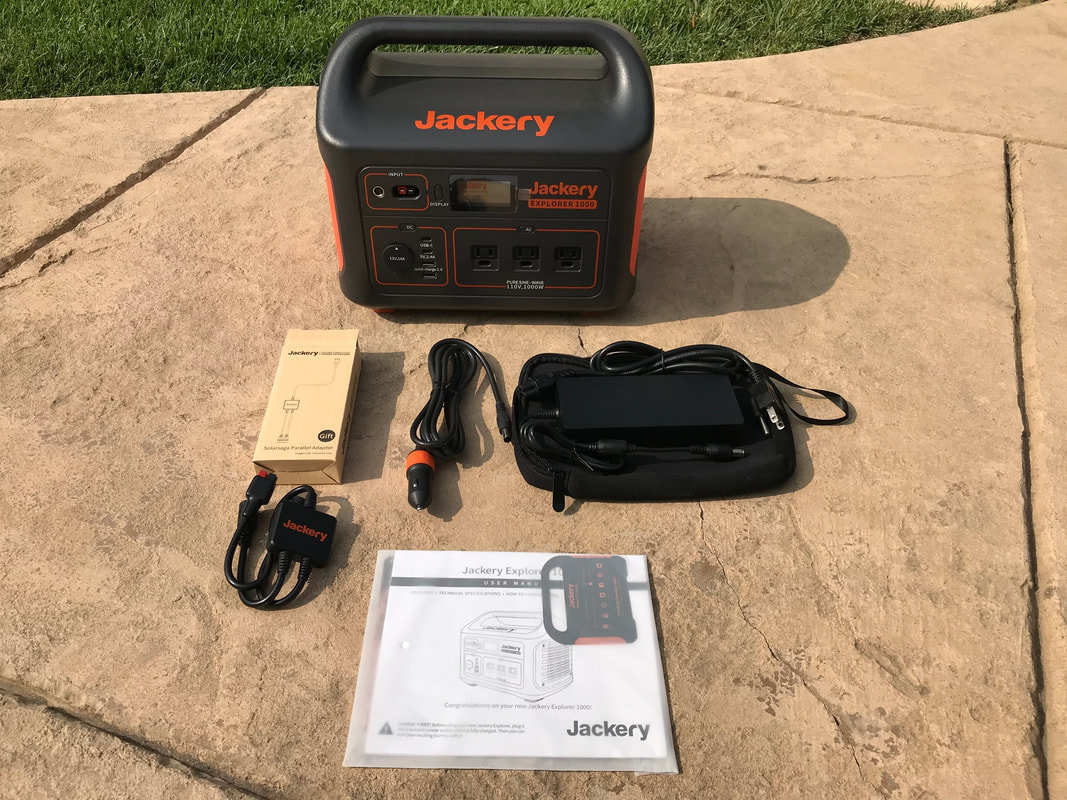
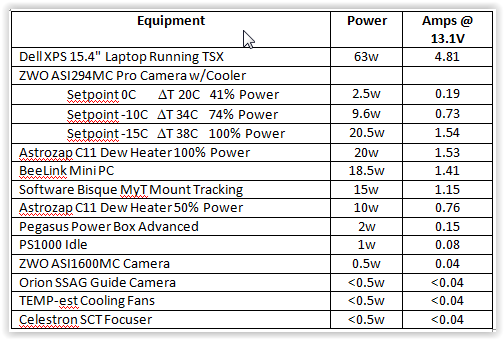
 I have been powering my astronomy rig in the field using either two 100Ah lead acid deep cycle batteries or my Yamaha EF2000is generator for a dozen years. While relatively cheap, batteries are heavy (50-60lbs), can only be discharged to 50% of capacity, are not voltage regulated, need to be maintained monthly, and do not have built in meters, USB charging, AC output, etc. At $1000 a generator is expensive, heavy (~50lbs), does not have either DC or USB outputs and is not permitted at most star parties. So I decided it was time to look at Li based power with solar recharging. Why Li? Because the power to weight ratio is much, much better than lead acid batteries, Li batteries have a higher depth of discharge (DoD) than lead acid batteries without damage and they maintain their voltage through most of the discharge cycle. The obvious downside to Li based power is the higher initial cost. 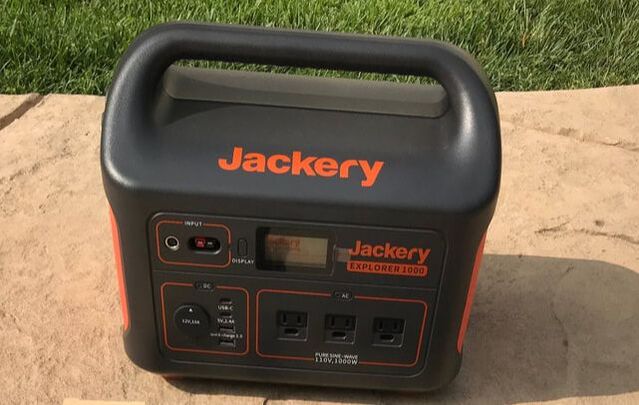 Solar Generators At first I considered 100Ahr LiFePO4 batteries like the well regarded Battleborn batteries marketed primarily to the RV and boating industries since I am planning to use these to add solar to my new RV in the coming year. But after much research I decided that a "solar generator" rather than a standalone Li battery is a much better match for astronomy applications. What is a solar generator? It is a Li battery with a battery management system (BMS), DC, AC and USB outputs, power input/output/SOC meter, an LCD display, power charging ports and a solar charge controller all built into a single lightweight, rugged and portable unit. There are many different suppliers of solar generators available today which are primarily marketed to the outdoor adventurer. Many solar generators use Lithium Nickel Manganese Cobalt Oxide (NMC) chemistry instead of LiFePO4 because of its nearly 2 to 1 advantage in energy density to weight ratio. I zeroed in on the solar generators from Jackery after reading many positive reviews about their design, features and performance. Their line of solar generators includes 160Whr (13.9Ah @ 12V), 240Whr (20Ah @ 12V), 300Whr(25Ah @ 12V), 500Whr (41.7Ah @ 12V) and 1000Whr(83.5Ah @ 12V) models with prices ranging from $139.99 to $999.99 with frequent sale pricing. These provide plenty of options for different astronomy needs. I contacted Jackery and suggested that amateur astronomers might be a market for them and they were kind enough one of their 1000Whr generators with a pair of their 100w solar panels for me to put to the test with my astronomy rig. Below are the results of more than a month of extensive testing in my backyard observatory and on a 3 night star gazing adventure in the field. 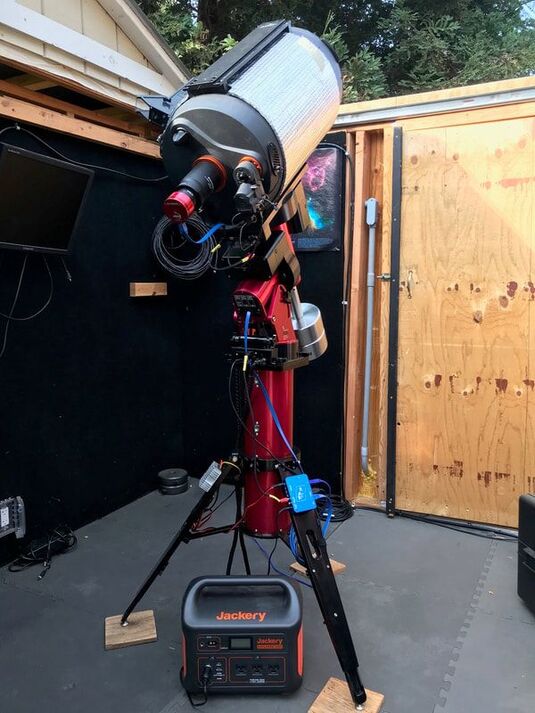 The Jackery comes well packaged with the generator shipped triple boxed. The PS1000 generator includes an AC charger in a soft carrying case, a car charger cable, an adapter to connect two solar panels in parallel for faster charging and a user manual. It enjoys free shipping, a 30 day free return and a 2 year warranty. Inside the box I found a registration card which enables a warranty extension to 3 years. The generator is solidly built using rigid ABS plastic casing and sports a smart functional design. With dimensions of 13.1 x 9.2 x 11.1 in. (L x W x D) it is only slightly larger than my lead acid batteries and fits nicely between the tripod legs of my mount. It's molded handle and weight of only 22lbs makes it a breeze to transport. Everything one needs to access is conveniently located on the front of the generator including: 1) a 10A DC cigarette adapter socket with dust cap; 2) a 5V 2.4A USB-A output ; 3) two 3A USB-C outputs; 4) a USB-A Quick Charge 3.0 output; 5) three 110V AC outputs from the internal 1000w pure sine wave inverter; 6) 8mm and Anderson Power Pole inputs to recharge the generator; 7) an LCD display which shows power output, input and battery % SOC and is low enough intensity as to not disturb fellow astronomers. 8) On/Off buttons for the power outputs and the display. A small LED light is mounted on the side. The Jackery can be recharged with the included AC charger, with optional solar panels or by car. Observatory Testing I conducted a series of tests of the Jackery using my Software Bisque MyT mount, Celestron C11 OTA, Celestron focuser, ASI1600MC camera, Orion SSAG guide camera (not shown in the accompanying photo), Astrozap dew heat strap, TEMP-est cooling fans, and a Pegasus Power Box Advanced (PPBA). I used a cigarette adapter to 5.5mm x 2.1mm cable to supply power from the Jackery to the PPBA which in turn distributed power to the MyT, dew heater and focuser. The cameras and fans drew their power from the MyT. Since the MyT requires 48V I used a DC-DC up converter on the output of the PPBA to transform 12V to 48V rather than using the less efficient AC adapter. I use The Sky X (TSX) to control everything except the PPBA which is controlled by its own application. I did run one test using the Jackery's AC outlet to power the MyT without any problems but that method unnecessarily wastes power in the conversion process. Since the first month of testing occurred during the massive wildfires here in CA I could not actually image. Instead, I ran everything exactly as I would during a regular imaging session with the ASI capturing dark frames to the laptop, the fans running, the guider taking dark frames and the heater powered at 50%. Since a laptop is typically the most power hungry device used and not everyone uses the same laptop, if they use one at all, I decided to run 3 different test setups: 1. Everything but the 15.4" laptop powered by the Jackery through the PPBA. 2. As in 1 but with the laptop powered through the Jackery's AC inverter. 3 As in 1 including a BeeLink mini-pc powered by the Jackery through the PPBA. The Beelink ran TSX and I used my laptop on its internal battery linked to the Beelink via Team Viewer as a monitor only to minimize power consumption. For these tests I tried not to discharge the generator batteries below 20% SOC to be very conservative in terms of long term battery lifetime. The manufacturer specs the batteries to > 500 full discharges to 0% SOC so you could increase all of my total times below by 25% if you are comfortable using the full capacity of the Jackery. Here are the test results: Test #1: I was able to achieve a total run time of 27hrs over 3 successive sessions before reaching a SOC of 20%. That is enough power for 3 nights of 9 hour imaging sessions without the need for a recharge in between, although a recharge is always possible. I noted that the ouput voltage of the Jackery remained steady at 12.9-13.1V all the way down to 20% SOC. Test # 2: To extend the session as long as possible, I disconnected the laptop from the Jackery when it reached a SOC of 25% and let the laptop run on its own internal battery until it reached ~5% and the Jackery reached 20%. This powered everything for 9hrs, sufficient for a long overnight imaging session powering everything with the Jackery. Considering that the Jackery was able to be fully recharged with 2 solar panels in 7.5hr , one could run indefinitely this way so long as a reasonable degree of sunshine is available during the day. Alternatively, the Jackery could be recharged in 6-7hrs with an AC outlet. Test#3: For this test I only used my laptop on its internal battery to check in on the BeeLink via Team Viewer occasionally. As I show below, the BeeLink which has no monitor consumes much less power than a 15.4" laptop so I was able to run for 8hrs and only draw the Jackery's SOC down to 59%. At that rate of power consumption I should be able to run for 15.6hrs without dropping the Jackery below a 20% SOC. That is nearly enough power for 2 nights of 8hr imaging without the need to recharge in between. Or I could use the extra power of the Jackery to keep my laptop powered using it as a monitor to check on imaging progress from time to time. 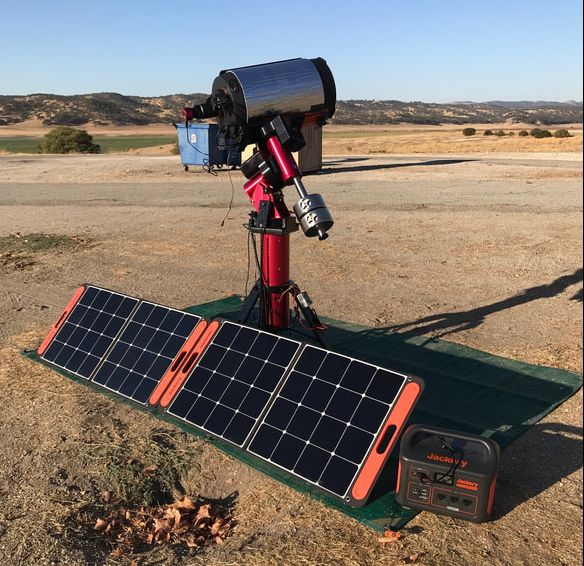 Actual Field Tests While the tests at my home observatory are telling, there is nothing like an actual test in the field. So, just after the October new moon and with clear skies at last I headed to a dark sky site along the central CA coast. I did not use the SSAG since I wasn't guiding and I also did not need the heater. However, for all three nights I powered my laptop with the Jackery as in Test #2 above for a completely self contained test of the Jackery. The first night I powered everything up at 6:17PM, just before dark and rough aligned on the crescent moon. As it turns out, my first night would be one of frustration as I learned after running a 120 point TPoint model that my PA was way off. It took a second TPoint run for me to realize that my daytime mechanical alignment was so far off that I had to rotate the entire mount and tripod and adjust the gross altitude pin on the mount to have any hope of an accurate PA. After 2 more TPoint runs I finally got a good PA and was able to begin imaging the M74 galaxy in Pisces at f/10. I typically dislike first nights in the field given my history of such self-inflicted wounds. My frustration actually provided a good power test since the mount spent a great deal of the first 4 hrs slewing back and forth across the sky more than 500 times. I powered down at 2:15 for a total run time of 8hrs with the laptop still fully charged and the Jackery at a SOC of 28%. In other words, I could have run for another 2 hours if I had been able to stay awake. During the next day I fully recharged the Jackery with the solar panels in about 6hrs so it was ready for the following night. I ran for 6hrs on the 2nd night completing my image collection of M74 and finishing with 50% SOC, easily recharging once again with the solar panels during the next day. The final night I ran for another 6 hrs finishing with 47% SOC as I imaged the edge on spiral galaxy NGC891 in Andromeda. Overall, the Jackery performed as I had expected allowing me to image for as long as 8-10hrs had I been able to stay awake, fully recharging each day with two 100w solar panels to be ready for the next evening. I was also able to use the Jackery during the day using its pass through charging feature to keep my cell phone recharged. Pass through charging allows the Jackery to simultaneously charge a device like the cell phone or laptop, while it is itself being recharged by solar or AC power. It will take correspondingly longer to recharge the generator depending upon the power used to recharge the connected device. Power Use Case Analysis Since everyone uses different equipment for their setups, I used the PPBA to measure the power requirements for each individual device and built the power consumption table shown below. Since my camera does not have cooling, I borrowed an ASI294MC Pro with cooing from a friend and measured the power requirements for three different degrees of cooling. Not surprisingly, the biggest power draw by far is my laptop and that is with the display turned down, Bluetooth and WiFi turned off. The camera cooler and dew heater on full are the next biggest power hogs. I find that I can usually run my heater at 50% with a dew shield and not have any dew problems, but others may find they need to run full power. Also, smaller OTAs will require smaller heater straps and correspondingly less power. The MyT mount power increases during slews but as I found when running TPoint in my field tests, 15w is a good average power consumption to estimate the total power needs for this mount if running by DC. In the past I measured the current requirements for a number of different mounts (CGE, CG5, Nexstar 6", ETX80 and IOptron Cube) and found that they use significantly less power than the MyT ranging from 2w to 6w during tracking. The ASI1600 is typical of cameras, including guiders, which operate on 0.5w or less without cooling. I do not have a powered filter wheel or camera rotator but I suspect that the power draw from those is negligible since they are used sparingly through the course of the night. 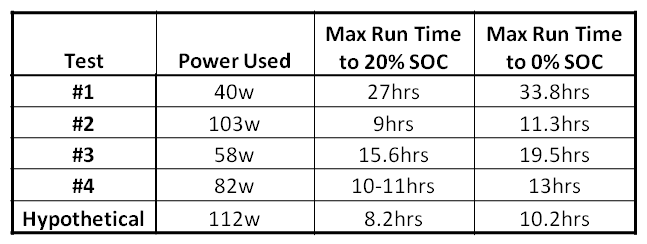 Taking these numbers into account, the following table summarizes the power required for each of my test cases and the corresponding maximum capable run time for discharges to 20% and 0% SOC of the Jackery. I added an additional case called "Hypothetical" which is identical to my Field test with the laptop powered by the Jackery up until the last 2 hours, but I added the additional power requirements of the dew heater at 50% power (10w) and a camera cooler at 100% power (20.5w) to get a total power requirement of 112w. One can see that for a setup that draws between 40 and 60w, fairly typical of an imaging rig using a mini-pc or a separately powered laptop, the Jackery 1000 can supply multiple nights of power without a need to recharge in between. Even in the most power hungry 'Hypothetical" case the Jackery 1000 can supply power for a long night of imaging. Additional Observations As noted above, the Jackery has a regulated power output. In my tests, the output voltage remained between 12.9 and 13.1V all the way down to 15% SOC showing excellent power stability. Another thing to note is that the drop in SOC was very linear with time, falling by the same % each hour all the way down to 15%. Like all other solar generators that I have investigated, Jackery specs the battery life to >500 full cycles after which the full capacity of the batteries will drop to 80%, or 800Wh for this particular model. At that point it will still supply 80% of its original capacity so one would still be able to get continued use out of it but the total run time would be shorter than during the first ~500 or more cycles. The Jackery can be used to power devices over the temperature range of 14deg F to 104deg F which will cover the typical star party season but might be a problem for hardy soles who like to observe away from home during frigid nights. Recharging of the Jackery requires a temperature above freezing, 32deg F, but I read of a clever trick where the generator is placed inside a cooler so that it stays warm enough under its own heat while recharging at temperatures below 32deg F. These are limitations typical of Li-chemistry batteries and it should be noted that the BMS will prevent the battery from being used outside these conditions so it cannot be accidentally damaged. Maintenance of the generator is simple requiring a discharge to 50% SOC and recharge once every 3 months. Summary I am thoroughly impressed with the build quality, performance and ease of use of the Jackery PS1000 as a source to power a typical astro-imaging session through a long night under dark skies. With the option to recharge within 7hrs by AC outlet and 8hrs by twin solar panels, if not less, I can look forward to eliminating those heavy lead acid batteries and avoid annoying my friends with my generator running through the night. The biggest downside to the PS1000 is its price. However, when I look at the cost of two 75Ah AGM batteries needed to match the Jackery's power, plus a quality pure sine wave inverter, MPPT charge controller for solar charging, power meters, USB charging sockets, cases, etc. I believe the cost of a DIY system easily exceeds $600 not counting the assembly effort. And one still has to carry two 50lb home built power supplies and connect them in series. Another consideration is that the Jackery can double as a backup generator in case of a power outage. The PS1000 will keep my refrigerator running for 9hrs before needing a recharge and, unlike my Yamaha generator, I can use it inside my house. For those with lesser power needs, say 40-60w the $499.99 Jackery 500 would be a lower cost option to achieve a 7-8hr imaging session. And for visual observers, the much less expensive 160 and 240w models would be more than sufficient for their power needs. I gave the folks at Jackery feedback on how they might make their generators more user friendly to the astronomy community. First, they might consider a 5.5mm x 2.1mm or an Anderson Power Pole DC output in addition to the cigarette adapter output. Or they could supply a cigarette adapter to 5.5mm x 2.1mm or Anderson Power Pole extension cable to make it easier to for us to connect the Jackery to our equipment. However, it was easy to find a cigarette to 5.5mm x 2.1mm power cord on Amazon that serves the purpose. The Jackery generator can be recharged with one or two of the Jackery Solar Saga panels in parallel or, with an MPPT to 8mm adapter with any solar panel under 30V and 10A. I plan to do a separate review of their solar panels in another blog soon so look for that soon. Pros High capacity and DoD Extremely light weight Voltage regulation Well designed and simple to use Simple to add solar recharging Cons Price Single 12V output No 5.5mm x 2.1mm or Anderson Power Pole output 500 cycles to 80% remaining capacity  You may also want to watch my video review of the Jackery 1002Wh and 518Wh solar generator models on my YouTube Channel. If you want to find out more about and shop for Jackery products, you can find them here Amazon.com. Links are Amazon Associate links. Jackery 1000 amzn.to/47DIVSm Jackery 500 amzn.to/47zeWep Jackery 240 amzn.to/3RX7QdM
4 Comments
Steve Waldee
6/17/2021 12:51:42 pm
Exceptional review, Curtis. I produced a rather similar but shorter and simpler article nearly 15 years ago for the power system I set up for my C-11; and I had even included such things as charts of individual device current consumption: so I was delighted that you have done the same thing on a MUCH larger scale. My wife is setting up a camping program and required a generator of some type; so in my research I found your CN report and "devined" how to find your website, and thus located the present article in full. I had considered some other options but you have CONVINCED me that (a) the Jackery is an excellent product, offering good tech support; (b) the Jackery solar panels are superior and offer more functionality on their own than competitors; (c) the Jackery's AC output is *obviously* so pure that it will not damage a PC, incredibly costly mount, and other ancillary imaging devices: in short, everything that my wife will require just for camping, and that I too can use if I decide to take a scope. Just put the 1500 W Jackery into an online service/sales cart, along with FOUR of the solar panels--I go top dollar, highest capacity (from rueful earlier experience with devices that have an inefficient power factor.) Good job with your absolutely first rate analysis, superbly researched and detailed account, and utterly authoritative and convincing report! - Steve Waldee, Ivins, UT
Reply
Curtis
6/17/2021 01:09:48 pm
Steve
Reply
9/21/2023 06:52:00 am
Great blog post! It's informative and well-written, making the topic easy to understand.
Reply
12/9/2023 09:42:38 pm
Curtis, thanks for the info on the Jackery sale. We did save on the 4 panels we purchaded!
Reply
Leave a Reply. |
Categories
All
Archives
January 2024
|
 RSS Feed