|
I have been using my faithful Celestron CGE mount for nearly 11 years since I got back into astronomy in 2008. I originally bought the CGE in a package with my trusty C9.25" SCT and both have performed wonderfully for me over the years. When I got aperture fever and bought a C14 Edge I also bought a Software Bisque MX mount to handle the bigger load. The MX has its home in my backyard observatory and that is where it will stay as it is too big for me to take to dark sites. However, I did take my C14 with me into the field mounted on the CGE. Despite the fact that the C14 is too heavy for the CGE I was still able to practice camera assisted viewing without too much trouble since most exposures were very short. The combination made for an amazing short exposure EAA rig bringing out great detail and color in short order, especially using the Hyperstar at f/1.9.
However, as time went on and I began to get the astrophotography bug it became clear that the C14 was not suited to the CGE. Oh, I could get some decent images from time to time with the pair when I used my Hyperstar and did not push the exposure too long. But I would more often than not get noticeable star trailing. At the same time it became clear to me that the C14 was getting much too heavy for me to carry into the field. I could no longer attach it to the CGE without help. So, as I wrote in a blog here last Nov, I finally sold my C14 and bought a C11 Edge in replacement. At 28lbs, the C11 is not light, but it is much lighter than the 46lb C14. And I still have a large aperture scope in the C11 to pursue my interests in astrophotography. It was also clear to me that the time had come to move on from the CGE even though it is still a wonderful mount for its class. The C11, especially with added accessories would be pushing the load limit of the CGE. So I decided to follow the MX at home with a MyT for field use. This way I could concentrate on The Sky X as the software to run my mount whether at home or in the field and optimize my understanding of all of its features rather than switching back and forth like I had been with the NextRemote and TSX software to date. I ordered the MyT in Feb along with its corresponding tripod and received them both in March. Fortunately I purchased both before a substantial price increase of the mount. With the Covid virus shutting down all star parties I set up the mount with the C11 inside my backyard observatory. To simulate field conditions I used the tripod on the wooden floor of the observatory instead of using my pier. Not ideal for vibrations but good enough for testing. While the mount is still not light at 34lbs, it is still quite manageable. And since the tripod sits lower to the ground the lift is not all that high. The tripod itself is very light and compact. Even though I had been using TSX since 2012 there was much I found that I really did not understand until I started using it with the MyT. My first objective was to get a TPoint model and accurate polar alignment. I found a couple of good YouTube video tutorials to help by Charles Walker www.youtube.com/watch?v=4pbgJ24_01I and another one by Richard Wright www.youtube.com/watch?v=6cy9pKSLwXk&t=5s . I highly recommend either of these to help walk you through the process, especially since the manual has multiple different descriptions which can be very confusing to the beginner. While I had done TPoint models before, I really did not understand how to get the best out of them until I watched these tutorials and tried it myself. The other thing that was new with the latest version of TSX was support for my ASI camera which was not there in the previous Camera Add-On. This meant that I could do an automated TPoint run which is light years ahead of doing it manually. Another improvement is the addition of the Accurate Polar Alignment feature which is run after the TPoint model and Super model are complete. The best way to describe it is that it is pretty much the same as the Celestron All Star Polar Alignment which slews to a star, allows you to center the star with the hand control, then moves to the location where the star should be if accurately polar aligned requiring you to use the mechanical Alt and Az adjustments to re-center the star and completing the Accurate Polar Aligment. The MyT behaves so much better with the mechanical adjustments than the CGE. There was a lot of cross talk between the two adjustments on the CGE making it difficult to get the star precisely center. But with the MyT there is virtually no cross talk between axes, which is what I expected when I shelled out $6K for this mount. With this done I have been able to get 90 to 120sec unguided images at f/10 without noticeable star trailing. I still have a lot more to do such as PEC training, learning to use the automated focusing application in TSX and then guiding. But with Covid it seems that I have time to work on each of these one by one in no particular hurry. So far I am happy with my decision to switch to the MyT for field use. My CGE is still available for a second solid mount if needed. Now all I need is for the star parties to return so I can take this new rig out for a test spin. If you are interested in the MyT, along with the tripod and carry case you can find them here: MyT - my mount for travel. Not too heavy and plenty of capacity Tripod for MyT - nice light weight but sturdy tripod, includes a nice carry case OPT links are Affiliate links.
0 Comments
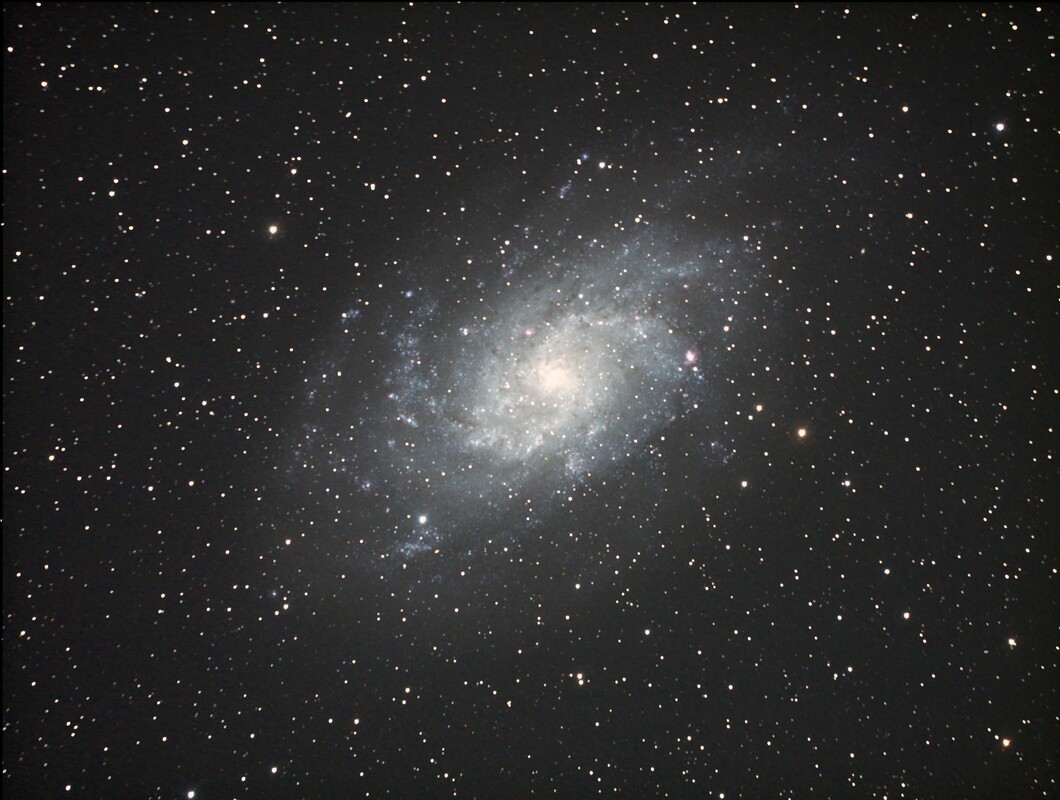 M33 C14 Hyperstar ASI1600MC 77 x 60sec Gain 139 Stacked & Stretched in Nebulosity M33 C14 Hyperstar ASI1600MC 77 x 60sec Gain 139 Stacked & Stretched in Nebulosity Never Over-Tighten Your Hyperstar I used the Hyperstar almost exclusively on my C14" Edge telescope with great success for years. Then one time I found that the Hyperstar would not unscrew from the secondary holder. No matter what I tried the Hyperstar was firmly attached to the secondary holder threads and would not come off. In fact, the more I tried to entice the Hyperstar loose I only succeeded in making the secondary holder spin in the corrector plate. Oh boy! What now? I reached out to Dean at Starizona who was a great help in solving my problem. He explained that the gasket that Celestron uses between the inside of the corrector plate and the secondary holder does not have sufficient grip and slips if the Hyperstar is tightened too much, as it was in my case. The solution, remove the corrector plate to get access to the backside of the secondary holder to release the Hyperstar. Once done, just replace the original gasket with a stickier one from Starizona and re-assemble. Well I did that but apparently I did not get the corrector plate centered on the primary mirror as well as I should have. How did I know that? Just look at this image I took of M33 and you will see that the stars in the corners are elongated in the direction of center indicating a collimation problem. Adjusting the secondary using the three screws was not sufficient to improve the collimation since the problem was that the secondary was no longer centered on the primary mirror. I read on CN about a technique using the circular rings formed by the primary mirror, baffle tube, secondary mirror and corrector when you look down the center of the optical tube as a guide to getting the corrector plate centered. The objective is to adjust the corrector plate using the screws on the outside of the optical tube (for Edge only scopes) until the ring of the corrector plate is centered. I tried this but found it too difficult to maintain a steady enough line of sight down the center of the tube to be certain how much I needed to adjust the corrector. I even tried setting up my iPad on a tripod to photograph the set of rings as shown in a YouTube video. But even this was not very successful for me. Apparently, this method does work for many people, but it wasn't going to work for me. The moral of the story ... snug is good enough for the Hyperstar! 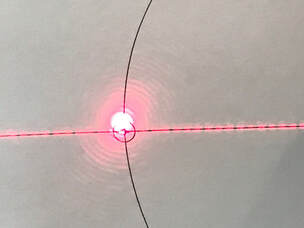 Before collimation of the CT collimator itself. Laser spot is off target slightly when reflected against a paper target as described in the CN blog. Before collimation of the CT collimator itself. Laser spot is off target slightly when reflected against a paper target as described in the CN blog. The HoTech Laser Collimator to the Rescue ... Not Quite Yet That led me to purchase a used HoTech Advanced CT Collimator on Cloudy Nights. The HoTech kit consists of a collimator plate, a Reflector Mirror with removable cap and a tripod adapter. There are four lasers on the back side of the collimator plate, one in the center and 3 at 120 degrees apart at a radius of several inches from the center. The laser in the center provides a cross-hair pattern for alignment of the plate to the telescope primary mirror. The 3 other laser provide parallel beams of light to simulate a distant star. The collimator plate has concentric alignment rings on its face for accurate collimation of the scope. The tripod adapter is used to attach the collimator plate to your own tripod and provides tilt of the collimator plate in two axes. The Reflector Mirror is inserted into the visual back or focuser to reflect the laser beams back to the collimator. If using the HoTech to collimate an SCT without Hyperstar this is all that is needed. When collimating with Hyperstar the optional Hyperstar upgrade kit is required as discussed below. Before attempting to use the CT Collimator I read a CN thread which indicated it was a good idea to check that the lasers on the collimator were themselves collimated before attempting to collimate the SCT. The thread provided a convenient method to do that using a paper target with a cross hair, a circle and 3 spots 120 degress apart where the lasers are positioned on the HoTech Collimator. The procedure is described here and works quite well. www.cloudynights.com/topic/647091-collimating-my-advance-ct-laser/?hl=%2Bcollimate+%2Bhotech+%2Bct#entry9088378 Using this method I came to the conclusion that one of my lasers was slightly off collimation. In principal, having found the offending laser I could adjust the laser myself to get it back in collimation. However, I was concerned that it was more likely that I might make it worse so I decided to send the collimator back to HoTech for adjustment. My only cost for the service was the postage. When I got the collimator back I set it up in my garage with the same paper target and verified that all three lasers were lined up where they should be. 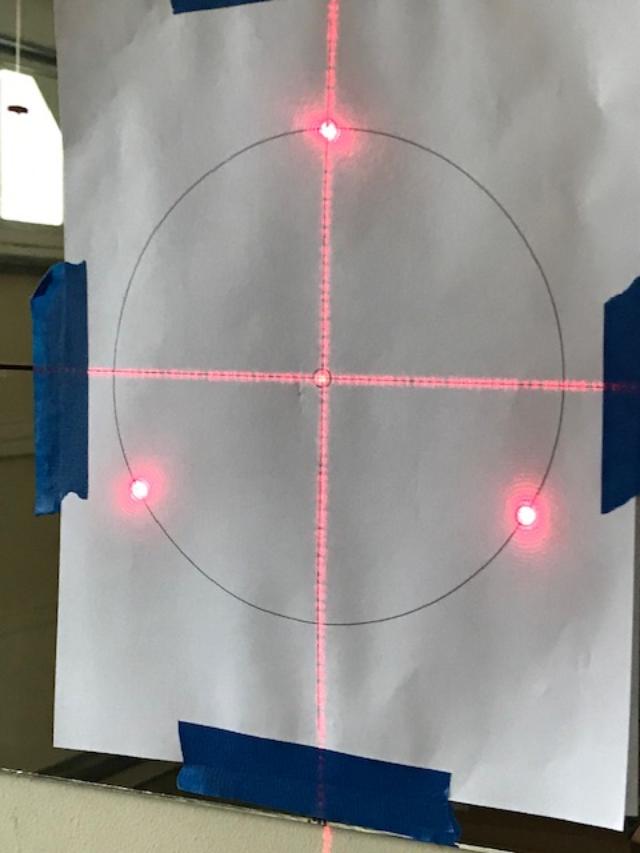 Cross hair and 3 laser beams reflected on the paper target showing perfect alignment after HoTech re-collimated the lasers. 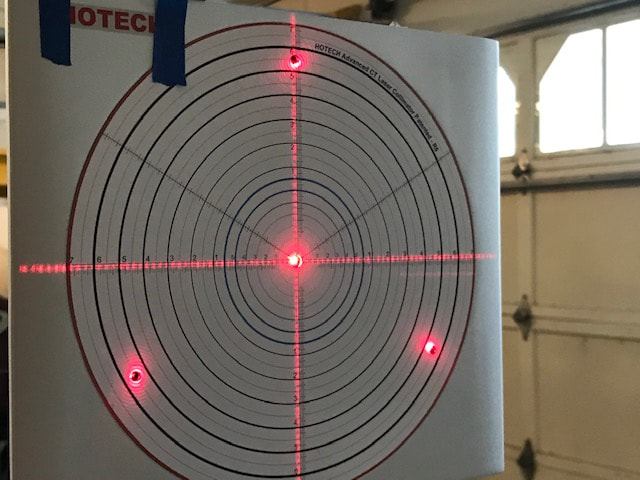 Using the mirror reflection method, the cross hair and 3 laser beams reflected back onto the collimator showing perfect alignment after HoTech collimation. The laser spot at the 4 O'Clock position is right on even if it looks slightly off in the picture which is an artifact of the off axis view. Using the mirror reflection method, the cross hair and 3 laser beams reflected back onto the collimator showing perfect alignment after HoTech collimation. The laser spot at the 4 O'Clock position is right on even if it looks slightly off in the picture which is an artifact of the off axis view. While waiting for my collimator to be aligned at HoTech I came up with another method to check the laser alignment using a small mirror instead of the paper target. Lining up the HoTech collimator 15 feet from the mirror and square to it enables the 3 laser spots to reflect off the mirror back onto the collimator. If the reflected laser spots all reflect back onto the lasers on the collimator, everything is in alignment. The advantage of this method is that the distance is effectively doubled providing greater precision. If you buy the HoTech Advanced CT collimator new you should not have this issue, but it is probably a good idea to check either using the paper target on the wall or the reflection from a good mirror. The originator of this CN blog insisted that I should not use a mirror as imperfections in the mirror would throw off the lasers. I understand that argument but if the reflected laser spots return to their origins as they obviously do in the image below after David at HoTech re-collimated the lasers, imperfections will not cause out of alignment lasers to appear in alignment. 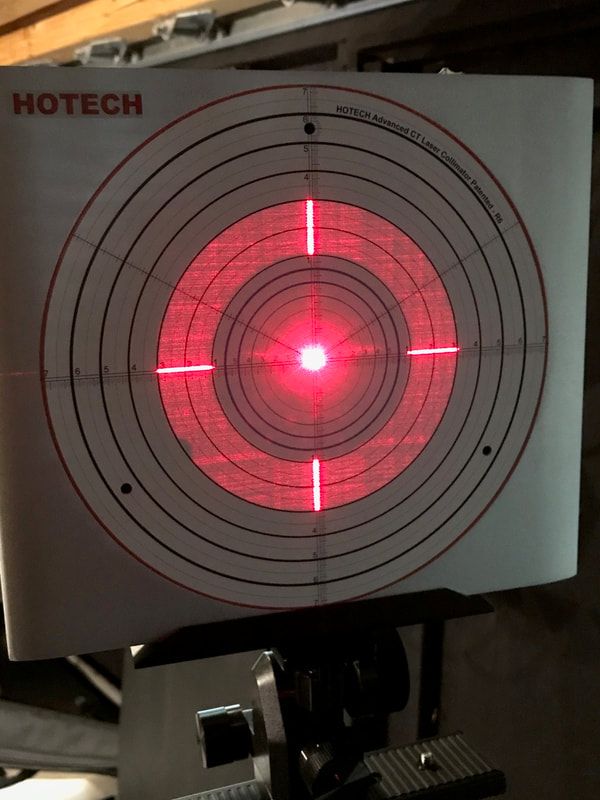 Both the cross hairs and the doughnut are visible. Both show alignment of the outer edges to one of the circles indicating co-planarity of the collimator to the primary mirror. The fact that the inner edges are also aligned to one of the circles means that the HyperStar (secondary) is centered on the primary. This image was taken on a brand new C11 Edge with perfect collimation. Both the cross hairs and the doughnut are visible. Both show alignment of the outer edges to one of the circles indicating co-planarity of the collimator to the primary mirror. The fact that the inner edges are also aligned to one of the circles means that the HyperStar (secondary) is centered on the primary. This image was taken on a brand new C11 Edge with perfect collimation. Mastering the HoTech Advanced CT Collimator Having certified that my collimator was in collimation I proceeded to the task at hand, to collimate my 14" SCT. Anyone who has used one of these will tell you that the initial step in the process is the most time consuming, tedious and most confusing step. And it is the most important step to get right. Once you get this done correctly, the rest is easy. Conceptually the first step is simple. Get the CT collimator plate in the same plane and on axis with the primary mirror. That is done by first attaching the HyperStar Reflector Mirror Assembly to the Hyperstar. The Assembly consists of an adapter ring, Reflector Mirror and a target cap. Next attach the collimator to a tripod with the included holder. The holder provides tilt adjustments along two axes which will be used to help align the collimator to the primary mirror. The following steps are performed with the collimator switched to Mode 1 using the center laser only to shine a cross hair pattern onto the telescope. Upon reflection from the primary mirror, this produces a clipped cross hair pattern on the collimator plate as seen in the image above. Next, adjust the height and distance of the collimator relative to the scope so that the cross hairs are centered and symmetric to one of the rings on the collimator. It is not necessary that the tips of the cross-hairs fall exactly onto one of the rings on the collimation plate, only that they be symmetric to the center of the plate. If the room is dark enough, you can also see a diffuse doughnut of red light from the laser collimator. Either the doughnut or the cross hairs can be used to do the alignment. Once either the cross hair or the doughnut is aligned, both will be aligned. I should note, that you will also move the telescope up and down or left and right to help align the collimator to the primary mirror. As the instructions say, repeat this process one or two more times but with smaller adjustments to get the alignment as spot on as possible. Also, it is best to set the collimator as far away from the front of the telescope as possible for higher precision. Typically it should be outside the Back Focal Length which is the point where the cross-hairs converge to a spot in the center of the collimator. You will notice that the inner edges of the cross hair (and doughnut) are clipped. This is due to the shadowing of the Hyperstar (or secondary). Likewise the outer edges of the cross hairs define the outer edges of the primary mirror.  C14 with Hyperstar attached. You can see how the scope and Collimator are tilted at an angle to simulate actual star gazing conditions I should note that it is much better to do this process with the scope pointed upward, say 45 degrees, as it would be while observing. The weight of the mirror will cause a slight shift in position inside the optical tube when elevated which will change the collimation slightly if this procedure is done with the telescope pointing horizontally. I did this and found that unless you have a very tall tripod or a 8" and smaller SCT you will have to put the tripod on a table and tilt the collimator to the same angle as the scope. When set up like this, the process is even more confusing in terms of moving the tripod around to get co-planar alignment of the collimator and the mirror. But, eventually I succeeded. Having aligned the collimator plate to the primary mirror the hard part is done. You may have to re-check that you have not disturbed this alignment in later steps and re-adjust if needed. 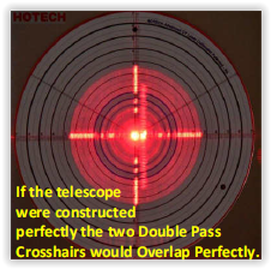 With the Reflector Mirror cap removed, a second cross-hair pattern is projected onto the collimator plate. The mis-alignment here indicates that the corrector plate is not centered. With the Reflector Mirror cap removed, a second cross-hair pattern is projected onto the collimator plate. The mis-alignment here indicates that the corrector plate is not centered. The next step is to make sure that the Hyperstar (or secondary if not using the Hyperstar) is centered on the primary mirror. Switch to Mode 2 which turns on the three lasers at 120 degree angles around the collimator plate. This creates three laser spots on the Reflector mirror target cap. Adjust the telescope focuser until all three dots converge into a single dot. If three spots are not all visible on the Reflector mirror target cap you will have to go back one step to realign the collimator to the primary mirror. Next, remove the Reflector mirror cap to allow a second smaller cross hair pattern to reflect from the Reflector mirror onto the corrector plate. This cross hair shows the tilt angle of the Hyperstar focal plane to the primary mirror. Adjust the push-pull pins on the Hyperstar to center this cross hair on the corrector plate. 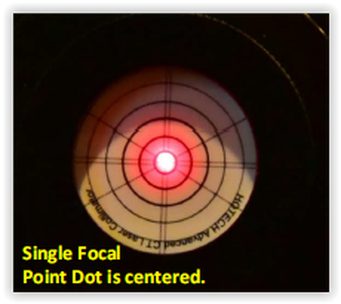 3 Laser dots on the Reflector Mirror cap aligned into a single dot. 3 Laser dots on the Reflector Mirror cap aligned into a single dot. The last step is to center the Hyperstar on the optical axis of the primary optical axis. Put the Reflector mirror cap back onto the Reflector mirror. The three laser spots should still be converged into a single spot. Next, this spot needs to be centered on the Reflector mirror cap. This is done on an Edge by loosening the screws on the front of the optical tube which hold the corrector retaining ring in place and then making use of the 3 adjustment screws on the outside of the optical tube to center the inner edges of the cross hairs on the same circle. If you do not have an Edge, you have to adjust the corrector manually until the secondary is properly centered. This completes the collimation process with the HoTech Advanced CT Collimator. The final step is to do a star test on a night with good seeing. Minor adjustments of the Hyperstar push-pull pins may be necessary to fine tune the collimation using the standard procedure for star collimation. When not using the Hyperstar, the process to align and center the secondary is different but is detailed in the HoTech Collimation manual and YouTube video which can be found in the links listed below. Also, when not using the Hyperstar, there is the added step of aligning the focuser to the optical axis. This procedure requires that the Reflecting Mirror supplied with the collimator be installed in the focuser and the secondary mirror removed so that a second cross hair pattern reflected by the Reflecting Mirror appears on the collimator screen. When this cross hair is centered on the collimator plate by adjusting the appropriate screws on the focuser, the optical alignment is complete. . 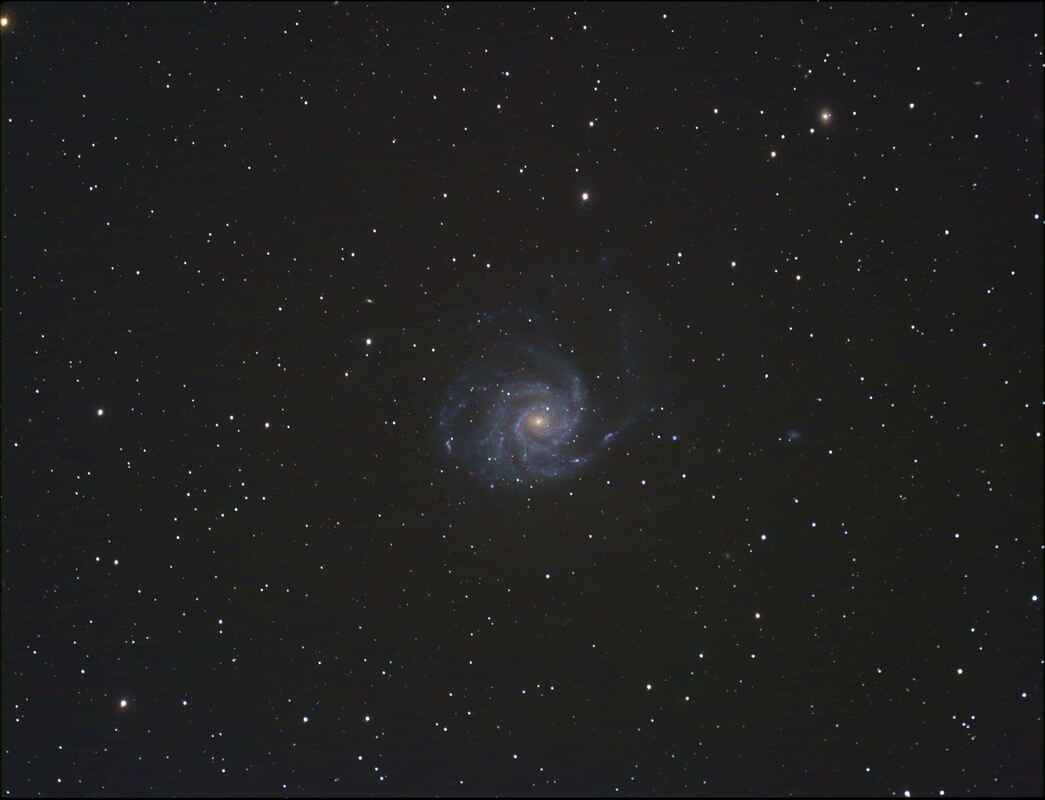 M101 116 x 30sec 200 Gain. Stacked and stretched in Nebulosity M101 116 x 30sec 200 Gain. Stacked and stretched in Nebulosity Collimation Confirmation
The final proof of good collimation was obtained by taking an image with the Hyperstar of a galaxy with lots of stars visible out to the edges of the field of view. Since much time had passed since I had imaged M33 to discover my collimation problem, it was no longer visible. So M101 was chosen as the test target since the FOV of the image has plenty of stars out to the edge to check for coma. As you can see in the image below, the stars are much improved at the four corners indicating much better collimation. While the HoTech Advanced CT Collimator is both expensive and requires a steep learning curve, it works extremely well allowing collimation during the day time or on a cloudy night. Unlike a star test, it also provides the ability to check the centering of the Hyperstar (secondary) and the alignment of the focuser to the optical axis of the primary, both of which can cause problems with star shapes when they are out of alignment. If you choose to use the CT Collimator, remember to be patient the first time you do it and use the helpful documentation in the links below. Good luck! If you are interested in the HoTech CT Collimator you can find it here. Make sure you get the right : HoTech CT Laser Collimator - 2" collimator with accessories HoTech CT Laser Collimator - 1.25" collimator with accessories 1.25" Reflector Mirror - separate mirror for a 1.25" opening 2" Reflector Mirror - separate mirror for a 2" opening OPT links are Affiliate links. Helpful Links HoTech has made a very helpful video which shows each step of the collimation process but with the secondary mirror in place, not the Hyperstar. It can be found here: www.youtube.com/watch?v=4BDwa0RVZw0 The complete written collimation instructions with illustrations, for both the Hyperstar and non-Hyperstar setups can be found on the "Helpful Links" page of this web site. There is also a CN thread showing a clever homemade jig to help make the collimation process easier which can be found here: www.cloudynights.com/topic/697589-learnings-from-using-hotech-laser-collimator-with-edgehd-scope/?hl=hotech+ct+collimator 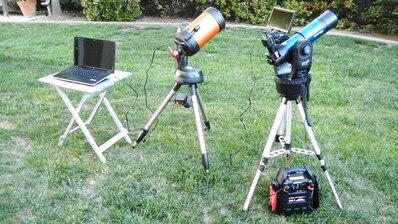 6" SCT with ASI224MC computer controled. ETX80 with Revolution Imager 2 and LCD display 6" SCT with ASI224MC computer controled. ETX80 with Revolution Imager 2 and LCD display There are many different names used to describe the activity of using an analog video camera or a digital USB camera to enhance the view through the lens or reflected from the mirror of a telescope. Electronic Assisted Astronomy or, EAA, is probably the most commonly used name and is the name used for a popular Cloudy Nights forum. But it is in my opinion a bit too general since the "Electronic" part of the name could simply mean a tracking mount, Night Vision equipment (as it does for the CN forum), some form of computer control, a WiFi connection, etc. The term "Near Real Time Viewing" is also commonly used since the effect is to see great detail in galaxies, nebulae, etc. in a matter of a few or tens of seconds. Video astronomy was the name used in the early days since, until recently, the most commonly used cameras by far were analog video cameras like the Mallincam, Stellcam and Samsung to name a few. But the name I like best is Camera Assisted Viewing since it goes to the heart of the activity which is to use a camera to collect light during short exposures of a few seconds or tens of seconds thereby greatly enhancing the detail seen compared to looking through the same telescope but with an eyepiece. The camera could be a video camera like those mentioned above, a digital camera like those from ASI, QHY or Starlight Xpress or even a DSLR. Often software like Sharpcap will be combined with the camera to provide on-the-fly stacking and processing to further improve what can be seen in seconds to minutes. So, regardless of what we call this, I have wondered where and how did it all begin? 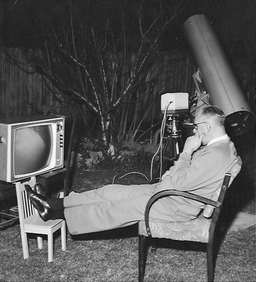 Gil Miles of Sydney, Australia in 1961 observing the moon with the aid of a closed circuit TV Gil Miles of Sydney, Australia in 1961 observing the moon with the aid of a closed circuit TV In the Beginning: Camcorders The image of Gil Miles using a CCTV in 1961 to view the moon live on a TV screen signals the possibilities which were to come to fruition in the coming decades. Video astronomy would not only allow amateur astronomers to observe much more than they could with an eyepiece, they could do this in more comfort and they could simultaneously share the view with others. This particular photo is amusing when one notices the formal attire Gil is wearing while comfortably seated in his armchair. We have come a long way in the last 58 years in more ways than one. It was not until Sony introduced the first consumer camcorder in 1983, the Betacam, that video astronomy finally was within reach of the average amateur astronomer. With the aid of a camcorder, armature astronomers were able to enhance their views of the moon and the planets and capture video to be viewed later or processed to make pretty images. However, because of the size of these early camcorders (they generally also housed a VHS or Beta tape recorder) they needed to be mounted onto a tripod or hand held at the eyepiece of a telescope for afocal imaging. Over time camcorders became smaller and lighter and easier to use with a telescope and some had detachable lenses so that the camera could be mounted at prime focus of the telescope. But camcorders were still limited to bright objects like the planets, the moon, double stars and lunar occultations because of their low light sensitivity (1-5 lux), short exposures (1/60th sec.) and lack of manual control of the exposure and gain settings. In addition, camcorders had auto focusing, which made them even more of a challenge to adapt to astronomy. Indeed, Dennis di Cicco reported in his review of the Canon L1 camcorder in Sky &Telescope April 1992 that he could only record a trace of the bright core of the Orion Nebula through a 200mm/f1.8 lens. Nonetheless, intrepid amateurs showed the advantages of adapting camcorders for astronomy as the age of Camera Assisted Viewing began. 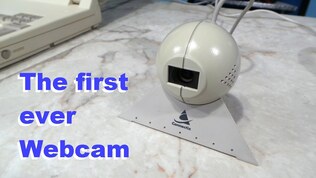 Webcams In 1994 the first commercial webcam, the QuickCam, was introduced for $99. In contrast to camcorders, webcams were not only inexpensive, they were also much smaller and lighter and more easily adapted to astronomy. And, they came with a USB cable and software for easy connection to and control by a computer. The QuickCam and the Philips ToUcam were two of the more popular early webcams using Sony's 1/4" ICX098BQ CCD detector with 350K total 5.6um square pixels. In contrast to the camcorder, webcams had a maximum exposure of 200 msec which was nearly an order of magnitude longer than that of a camcorder. While offering the amateur astronomer improvements over the camcorder, the webcams did have their limitations. Since they were designed for terrestrial use, they required mechanical modification to enable attachment to a telescope. This involved surgery to remove its lens and add a c-mount adapter. And the small size of the detectors used in webcams greatly limited their field of view, making it sometimes difficult to find and center the object of interest. Ultimately, with sub-second exposures (0.2 sec.), small chips (1/4"), small pixels (5.6 microns), poor sensitivity (initial Lux values of 10 to 20), webcams were limited to bright celestial objects like the moon and the planets. Despite this, webcams quickly made their mark as premier planetary imagers. By taking advantage of their 60 to 90 fps image capture rates amateurs could collect thousands of images of a planet in a few minutes which they would post process later. Using free software like Registax to automatically select and align the better images produced during brief moments of exceptional seeing, amateurs were able to produce images rivaling those of professional astronomers with much larger and better telescopes only a decade earlier. As this approach gained traction, the Quickcam and Unconventional Imaging Astronomy Group (QCUIAG) was formed in 1998 as an online forum where new methods, cameras, modifications and images could be shared among like minded video astronomers. It did not take long for some enthusiasts to push the envelope and figure out how to modify these webcams to achieve longer exposures and begin using them to successfully view and image some of the brighter Deep Sky Objects (DSOs) like star clusters, galaxies and bright nebulae. In 1999 Dave Allmon found that by clipping a single wire in the Connectrix webcam he was able to take long exposures which he demonstrated with images of 5 sec to 180 sec duration of the Andromeda galaxy. Unfortunately this capability was a quirk of the Connectrix camera and could not be applied to other Webcams. Then in the summer of 2001 Steve Chambers is credited with pioneering a series of modifications to a wide variety of webcams allowing long exposures, replacement of the standard CCD with larger and more sensitive CCDs and disabling of the amplifier to minimize noise. While amateur astronomy is flush with do-it-yourselfers, not everyone has the skills or desire to make their own modifications. Enter the commercially modified webcams from the likes of Atik (ATK-1C, ATK-2C), SAC (SAC7, SAC7b), Celestron (NexImage), Meade (Lunar and Planetary Imager and Deep Sky Imager), and Orion (Starshoot Solar System and Deep Space). The ATK-1C and NexImage were commercial modifications of the ToUCam. All of the commercially modified webcams were designed with housings to fit into standard 1 1/4" eyepiece holders, many had passive cooling designs and some even had fans to better reduce the appearance of warm pixels. They also came with larger chips for larger fields of view and larger pixels for improved light sensitivity. And all provided longer exposures than unmodified webcams pushing practical exposures into the range of minutes. This finally made it possible to create images of DSOs by collecting hundreds of exposures of a few tens of seconds which could later be stacked and processed with software like Registax. See for instance, Stephen Chambers and Stephen J. Wainright, Sky &Telescope Jan. 2004. At this point it was possible to do Camera Assisted Viewing of brighter DSOs with a webcam, but this limited capability was already being made moot by the availability of integrating video cameras from SBIG, Adirondack and Mallincam leaving webcams as the mainstay for lucky imaging of the solar system rather than the key to Camera Assisted Viewing of DSOs. A complete review of Webcams and their applications to astronomy can be found in Robert Reeves 2006 book, "Introduction to Webcam Astrophotography". 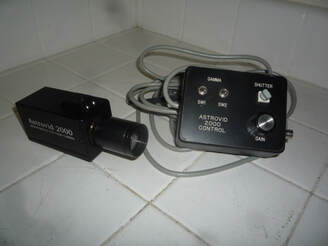 Adirondak's Astrovid 2000 Adirondak's Astrovid 2000 Security Cameras As the search for ever improving capability evolved in the 90s, amateur video astronomers eventually began experimenting with low-light video surveillance cameras. While larger than webcams these cameras came with higher sensitivity, detachable lenses and c-mounts allowing them to fit nicely into 1 1/4" eyepiece holders. They were typically used with a frame grabber and a VHS recorder to capture thousands of frames which could later be stacked in software to produce excellent solar system images, some say better than what could be obtained with long exposure film cameras. In 1994 two amateur astronomers in upstate New York, John Cordiales and Jim Barot, saw the value in these video surveillance cameras and launched their own company, Adirondak Video Astronomy. One of their first products was the Astrovid 2000 in 1996 which sold for $595. This camera used a Sony 1/2" B&W CCD, ICX038DLA, and had an exposure range of 1/60 sec to 1/10,000 sec making it well suited to solar, lunar, planetary and occulations but not DSOs. A big advantage of the Astrovid 2000 was the fact that it provided for manual adjustment of the shutter, gain, gamma and contrast through a wired hand control providing the needed control over the image settings and also making it possible to change camera settings without disturbing the telescope. David Moore published a detailed review of the Astrovid 2000 in Sky & Telescope Aug. 1999. While still not ready for DSO viewing, John and Jim would soon play a pivotal role in reshaping the nature of video astronomy.  Supercircuits PC-23C Supercircuits PC-23C Then in 1998 a Texas company, Supercircuits, introduced two very inexpensive video surveillance cameras, the PC-23C and PC-33C, a B&W and color model, respectively. Because these cameras could be purchased for only $80, they quickly became very popular in the video astronomy community. These re-badged Topica TP-505D/3 cameras from Taiwan used 1/3" Sony CCDs and had a maximum exposure of only 1/30 sec. Unlike the Astrovid 2000, the Supercircuits cameras had auto exposure and auto gain mading the cameras challenging to obtain the needed exposure for small, high contrast objects like the planets. In his Skywatch March-April 1999 review of the PC-23C, Rod Mollise noted the excellent views he achieved of Saturn and Mars, including a clearly defined and razor sharp view of the Cassini Division. But, he noted, " For 'real' deep sky work you do need an integrating CCD camera..." Even though these inexpensive Supercircuits cameras were not capable of viewing DSOs, they were quite capable at capturing images of the solar system and the B&W version was a favorite tool for asteroid occultations. Similar to Topica, another Taiwanese company, Mintron, and a Japanese company, Watec, began developing and selling video surveillance cameras in the 90s. Cameras like the Watec 902H ($500) with its 1/2" Sony ICX249ALL CCD also found their way into the amateur astronomy community even though the manufacturers were not initially aware of this application for their products. But with exposures still limited to 1/60sec (NTSC) and 1/50sec (PAL) these cameras were also not useful for viewing DSOs. Nonetheless, both Mintron and Watec cameras would be key to shaping the nature of Camera Assisted Viewing over the next decade, if primarily through several innovative amateur astronomers who saw the value of this new technology. While the 90s brought a new technology, video surveillance cameras, to the forefront of amateur astronomy, maximum exposures of 1/30 sec limited the cameras, like the webcams, to the solar system, asteroid occultations, lunar meteor impacts, double stars and bright open clusters. To take advantage of this new branch of astronomy, a Yahoo Video Astro Group was formed by Jim Ferreira in the spring 1999 providing an on line forum for discussion of video cameras and equipment for lunar, solar and planetary astrophotography, and eventually DSOs. That forum continues to this day. 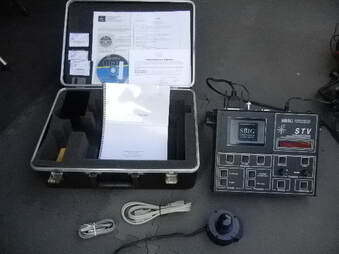 SBIG STV Deluxe from 2000 SBIG STV Deluxe from 2000 Integrating Astro Video Cameras In the Beginning: The SBIG STV The first video camera designed and marketed for real time viewing of DSOs is probably the SBIG STV. This dual purpose guider and video camera was introduced in 1999 with with the capability to perform exposures of 1 msec to 10 min. In their 2000 book, "Video Astronomy", Steve Massey, Thomas Dobbins and Eric Douglass called the arrival of the STV a "first glimpse into the exciting future of video astronomy." The longer exposures afforded by the STV suddenly made it possible to view images of DSOs in real time without the need to capture thousands of individual frames for stacking and processing later. An exciting new age in amateur astronomy had arrived. The key to longer exposures is the ability of the camera to integrate the light captured by the CCD over many 1/60 sec (NTSC or 1/50 sec PAL) exposures effectively creating a single longer exposure. This long exposure is stored in the camera's buffer and continuously output to the monitor at standard video rates, 30 frames/sec NTSC or 25 frames/sec PAL. When a new long exposure is ready it is transferred to the buffer and output in the video feed for viewing until the next long exposure replaces it. Thus, one can view an image continuously on the monitor while the camera takes the next long exposure. The STV is an all-in-one system with a CCD camera attached by an electrical umbilical cord to a large control box just under 12" x 10" x 3". The camera uses a sensitive B&W 1/3" CCD sensor from Texas Instruments, TC-237. The STV gives the user manual control of exposure, gain, brightness and contrast providing the user with complete control over the camera, unlike camcorders and security cameras like the Supercircuits PC-23C and similar cameras of the day. With the STV it was now possible to view all of the Messier objects with exposures in the range of a few seconds to minutes. In many ways the STV was way ahead of its time considering that it also came with a Thermo Electric cooler, automatic dark frame subtraction to minimize noise, complete control of the camera's settings, image display and image capture with or without a computer and a feature called "Track and Accumulate". The "Track and Accumulate" feature allowed the camera to internally align and stack up to 10 frames in real time to dramatically improve SNR reducing noise and improving feature detail. The STV also had the ability to store images in the on-board internal memory for later display or download to an external computer. Optional accessories included a 5" B&W LCD monitor, color filter wheel and a focal reducer with an extension tube capable of reducing an f/10 system to ~f/6 and f/3.75. The focal reducer could also turn the camera into a wide field finder "eFinder" with a FOV of 2.7 degrees. Alan Dyer gave a thorough review of the SBIG STV in the Jan. 2001 Sky &Telescope. However, at a price of $1995 for the base unit and $2395 for the Deluxe with the LCD display, this camera was out of reach of many amateurs who continued to look for a cheaper alternative. The STV was discontinued in 2006 due to the lack of key component availability, but used systems can occasionally be found for re-sale on Cloudy Nights. 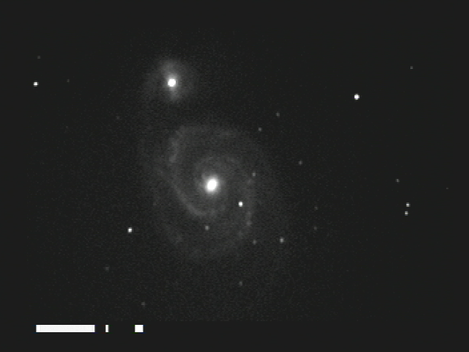 M51 30sec x 7 Track & Accumulate w/Dark Field Subtraction SBIG STV C9.25 f/4.5 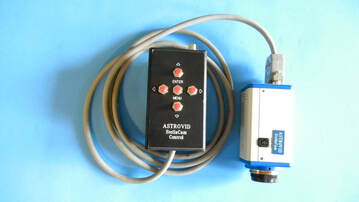 Stellacam (Mintron MTV12V1) Stellacam (Mintron MTV12V1) A Couple of Guys in Upstate N.Y.: The Stellacam In the meantime, a number of forward looking amateur astronomers were working on adapting existing security video cameras from companies like Mintron and Watec for astronomical use. As mentioned above, Adirondak Video Astronomy was one those and although their Astrovid 2000 was not suitable for real time viewing of DSOs, things changed in the fall of 2001 when they introduced the Stellacam for $595. While this camera had the same CCD as the Astrovid 2000 the key difference was the capability to integrate up to 128 x 1/60 sec image frames for a maximum exposure of 2.1 sec. This extended exposure capability, while not as long as that of the STV, was sufficient to make it possible to view many DSOs in real time that were not possible previously with cameras like the Astrovid 2000, Supercircuits PCs, modified webcams and camcorders. The Stellacam was in reality a re-badged Mintron MTV 12V1 with the IR filter removed to increase sensitivity at the important Halpha wavelength. It also had a different rear panel than the stock MTV 12V1. Instead of the 5 buttons to navigate the camera on screen menu, the BNC video and S-Video connectors, a power input port and a green LED, the Stellacam had a single multi-pin connector for the cable to connect to a wired hand control. Unlike the more sophisticated hand control for the Astrovid 2000, the Stellacam's hand control was a small metal box with five buttons and a resistor network inside so the user could to emulate the camera menu buttons on the back of the camera body. This box also had an input for camera power and a BNC connector for the video output from the camera. This enabled a single wire from the camera to the observer several feet away. While the STV heralded a new world of possibilities, the Stellcam, even with its limited exposure, opened up that new world to many more astronomers at 1/3 the cost of the STV. 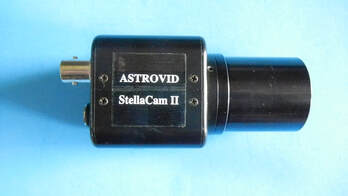 Stellacam II (aka Watec120N) Stellacam II (aka Watec120N) The Stellacam was followed by the Stellacam EX in 2002 ($695) and the Stellacam II ($795) in 2003 further improving the depth and detail of DSOs which could be viewed in real time. The EX was another re-badged Mintron security camera, the MTV12V1Ex. It was still limited to 2.1sec exposure but with the more sensitive 1/2" Sony ICX248 CCD it could provide much more detail than the Ex. It came with the same hand control as the non-Ex camera. In his review of astronomical video cameras available at the time in Sky & Telescope Feb 2003, Johnny Horne noted that both the Stellacam and Stellacam EX were "sensitive enough to put the Triffid Nebula directly on a TV screen in real time." With the Stellacam II, Adirondak switched manufacturers from Mintron to Watec, re-badging the Watec 120N which had the even more sensitive Sony 1/2" ICX418 CCD. But the biggest improvement with this camera was the capability to increase internal stacking to 256 frames for a maximum exposure of 8.5 and 10.2sec, respectively, for the NTSC and PAL versions of the camera. The Stellacam II was supplied with a much more sophisticated wired hand control than either the Astrovid or the Stellacam Ex. Most likely the new hand control was manufactured by Watec itself, since one could purchase the exact same camera and remote directly from Watec. This remote had rotary knobs for adjustment of the exposure integration (1X , 2X, 4X, ... 256X) and Gain along with a sliding switch to change the Gamma. An optional wireless hand control was available instead of the wired hand control eliminating one extra wire from the camera to the observer. The last of the Stellcam series, the Stellacam III ($1295) based on the Watec 120N+, was released in 2006. It had the same CCD as the Stellacam II but now had an unlimited maximum exposure which made the Stellcam III the ultimate an astronomer could ask for. Now, the ability to view DSOs was more limited by the mount polar alignment, tracking capability and light pollution rather than the upper limit of the camera exposure. The Stellacam III had the same wired and wireless hand control options as the Stellcam II. But it also introduced Thermo electric cooling (TEC) of the sensor with the addition of a Peltier cooler like the STV to help reduce thermal noise. In his 2005 book, "Visual Astronomy Under Dark Skies", Antony Cooke called the Stellacam line of cameras "true astronomical video pioneers." Around 2010, the Stellacam line of cameras was taken over by John Lee's CosmoLogic Systems. Cosmologic had provided the Peltier cooling for the Stellacam III and the wireless remote for Adirondak's camera. When Cordiales decided to leave the business, Lee stepped in, at least for a short time. It seems that the change in ownership, the fact that Stellacam never introduced a color camera and stiff competition from another innovative amateur astronomer ultimately led to the disappearance in the Stellacam line earlier this decade. Used Stellacams can still be found in the Cloudy Nights or Astromart classifieds, but have long since been supplanted by much more capable and even less expensive video cameras.  Mallincam Xtreme, Junior Pro and Micro Ex Mallincam Xtreme, Junior Pro and Micro Ex A Guy Even Further North Joins the Fun: The Mallincam In the meantime, up in Canada a fellow named Rock Mallin began tinkering with video cameras for astronomy in earnest in 1994 and introduced his 1st commercial camera, the Mallincam I (MC I) in 1999. This first camera also used a B&W 1/3" CCD and had a maximum 1/2 sec. exposure which limited its use to the solar system and lunar occultations. It was not until late 2002 or early 2003 that the Mallincam II was introduced with the ability for exposures of 2.1 sec, long enough to display many DSOs in real time. It used the same Sony CCD as the Stellacam and the Mintron 12V1 and appears to be a modified version of the Mintron. It is likely the MC II that Terence Dickenson reviewed in Sky News Nov/Dec 2003 remarking that " On the deep sky, the Mallincam really shines." The MC I and MC II appear not to have widespread distribution and may have only been used by a handful of amateurs in Canada. But this would change dramatically as Rock released a succession of analog video cameras with key improvements over the next decade. His MC II Color camera introduced in late 2003 or early 2004 was the first commercially available long exposure astronomy video camera with color capability and a major game changer for deep sky camera assisted viewing. The MC Hyper in 2004-2005 extended exposures up to 12 sec with its "hyper" circuitry. The Hyper Plus introduced in 2005 and reviewed by Gary Kronk in Astronomy, July 2010, extended the maximum exposure to 56 sec and appears to be the first Mallincam camera with Peltier cooling. It is likely that with the Hyper and Hyper Plus cameras, the Mallincam line really took off. The VSS and VSS+ in 2007-2008 pushed the maximum exposure to just under 2 min. and also were equipped with a Peltier cooler. With the Xtreme in 2009 the maximum exposure was now 100 min., certainly beyond any real time viewing threshold. The B&W versions of the Hyper Plus, VSS, VSS+ and Xtreme all used the Sony ICX428, while the color versions used the ICX418, all 1/2" format. The Xterminator introduced in 2014 with the extremely sensitive Sony ICX828 CCD was the last of the new analog cameras from Mallincam. Rocks cameras ranged in price from $249 for the Micro kit to $600 for the MC Jr Pro model up to $1750 for the Xterminator. The Mallincams have been some of the most popular, if not the most popular cameras in the post Stellacam era. Many of these cameras are still available today along with a line of digital CMOS cameras for both real time viewing and astrophotography.  M20 60sec C14 Hperstar f/1.9 MC Xtreme 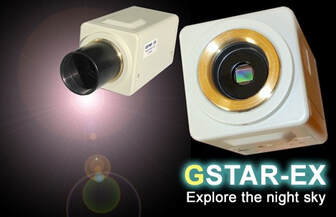 From Down Under: The GSTAR While Stellacam and Mallincam were well established in the video astronomy community in North America, down under an Australian company launched by Steve Massey in 2002, MyAstroShop, began marketing its GSTAR line of astronomy video cameras. Steve eventually released 3 analog video cameras over the years, all re-badged Mintron cameras. The GSTAR EX was first with the 1/2" Sony B&W ICX429AL CCD and a 2.56 sec maximum exposure. This was followed by the GSTAR EX Color, most likely a re-badged Mintron72S85HP-EX with the 1/2" Sony ICX249AK and 5.12 sec maximum exposure. The last video camera in the GSTAR series was the GSTAR EX2 ($579) with the 1/2" Sony B&W ICX429 CCD also with a maximum exposure of 5.12 sec. It appears that all of the GSTAR analog video cameras are now discontinued but have been replaced with CMOS digitial cameras as the hobby has moved in that direction. Steve's cameras had their IR filters removed like both the Stellacams and Mallincams. Unlike the Stellacams and Mallincams at that time, the GSTAR cameras could be controlled by a computer with the free GSTAR-COM software. An optional 10 meter RS232 to DB9 cable was needed to connect the pc to the camera through the camera's Aux port. In addition to the camera shop, Steve has advanced the hobby by authoring several books, including two books on video astronomy in 2000 and 2009.  Samsung SCB2000 Samsung SCB2000 The Stock Security Camera: Mintron, Watec and Samsung While it does not appear that Mintron actively marketed their cameras to the astronomy community, that did not stop astronomers from seeking out their latest cameras for such use. This included the MTV12V1 and 12V1-EX which were used in the Stellacam, Mallincam and GSTAR line of cameras to name a few. Other Mintron security cameras like the 12V6HC-EX color camera also found their way to the back of telescopes through word of mouth on one astronomy forum or another. In Astronomy Now Dec 2007, Ade Ashford reported that he was able to see the dust lanes in the spiral arms of M31 with a Mintron 12V1-EX attached to his 105mm f/4.2 AstroScan. At some point, Watec began to realize that their cameras were being used for astronomy and began to advertise them as such. Their 120N and 120N+ with wired remotes were sold direct to astronomers as well as re-badged by Adirondak and sold as Stellacams. Like the Mintrons, amateurs sought out any promising camera from the likes of Watec over the years. In 2008 Samsung introduced its SDC425 video security camera with a 1/3" color Sony CCD and the capability for 4.2 sec exposure integration for the comparatively low price of $175. In 2009 the Samsung SDC435 (later renamed the SCB200) was released with a 1/3" Sony ICX638 color CCD and an exposure of 8.5 sec for just $99. This became a very popular camera given its price and reasonable capability for deep sky viewing. The SCB4000 with the 1/2" Sony ICX428 CCD was released in 2009 for $347 and it also had a maximum exposure of 8.5 sec. These cameras have a plastic IR filter placed in front of the CCD which is easily removed since it is held in place with two small screws. The Samsung's were never marketed for astronomy and apparently never re-badged and resold to the hobby, but could be purchased direct from security video camera suppliers. They were much larger than the Mintron and Watec cameras and are still popular today, although the above versions are no longer in production. 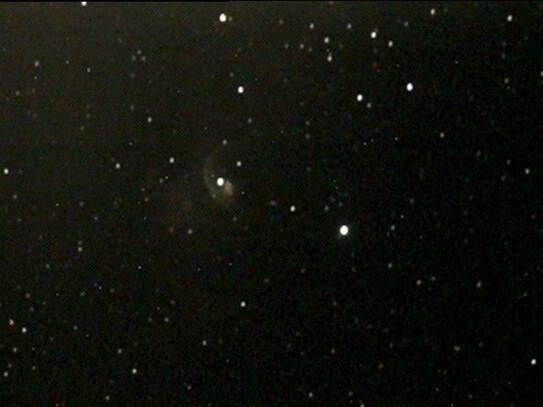 NGC7635 8.5sec Samsung SC2000 Celestron C14 Hyperstar f/1.9  LNtech300 also rebranded as the Revolution Imager I and the MC Micro Ex LNtech300 also rebranded as the Revolution Imager I and the MC Micro Ex A Late Arrival: The LNTech300 In 2013, word spread of a new, small form factor security video camera manufactured in Hong Kong and available on-line from a number of Asian re-sellers. Like the Samsung, this camera was not directly marketed to the astronomy community, but awareness within the ranks soon made it a very popular camera. That and the fact that it could be purchased for a mere $69 yet had the capability for exposures of 20.5sec PAL and 17.1sec NTSC. Not only that, but this camera had the capability to internally stack up to 5 successive images on the fly, a process called 3D-DNR, which greatly helped increase SNR and smoothed out the noise and enhanced the detail. The LNtech300 used the 1/3" Sony ICX810 and 811 CCD for NTSC and PAL, respectively. Since this camera was not sold directly as an astronomy camera, one had to either ask the re-seller to remove the IR filter glued on top of the CCD or remove it themselves, which many did. The main limitation of this camera was the fact that it used a 1/3" CCD at a time when most amateur astronomers were already used to the 1/2" format and were looking to the possibility of even larger sensors in the future. The main advantage was its low cost making it appealing to anyone just entering the hobby. Mallincam came out with a rebranded version of the LNtech300 called the Micro Ex in late 2013. This camera was identical to the LNtech300 except in two important ways. First, the IR filter was already removed from the CCD. Second, the Micro had some internal wires spliced so that the Auto Iris connector could be used with the proper cable to control the camera menu by a computer and free SW which emulated the buttons on the back of the camera. This was a very nice feature for those who wanted to use the camera with a computer. A DIYer could easily make the same modification to the LNtech300 which many did. In fact, one can find threads on the Cloudy Nights forum for this and another modification to provide WiFi control of the camera as well. 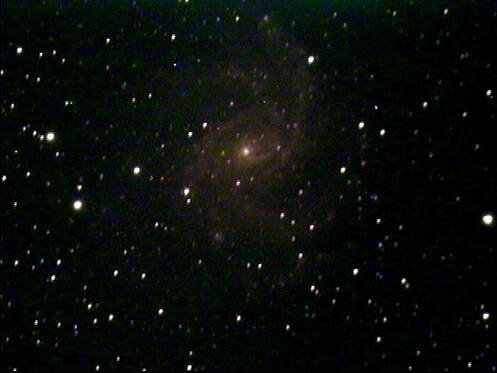 LNtch300 NGC6946 20sec 3DNR x5  Revolution Imager 2 with nose piece and 0.5X focal reducer Revolution Imager 2 with nose piece and 0.5X focal reducer End of the Line: The Revolution Imager The LNtech300 was re-badged and sold along with several useful accessories by Orange County Telescopes starting in Sept. of 2015 as the Revolution Imager. It used the PAL version of the CCD, the ICX811, which provided a maximum exposure of 20.5sec. While most camera suppliers included a C-mount adapter, a power cable or power transformer and maybe a video cable with their cameras, the Revolution Imager kit was unique in the completeness of the included accessories. For $299 you received the camera with the IR filter already removed, a C-mount adapter, power and video cables, plus an external 1.25" IR filter, a 0.5X focal reducer, a 7" LCD display, and a rechargeable battery all neatly arranged in a padded soft carrying case. The user need only supply the telescope and a clear night sky. The Revolution Imager was reviewed by Rod Mollise in his Dec 13 2015 Astro Blog where he concluded that the Revolution Imager was not only inexpensive but a "very capable camera." Unfortunately the LNtech 300 supply from the Asian re-sellers was exhausted by late 2015 or early 2016 and with it the last of the Revolution Imager cameras. Fortunately, Mike at OCT was able to source a new analog video camera by May of 2016 which he called the Revolution Imager 2. This camera comes in a square rather than a rectangular case format but with the same ICX811 sensor. However, the firmware for this camera differed from the RI I such that the maximum integration was x256 and not x1024 like the RI I. Thus the longest exposure was 5.1sec. However, the 3D-DNR allowed averaging of 6 successive frames instead of 5 which gives a 30.6 sec total average signal. The RI 2 is still available today from OCT and a number of astronomy retailers. 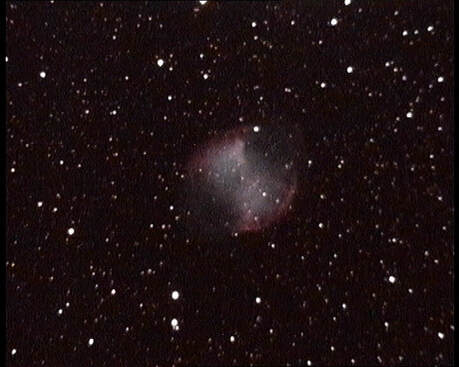 Revolution Imager M27 5sec x DNR4 RI 2 Celestron 6SE And Then There Were: Orion, PD, Polaris, ITE, SC2000 While the cameras mentioned so far probably account for the vast majority of video cameras used for deep sky viewing, I would be remiss not to mention some others. One of these, Orion Telescopes, marketed their offerings as the StarShoot Deep Space Video Camera I and II. Both cameras were simply re-badged Mintron 72S85HN-Ex-R color cameras with a 1/2" Sony ICX248AKL (NTSC) or 249AKL (PAL) CCD and an integration of 256X. The only difference of the DSVC II appears to be an added serial interface for computer control. Polaris USA marketed several different Mintron cameras without modification including their most popular model the Matrix (Mintron MTV12V1) and their color model the Polaris DX-8263SL, a re-badged Mintron MTV63V1. ITE appears to have sold three different cameras, the Deep Sky Pro, a re-badged the MIntron 12V1, the Deep Sky Pro EX, probably a re-badged Mintron 12V1Ex, and a color camera called the Color Eye Pro. In the U.K. Phil Dyer is still a major supplier of video cameras. These include the B&W Mintron MTV2285HC-Ex with a 5 sec exposure which he calls the PD2285C-Ex. Phil also has a color camera which is a modified Huviron (Korea) security camera with an ICX638 (NTSC) or ICX639 (PAL) Sony CCD with up to 20sec maximum exposure. Several of these cameras are discussed in Adrian Ashford's Dec 2003 Sky & Telescope article on integrating video cameras. In early 2015 yet another deep sky video camera option came to light with a posting on the Cloudy Nights EAA forum by "photo444". He documented a DIY project to build a camera from the pc board containing the CCD and electronics which he purchased from SecurityCamera2000 for just $23. A wired remote was included which was easily attached to the appropriate points on the camera board with push on connectors. Originally, these cameras came with the typical IR filter which removes some of the useful IR light from deep sky objects. However, it was not difficult to remove by applying heat to the glass filter with a soldering iron. Fortunately, the DIY project became a lot easier when it became clear that one could request the board camera without the IR filter directly from the supplier. Then all that was required was to build a simple enclosure and attach the board camera, feed through the wire harness for the remote and connect a C-mount adapter to the face of the box. The original idea came from another poster on Cloudy Nights, "David B in NM", who had suggested it to "photo444". This board camera compared favorably in performance with the LNtech300. It used the 1/3" Sony ICX638 and ICX639 CCD and had a maximum exposure of 1024X. This camera set off a wave of similar extremely inexpensive but capable DIY board cameras. More information and images cane be found on the Cloudy Nights forum by searching "SC2000" on the EAA forum and by reading the blog on this web site do-it-yourself-board-camera-for-35.html  Mallincam Control Software Mallincam Control Software Its Not All Hardware: Software Plays Its Part Indeed, while the focus to this point has been on the development of the ever improving hardware that collects the photons necessary to view deep space wonders, software may be the unsung hero that has had its own ongoing role in the advancement of video astronomy. Software's contributions can be divided into two important categories: 1) camera control; 2) image capture. A major challenge for newcomers when trying to operate one of the video cameras is the fact that the camera settings are designed for video surveillance applications, not for astronomy. Hence, the menus can look like Greek to the uninitiated with many of the functions completely irrelevant to astronomy applications. On top of that, important camera settings can be buried several layers deep within the menu. A more in depth discussion of this challenge can be found here making-sense-of-video-camera-osd-menus.html . Fortunately, some very helpful individuals have come to the rescue and created free software which put all of the relevant camera settings in an easy to view, understand and modify format. Two such examples are the GSTAR-COM software developed for the GSTAR and Stephan Lelonde's Mallincam Control software developed for the Mallincams. Both are free and both require that the camera be connected to the pc with the appropriate cable which can be obtained from the camera supplier. These simple to navigate and effectively organized menus leave out the camera functions one would never use for astronomy and make it much easier to navigate through the control settings needed for astronomical viewing. While these programs made controlling the camera much easier they did not provide for image capture and processing.  Screen shot of the Sharpcap screen. Screen shot of the Sharpcap screen. As video cameras became more popular and amateur astronomers craved to go deeper, minimize noise, remove hot/warm pixels and save images more sophisticated software began to appear. In 2010 Robin Glover released a program called Sharpcap which was originally developed to simplify camera control and image capture for Webcams in place of existing programs like AMCAP. In 2012 Sharpcap was revised to work with additional cameras which eventually grew to include Basler, ZWO, Starlight Xpress, QHY, Celestron, Point Grey, almost all Webcams, cameras with an ASCOM driver and most frame grabbers. Sharpcap provides a simple layout with a live image along with camera controls all in a single screen view. Over the years Robin has added new features to the camera making it extremely useful for real time image viewing, processing and capture. These include on the fly dark frame subtraction, flat frame correction, image stacking, histogram adjustments, polar alignment, plate solving, focusing aids and more. There are both free and license versions of Sharpcap, with the later containing many of the more advanced features. Sharpcap may now be the most used software for real time viewing. Chris Wakeman and Steve Massey developed a program called GSTAR-Capture in 1998 for automated and manual capture of video AVI files. It included the ability to capture single frames and had faint object enhancement features including dark frame subtraction. A revised version, GSTAR 4 Capture was released later which added a favorite object, location and equipment database and the ability to record Universal time, RA, DEC, filter used, telescope, and focal length. This version also included a live histogram, occultation time stamping plus the GSTAR-COM camera control for a compete camera control and capture software package. Also in 2012 William Koperwhats developed the Miloslick software ($49) for many of the Mallincam cameras (Xterminator, Xtreme, VSS, VSS+, etc.). Like Sharpcap, Miloslick provides simple to understand camera controls along with a live image view. And like Sharpcap it provides image capture sequencing, on the fly dark frame subtraction, image stacking, histogram adjustments and more. Lodestar LIve is yet another similar program, developed by Paul Shear in 2014 specifically for the SX Lodestar, providing many of the same image capture and on the fly processing functions as Sharpcap and Miloslick but only for the Lodestar. Eventually Starlight Xpress (SX) bought the software and renamed it to Starlight Live and expanded its compatibility to several other SX cameras. 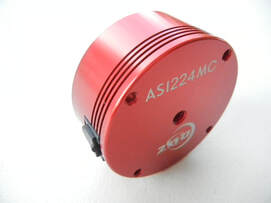 ZWO's ASI224MC. One of the first digital CMOS cameras widely used for CAV ZWO's ASI224MC. One of the first digital CMOS cameras widely used for CAV The Digital Revolution In 2015 Sony announced that it would cease production of CCDs by 2017 and concentrate on the less expensive CMOS technology which was beginning to match CCD performance and is widely used in commercial digital cameras. While security camera based analog video cameras capable for deep sky observing are still available from Mallincam, Mintron, Watec, Samsung, OCT and PD, there have been no new analog astronomy cameras coming onto the market since the Revolution Imager II and it is not likely that there will be. Instead there has been steady growth of the CMOS based digital cameras from the likes of ZWO, QHY, Starlight Xpress, ATIK, Altair Astro and Rising Tech. Mallincam, GSTAR, and OCT also have new digital cameras for real time viewing as well. Almost all of these cameras use CMOS sensors and all have much higher resolution and larger sensors than the analog cameras. When coupled with the latest software like Sharpcap (and others), real time viewing of the deep sky has evolved tremendously from its roots decades ago. That history is still being written, but you can read more about the early days of this digital revolution on my blog here: the-digital-revolution-in-camera-assisted-viewing.html The Video Astronomy Innovator Hall of Fame
If I were to make a list of those who have played a significant role in shaping the last 20+ years of amateur video astronomy the following would be my candidates. Steve Chambers: For leading the charge for extended exposure webcams Jim Ferreira: For creating the Yahoo Video Astro group and expanding the hobby SBIG Team: For setting the bar in 1999 with the STV John Cordiales & Jim Barot: For popularizing the modified security video camera Rock Mallin: For the 1st color video camera and continuous camera innovation Steve Massey: For his books on video astronomy and his GSTAR line of cameras Mike Fowler at OCT: For providing a low cost video camera kit for the beginner Stephan Lelonde: For providing one of the first camera control programs for free Robin Glover: For Sharpcap with real time on the fly processing William Koperwhats: For developing Miloslick SW for the Mallincam cameras Jim Turner: For creating the live broadcast site Night Skies Network in 2009 photo44 & David B in NM: For popularizing the DIY board camera  My first telescope was a 60mm Unitron refactor which I bought with money saved from my paper route when I was about 14 years old. At f/15 this refractor was designed for solar, lunar and planetary work which I did visually from my heavily light polluted back yard in Pittsburgh, PA. Dreams of deep space objects and trying my hand at astrophotography would have to wait many decades until I purchased my second scope, a 9.25" Celestron SCT. The SCT is a versatile telescope design which can be used for solar, lunar and planetary work at its native f/10 or higher with a barlow, or for deep space objects with a focal reducer at f/6.3 and lower. My 9.25" was used primarily for Camera Assisted Viewing (CAV),or EAA. It has good optics, is light weight, provides excellent aperture/cost and mine seemed not to suffer much from mirror flop or mirror shift. I have posted many images on this web site taken with the 9.25" and a variety of video cameras. (Keep in mind that CA or EAA is not about true astrophotography but is focused on real time viewing with a camera. It is understood that images captured with a video camera will never compete with those captured with a true astrophotography camera. Instead, the images serve as a "postcard" of each DSO visited and viewed in much greater detail with the camera in real time than what would be visible with an eyepiece only). 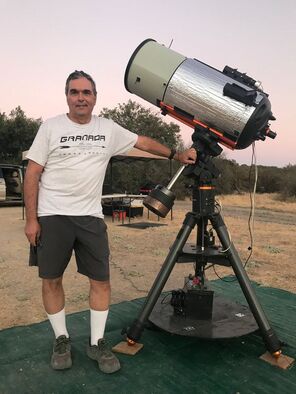 It only took a couple of years for me to succumb to "aperture fever" and order a second SCT, the Celestron 14" Edge with Hyperstar. The C14 obviously has a much larger aperture than the C9.25 which allows it to collect ~2.3X as much light. This allowed me to get much more detail and much higher magnification when viewing and imaging deep space objects. And with Hyperstar, which my particular C9.25 does not have, the C14 can achieve a focal ratio of 1.9 providing a very fast optical system which is ideal for CAV. See the photo below of the Sculptor Galaxy NGC253 taken with a Mallincam Xtreme video camera with the C14 Hyperstar at f/1.9. The exposure time was a mere 14sec, yet the image shows amazing detail for such a short time due to the very fast optics and the high sensitivity of the sensor in the Xtreme. With performance like this I referred to the C14 as my "Big Gun". Initially I planned to use the C14 only in my home observatory since it is nearly twice the weight of the C9.25. But, darker skies called and I began taking the C14 with me to my typical star parties, GSSP and CalStar. The "Big Gun" has been my companion at nearly every one of these star parties since 2012. 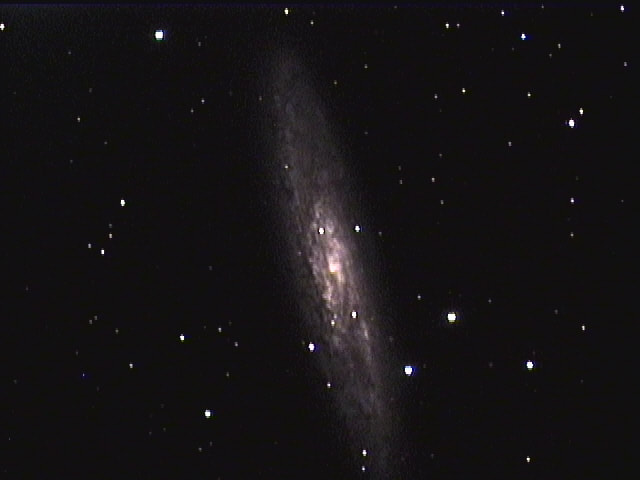 As my interest in CAV led me to more traditional astrophotography with CMOS cameras like the ASI 224MC and 1600MC, the C14 was the natural choice for an OTA. As I mentioned above, it's ability to go from f/11 (the C14 Edge is native f/11 instead of f/10) to f/7 withe the very expensive Edge focal reducer and to f/1.9 with the even more expensive Hyperstar adapter, makes the C14 a very versatile scope for astrophotography. Below is one of my first attempts at traditional astrophotography using the C14 in hyperstar mode with an ASI1600MC. The image is a stack of 116 x 30sec subs with dark frame subtraction and a stretch of the data to obtain the final image. At 46 lbs not counting any extra mounting plates, the C14 is a challenge to mount and de-mount without assistance. The fact that most of the weight is at the back end makes it even more difficult to maneuver into place. With age and after surgery on each of my shoulders, it was clear that my " Big Gun" needed a new home. While sorry to see it go, I was lucky to find a very experienced astrophotographer in my local astronomy club who could not only handle this massive scope physically, but could also put it to excellent use. While I still have my C9.25 I was not ready to completely give up on large apertures. So I immediately used the proceeds to purchase a C11 Edge which is only slightly heavier than my C9.25. I hope to be able to use this smaller, yet fairly large scope for many years to come as I work on my attempts to master traditional astrophotography. I expect to post images with this new scope, on this web site in the near future. 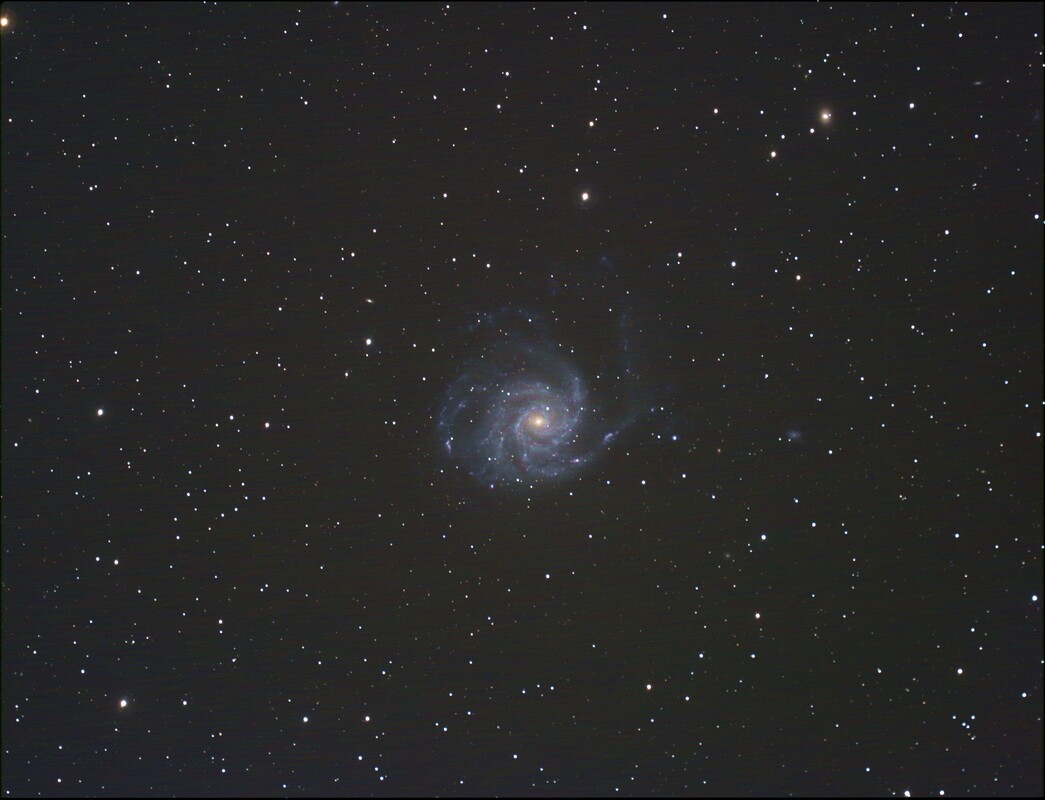 M101 116 x 30sec 200 Gain C14 f/1.9 ASI1600MC If you are interested in the Celestron 14" SCT you can find it and the accessories I used here: Celestron 14" Edge - if you can handle a telescope this size you will be amazed by what it can do. Hyperstar 14" - this turns your SCT into a Schmidt camera at f/1.9. Super fast and wide field 14" Hyperstar Metallic Dew Shield- I kept this on overnight with the Hyperstar attached Telrad Reflex Finder - I love this thing. So simple. I never use my 50mm finder As an OPT Affiliate I can earn from qualifying purchases through my site with no additional cost to you. This helps to defray the cost of this website.  The introduction by ZWO of their camera, the ASI1600, in early 2016 has been a game changer for Camera Assisted Viewing (CAV), also known as Electronically Assisted Astronomy (EAA) or Near Real Time Viewing. This camera was the first astronomy camera to use Panasonic's latest CMOS sensor, the MN34230. The 4/3 format sensor has 16.3 Megapixels (4644 x 3506), each 3.8 microns square with a total chip size of 17.6 x 13.3mm. The larger chip size has a diagonal of 22mm which provides a much larger field of view compared to the cameras commonly used for CAV . Compare this to the analog cameras from Mallincam which have less than 0.5 Megapixels and diagonals of only 6 and 8mm depending upon the camera model. Even the recent CMOS cameras like the ASI224 only has 1.2 Megapixels and a diagonal of 6mm, much smaller than the ASI1600. And with 3.8 x 3.8 micron pixels it provides high resolution images for excellent image detail. Additionally, this sensor supports extremely low read-out noise on the order of 1 electron which made stacking many very short exposures much more practical. This reduces the demand on the quality of the polar alignment and the mount tracking for a successful CAV session. With such a large sensor and 16 million pixels, this chip supports binning 1x1, 2x2, 3x3 and 4x4 which trades resolution for sensitivity by making the "effective" pixel size larger. This is also useful in tailoring the image scale (arc-sec/pixel) to different optical setups.  Panasonic's new sensor was quickly incorporated into new cameras from ZWO, QHY, Mallincam and others and soon took the CAV community by storm making these the new hot cameras to have. ZWO was the first to incorporate this sensor into its ASI1600 camera which came in both uncooled Color ($699) and Monochrome ($899) versions. The uncooled color camera is now discontinued, but still can be obtained on the used market. They later came out with a cooled Monochrome version ($1280) called the Pro with 2 stage cooling down to -40deg, a 256MB DDR3 memory buffer to help avoid lost frames during high rate data transfers, a USB3.0 port and a USB2.0 Hub to connect accessories such as a filter wheel, guider and a focuser. The camera also has an autoguider port in case you want to use it as a guide camera. 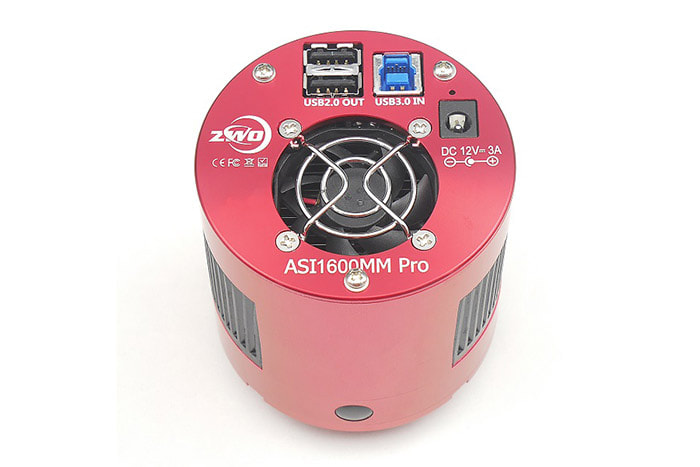  QHY and Mallincam soon followed with similar cameras of their own incorporating this new Panasonic sensor. The QHY163 comes in color ($899) and monochrome ($1199) versions and also includes 128MB of DDR memory, a USB 3.0 interface, guide port, two stage cooling to -40C cooling and a sealed chamber with a heated window to prevent dew from building up. Mallincam's SkyRaider DS16 comes in 3 versions, color ($999), monochrome ($1299), both with a fan for passive cooling and TEC version ($1700 color, $1900 monochrome) with active cooling. They all have a USB 3 interface, a sealed chamber, DDR memory and a full featured software, Mallincamsky, for camera control, capture, live stacking and dark frame subtraction. The TEC version includes a USB Hub and a heated window for dew prevention. Both the ZWO and QHY cameras use the free software Sharpcap which performs all of the same functions as Mallincamsky and much more if you pay for the Pro version, but that is a topic for another blog. There are still more versions of cameras incorporating the Panasonic 4/3 chip, but I will not list all of them here.  These new cameras appear to have had two major impacts on the way we do real time viewing.
First, if you read the threads on the Cloudy Nights forum, you will see that many amateur astronomers have moved away from the long exposures of 30 sec to minutes common with the security type astronomy cameras like the Mallincam Xtreme and Xterminator or the Revolution Imagers 1 and 2. With such low read-noise it is now practical to use programs like Sharpcap to stack many very short exposures of a few seconds on the fly to get as good or better image after 30sec to minutes but with less demand on the quality of the mount and the polar alignment. In fact, Alt-Az mounts become even more practical for CAV with such short exposures and the use of an on-the-fly stacking program. This can both minimize the cost of the setup and reduce the overall hassle in getting a good polar alignment. Obviously, a better mount and more time spent on a good polar alignment will improve the experience, but less so with exposures of 2 to 5 sec which is now practical with this new sensor. Second, since the pixels are square not rectangular stars are round unlike their appearance with CCD analog cameras and they do not have the black halo common to stars in images taken with analog cameras. Also, with pixels about 1/3 the size of the pixels in analog cameras much more detail can be seen in galaxies and nebular with the new sensor. Images obtained are of much higher quality than ever before. The net result appears to be a move by many CAV folks more and more in the direction of traditional astrophotography. It has become increasingly the case that dark frame subtraction and even flat frames are both employed with on-the-fly stacking to get the best possible image. The ideal case is to be able to view the image in real time to get the immediate enjoyment of observing deep sky objects, while saving individual frames for later post processing to obtain an astrophotography quality image. In fact this can be done with Sharpcap using the Live Stacking feature while selecting the option to save individual frames in FITs or PNG format for later post processing. As is always the case, time marches on and even newer products come to market. It appears that the successor to the ASI1600 is the ASI294 with the Sony IMX294 CMOS chip. It too is a 4/3 sensor with extremely low read noise. Even thought it has less pixels at 11.7 Megapixels, the major new advantage of the ASI294 is it's much deeper well which provides a significant advantage for dynamic range. Perhaps a topic for a later blog. I have been using the ASI1600MC for the last two years and am very happy with it. However, only the mono versions are still available. My astro buddy uses the ASI294MC color cooled version and has had great success with it. You can find the products listed in this blog in the links provided below. As an OPT Affiliate I can earn from qualifying purchases through my site with no additional cost to you. This helps to defray the cost of this website. ZWO ASI1600MM Uncooled - this is the mono version of the camera I have ZWO ASI1600MM Pro - cooled mono version of the camera I have QHY163 - QHY's cooled version of the color camera I have ZWO ASI294MC Uncooled - this camera is one of the most used cameras for EAA ZWO ASI294MC Pro - this is the cooled version of the 294 Revolution Imager II - analog camera which I have used and reviewed elsewhere
Until recently the only way to view deep sky objects in real time with the assistance of a camera was with one of the many analog cameras like those from Stellacam, Mallincam, Altair Astro, Samsung and a few others. These security cameras re-purposed for astronomy have very sensitive CCDs which can collect enough light in a few seconds to a few tens of seconds to provide stunning views of a wealth of deep sky objects. Some of these cameras have been modified to provide improved astronomical performance. These may include extended exposure, reduced amp glow, sensor cooling, remote control and more, while other cameras like the Samsungs have no astronomy modifications at all. In either case, they provide the user with many important advantages over the traditional view through an eye piece such as:
Mallincam Xtreme, LnTech 300, Samsung SCB2000, AVS
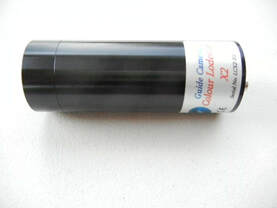 Starlight Xpress Lodestar X2C Starlight Xpress Lodestar X2C
Since these are analog cameras, they provide a video signal which can be viewed directly on any video monitor, LCD or television with a video (RCA) input. All that is needed is the appropriate cable and connector. Images can also viewed on a computer if the video signal is connected to the computer through a video capture device like the Pinnacle Dazzle or EzCap. Using a computer has the added advantage of allowing the user to capture images, as well as, utilize fancy software programs to stack frames on the fly, remove hot/warm pixels with dark frame subtraction and perform other miraculous feats to greatly improve the detail in the image being viewed live.
Somewhere around 2009, people discovered that the Starlight Xpress Lodestar guide camera was actually a very good camera for viewing deep sky objects in real time. This camera uses the PAL version of the same very sensitive CCD sensor as the Mallincam Xterminator, the Sony ICX829. While the Xterminator is another analog camera, the Lodestar is a digital camera with a USB output which can be connected directly to a computer without a video capture device. And, unlike the analog cameras which need separate cables for power, signal and control, this digital camera uses the single USB cable for all three functions. On the other hand, since the output is digital it cannot be connected directly to an LCD or other analog display device and needs a computer to control the camera and view its output. The Lodestar is controlled with Paul Shears software, Lodestar Live (now called Starlight Live) which also provides the ability to view, capture, stack and stretch images live while watching them improve in depth and detail. Despite these capabilities, most real time viewers seemed happy to continue to embrace their analog cameras including several newer and better cameras like the aforementioned Mallincam Xterminator, the LnTech300 ( also sold as the Revolution Imager 1) and the Revolution Imager 2. 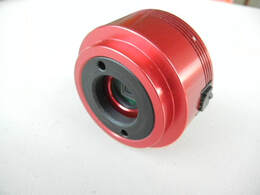 ASI224 w/1/3" Sensor ASI224 w/1/3" Sensor
Then, in 2015 a company in China called ZWO introduced an astronomy camera with a CMOS sensor, the Sony IMX224. Their ASI224, like the Lodestar, is a digital camera but with much higher resolution than the Lodestar and all of the analog cameras while maintaining very good sensitivity. The ASI224 is controlled with a software program called Sharpcap, which has all the same features as Starlight Live and more. Even though the ASI224 has a small sensor, 1/3", it has 1.27 Mega pixels, more than double the Lodestar and all astronomical analog cameras. And, its square 3.75 micron pixels are less than half the size of the typical analog camera pixels which provides more detail and more realistic looking stars, i.e. round instead of square. In addition, the read out noise of the ASI224 is so low as to make it much more practical to perform live stacking of many very short exposures (2 to 5 sec) with a program like Sharpcap. This minimizes the demands on mount alignment and makes it more practical to use Alt-Az mounts for real time deep sky viewing. The relatively inexpensive ASI224 (originally $350) fast became a favorite of many who had been using the analog camera and soon other manufacturers like Mallincam, QHY, Rising Tech, Orange County Telescopes, Altair Astro came up with their own versions of cameras with the Sony IMX224 CMOS sensor.
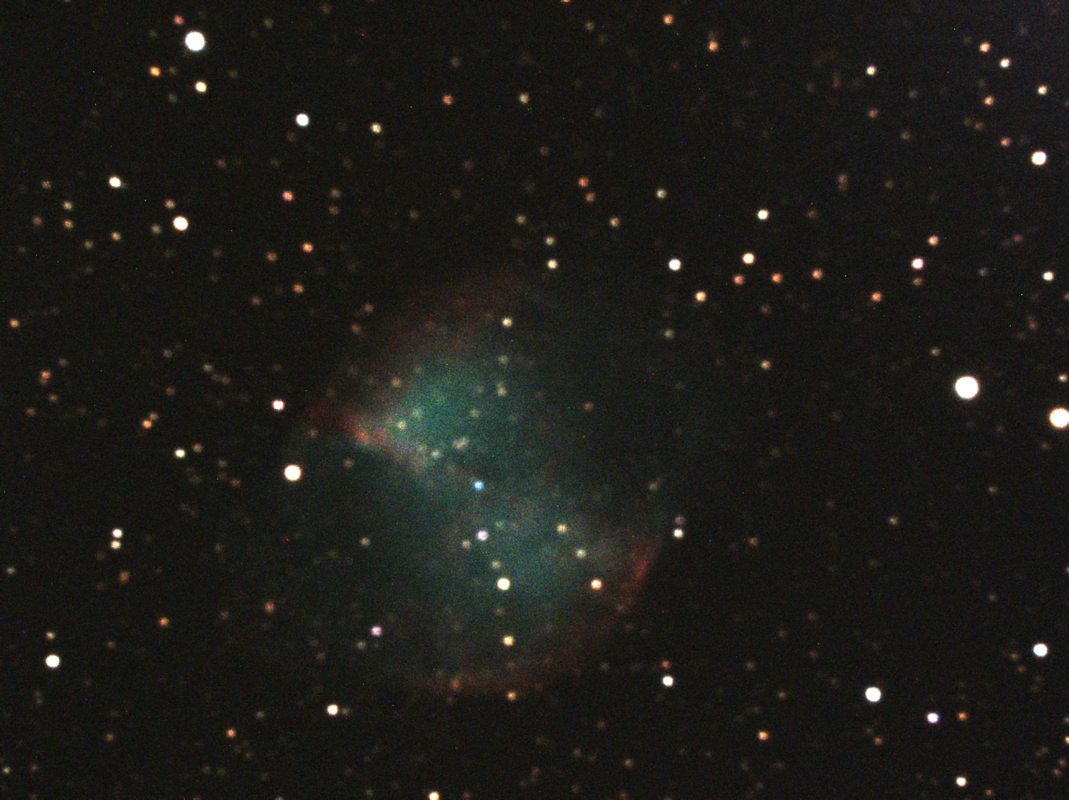
M27 w/ASI224MC. Single 20sec frame at 400 Gain Celestron 9.25" SCT
 Atik Infinity Atik Infinity
Within just a few months, two other digital astronomy cameras for real time viewing became available. One is the well regarded camera from Atik named the Infinity. This camera uses the Sony ICX825 CCD sensor with 1.4 Mega pixels which are slightly larger at 6.45 microns than the IMX224. This is also a 2/3" sensor which provides a much larger FOV at 11mm diagonal compared to the ASI224 at 6mm. It comes with the highly acclaimed Infinity software with all of the same great features for live viewing as the Lodestar software. In fact, the Infinity was the first ATIK camera marketed as a "video camera". Even with a substantial price tag of $1000, the Infinity became very popular particularly as it is noted for its ease of use, especially for beginners.
Around the same time StarLight Xpress came out with their own camera using the ICX825 sensor called the Ultrastar which uses the Starlight Live software just like the Lodestar. And it was not long till Mallincam came out with their version of an ICX825 camera called the StarVision. While the Infinity, Ultrastar and StarVision use CCD sensors as opposed to a CMOS sensor like the ASI224, they all are digital cameras with a single USB output. With these cameras widely available in late 2015 or early 2016, one could say that the floodgates were suddenly opened to digital cameras for real time astronomy. 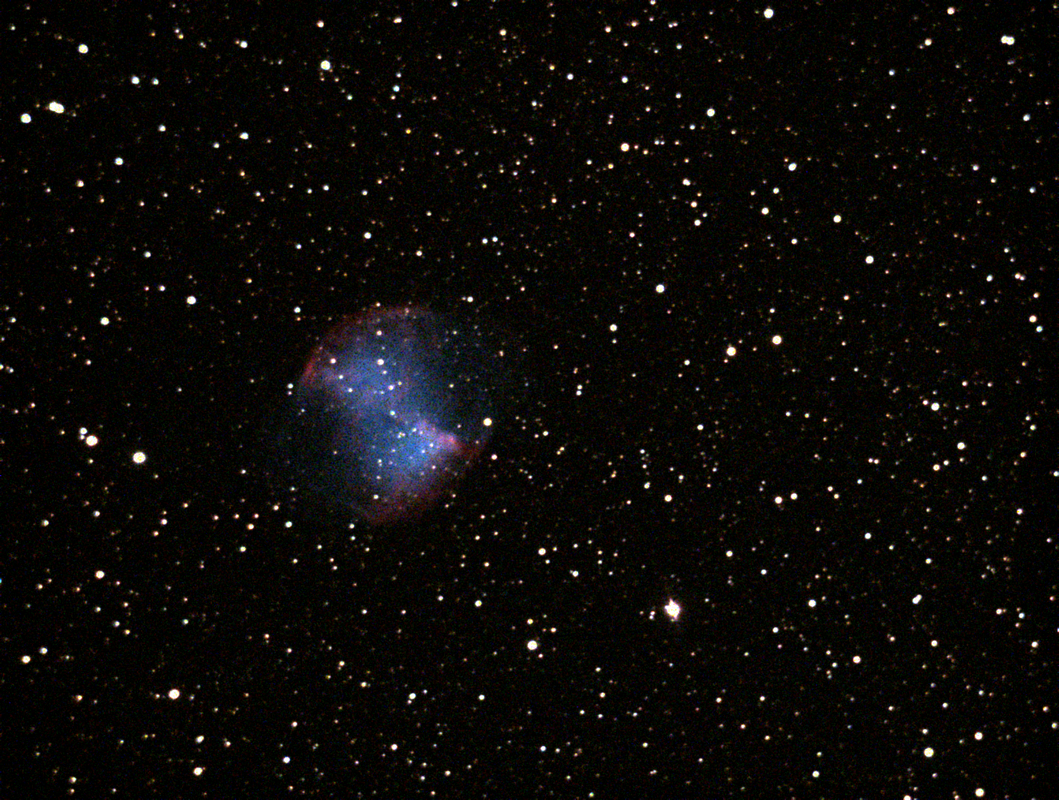
M27 w/ASI1600. Single 27sec frame at 350 Gain. 9.25" SCT
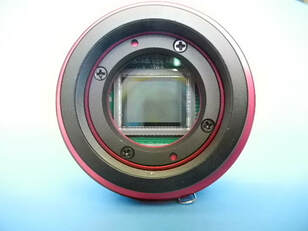 ASI1600 w/ 4/3" Sensor ASI1600 w/ 4/3" Sensor
Not to be outdone, ZWO came out with another digital camera in the spring of 2016, the ASI1600 camera utilizing the Panasonic 4/3" CMOS sensor with 16 Mega pixels. This was a quantum leap in field of view compared to the 1/3" IMX224. The ASI1600 came in color, B&W, cooled and uncooled versions. Atik followed with their own version of this sensor called the Horizon. Both cameras have extremely low read noise, making them ideal for stacking of very short exposures. It was not long before Mallincam also came out with a camera, the DSC16, which uses the Panasonic 16Mega pixel sensor. Camera manufacturers try to differentiate themselves from the pack using identical sensors by providing unique mechanical form factors, added internal memory, different methods of cooling and different software. More recently, ZWO (ASI294) and Mallincam (DS10c) have come out with digital cameras for camera assisted viewing using the latest Sony 4/3" format IMX294 sensor. The IMX294 is a CMOS sensor with 11.7 Mega pixels and very good light sensitivity.
Judging from the posts on the Cloudy Nights "EAA Observation and Equipment" forum, digital cameras are now the new norm for camera assisted viewing. This is not to say that analog cameras are long gone, but do not expect new models to be introduced as all of the manufacturers appear to have shifted to digital cameras. Analog cameras will still have their place so long as they are available new or used, but it is clear that the digital wave has taken the forefront.
I have been using the ASI1600MC for the last two years and am very happy with it. However, only the mono versions are still available. My astro buddy uses the ASI294MC color cooled version and has had great success with it. You can find the products listed in this blog in the links provided below. As an Amazon Associate I can earn from qualifying purchases through my site with no additional cost to you which helps to defray the cost of this website.
Just what is live stacking? Live stacking is the process of averaging successive frames of an object such as a galaxy, nebula, star cluster, etc. to improve the signal to noise ratio (SNR) while watching the stacked image quality improve right before your eyes in real time. Live stacking has become a common technique employed by amateur astronomers engaged in deep sky video astronomy (also called Electronically Assisted Astronomy, Near Real Time Viewing, Camera Assisted Viewing, etc.). The SNR is improved because noise is random and signal is fixed. So, for a given pixel within the sensor, noise varies from frame to frame randomly while the signal remains fairly constant. Therefore, when multiple frames are averaged together, the noise mostly cancels out while the signal remains relatively constant. Thus, the SNR goes up and the image shows more detail and the background sky has a smoother, more uniform appearance rather than the grainy appearance usual in a single frame. In other words, the image looks a lot better. The more frames averaged the better the image appears, up to a point.
There are two kinds of live stacking used: 1) in-camera stacking; 2) stacking with a computer and specialized software program. Let's discuss these one at at time. In-Camera Stacking In-camera stacking is available on some of the more recent analog video cameras but not on any of the digital cameras like the many CMOS cameras that have become available in the last few years. Analog cameras like the Revolution Imagers 1 & 2 (RI1 and RI2), Mallincam Micro and the LnTech 300 can do live stacking internally without the need for a computer. All of these cameras are security cameras which are used for astronomy, but are not purpose built for astronomy. In low light conditions the camera images can have a very grainy appearance making it hard to distinguish features such as license plates and people, which also means less ability to make out details in faint nebulae and galaxies. Security camera manufacturers combat this problem with Digital Noise Reduction (DNR). There are two types of noise reduction, 2D-DNR and 3D-DNR. With 2D-DNR the camera has an algorithm to compare the signal at each pixel relative to the signal at the same pixel in successive frames to identify and reduce noise by averaging the signals for each pixel frame to frame. 2D-DNR is a temporal noise reduction method since it looks at the time averaged variations. The drawback to 2D-DNR is the potential to blur images for moving objects. Such would not be a problem for astronomical use cases, but, once again, these cameras were created for video surveillance applications and are only being adapted to astronomy applications. To eliminate blur another DNR algorithm called 3D-DNR was developed. 3D-DNR combines the temporal noise reduction from frame to frame of 2D-DNR with spatial noise reduction within a frame by examining and comparing the signal at neighboring pixels to further reduce the overall noise within an image. 3D-DNR is more effective in reducing noise and improving image clarity and detail than 2D-DNR. The DNR feature within the camera menu allows one to turn this type of noise reduction on or off. The RI1, Micro and LnTech 300 cameras use 3D-DNR while the RI2 does not specify either 2D or 3D. I would assume that it is also 3D since it is the newest of the cameras. When turned on, the user specifies the number of frames to average from 1 to 5 (RI1, Micro, LnTech 300) or 6 (RI2). When DNR is off, the camera does no averaging and what you see on your monitor is just a single frame exposure. So, as an example, let's assume that DNR is turned on with frame averaging set to 4 frames. And, let's assume that the exposure is set to 5 sec. After 5 seconds, the camera has captured its first frame which it sends to a buffer and outputs this same frame to an attached video monitor at a rate of 60 (NTSC) or 50 (PAL) frames per second. We see the same image until the next 5 sec exposure is finished. At that point, the camera performs the DNR algorithm on the 1st and 2nd frames and stores the result, an average of both frames, in the camera buffer and simultaneously outputs this to the monitor. When this happens, we will see an improvement in the image quality. This processes is repeated for the 3rd frame, this time the image we see is an average of 3 frames and once again with the 4th frame. The image quality continues to improve after each frame until we reach the end of the 4th frame. If the camera is allowed to continue to run with no changes in exposure or DNR settings, the 1st exposure will be discarded and the 5th exposure will be averaged with the 2nd, 3rd and 4th exposure and placed in the camera buffer as well as out put to the monitor. This image averaged over 4, 5 sec frames has taken 20 sec to complete. In general, once the maximum number of frames has been reached, 4 in this example, the image will not get any better. However, if for instance a satellite trail passes through the field of view during one of the frames, it will be eliminated once 4 new frames have been taken after the passing of the satellite. This averaging process will continue with each new frame replacing the oldest frame in the sequence until the exposure is stopped. In-camera stacking is a simple and convenient way to greatly improve the image you see on your monitor without a computer and additional software. And since the camera is continuously outputting frames you get to watch the image improve live. However, in-camera stacking has two limitations. First, it will only support 5 or 6 frame averaging depending upon which camera is used. This greatly limits the amount of improvement to be had since there are many very faint objects that would benefit from averaging over many additional frames. Second, the camera does not make any allowance for the object to drift within the field of view from frame to frame. In other words, there is no alignment of the frames being stacked as the camera algorithm assumes the image does not move. This is fine for surveillance applications, but for astronomical use cases objects can drift within the field of view if the telescope is not perfectly aligned with the polar axis, or one is using an Alt-Az mount. In this case, stars can tend to become elongated as the successive frames are averaged. It all depends upon the exposure time, number of frames selected for DNR and the mount type and setup. For instance, the maximum exposure of the Revolution Imager 1 is 20.48sec and the maximum DNR setting is 5, so this would mean the object would have to remain fixed in the field of view for 102.4sec. If one was using an Alt-Az mount it is virtually certain that the stars will appear elongated and not round. For the Revolution Imager 2, the maximum exposure is 5.12sec and the maximum DNR setting is 6, so the maximum total exposure would be about 31sec which would probably not show appreciable star trailing even with an Alt-Az mount. Stacking with a Computer Now, lets suppose you want to use a computer and software to do live stacking. One advantage of this method is the fact that you can stack as many frames as you like to bring even more detail and sharpness to the image. Another advantage is that the software aligns each successive frame to the first which can avoid star trailing for stacks of 10min or more without guiding when using a polar aligned EQ mount. The maximum time without star trailing depends on the quality of the polar alignment and the mount capability. In addition to stacking frames, most software also allows one or more of the following: dark frame subtraction: flat frames; and a histogram to stretch the stacked image. Computer stacking is a necessity for all of the digital cameras since none of them has the capability to do in-camera stacking. Examples of these are the USB cameras from ATIK (Infinity), ZWO (ASI224/1600/294, etc.), QHY (Horizon), Mallincam (SkyRaider) and Starlight Xpress (Lodestar, Ultrastar). Computer stacking can also be used with analog cameras even if they have their own internal stacking function. In the later case, it is best to turn off in camera stacking if you are using computer stacking. Computer stacking is a little different with a digital camera compared to an analog camera since a digital camera only outputs an image when an exposure is complete, whereas, an analog camera outputs an image at 60 or 50 frames/sec. Lets discuss stacking with a digital camera first. With a digital camera the output USB cable is connected to the USB port on the computer. This allows the software to control the camera functions like exposure, gain, cooling etc., preview an image, capture an image and perform live stacking. Some software works natively with certain cameras which means that the software will simply recognize the camera and provide control for all of it's functions. This is true for Sharpcap and the ZWO, Altair Astro, QHY, Starlight Xpress and a few other cameras. The Starlight Xpress Lodestar and Ultrastar cameras also work natively with Lodestar Live, while the Atik Infinity camera works natively with the Infinity software, and the Mallincam SkyRaider cameras with the MallincamSky software. If the software does not natively support one of the cameras, it likely will support the camera through an ASCOM driver but may not support every camera function. Now, as an example of live computer stacking with a USB camera, consider an exposure setting of 5 sec. The camera outputs a new image every 5 sec to the computer. The software aligns each successive image to the first by translating and rotating the images to match. This continues until the user stops the stacking process. So, if stacking is allowed to run for 20 frames, the total stacking time is 5sec/frame x 20 frames = 100 sec. If dark frame subtraction is turned on, the appropriate dark frame from a dark frame library is subtracted from each frame prior to stacking. Similarly, if the software supports flat frames, flat frame scaling takes place on each captured frame prior to stacking. Also, the user has access to a histogram during the stacking process where adjustments to the black and white levels can be made on the fly to improve the detail captured. At the end of the stacking process, the user has the option to save the stacked frame. Computer stacking with an analog camera is identical to what has just been described except for two things. First, the camera's output must be connected to an video capture device which digitizes the image and outputs that on a USB cable to the computer via its USB input. Second, the analog camera sends out frames at 60 or 50 frames per second regardless of the length of the exposure. So, if the exposure is set to 5sec as before, the camera will output 60 (or 50) frames x 5 sec = 300 frames from the first 5sec exposure before it starts to output a new exposure. All 300 frames will be stacked regardless of the fact that these are essentially identical frames. The computer software has no idea whether the individual frames are identical or not since it does not see the camera but only sees the video capture device and has no idea what the camera exposure time is set to. Thus, for the same 100sec stack, there will be 60 (or 50) frames/sec x 100sec = 6000 frames in the stack. The computer just sees each frame as it arrives and diligently stacks them all. The fact that the analog camera is outputting 60 (or 50) identical frames for each 5sec exposure is not really a problem. In fact, because the signal is analog, it is prone to pick up noise in the interconnecting cable between it and the image capture device which digitizes the frames. This noise will be random so, in fact, the 60 frames/sec are not completely identical and the fact that they are all stacked together further helps to improve the image SNR. An exception to this is the MiloSlick Mallincam Control software which can do all of the live stacking functions described above, but can also be synchronized to the actual exposure time of the analog camera so that it will stack only new frames output at the end of each complete exposure time. This software was designed to work with a variety of Mallincam analog cameras such as the Xtreme, the Xterminator and others. So, that is how live stacking works for both analog and digital cameras using either in-camera stacking (if available) or stacking with a computer. No matter what method used, live stacking is a powerful tool to greatly improve the quality of the deep sky objects we view in real time.  Image Credit John Pierce Image Credit John Pierce I must first explain that I have only attended 2 different star parties in my lifetime, Golden State Star Party (GSSP) and CalStar. I have attended both many times over the last 10 years. You can read my August 2016 review of GSSP in the blog archives. Today, I will discuss CalStar since I just returned from another successful and enjoyable event just two weeks ago. Calstar is a very informal star party which is held at the Lake San Antonio campgrounds in southern Monterey County. What does that mean? It means that there is no registration, no scheduled star party events, no speakers, no vendors, no hospitality tent, no on-site food, etc. But, there are dark skies and great people to share them with. CalStar is sponsored by the San Jose Astronomical Association and the Left Coast Observers (the people who put on GSSP). They decide on a date, post it on the CalStar web site (calstar.observers.org/ ) and people just show up. It's not free, you do have to pay the park camping fee which is around ~ $32/day for dry camping ($27/day for seniors). The star party is held during the new moon, of course, in Sept or early Oct. When the park was closed due to drought recently, the star party was moved to a nearby religious retreat but it is now back at Lake San Antonio. And, starting this year, a spring CalStar was added in April. I would estimate that Calstar attracts 100 people tops, sometimes less. Set up is in the "Overflow" campground which is a nice name for what once used to be a ball field but is now a dry, dusty open area. This is where most people set up. This is the strict light enforcement area with most visual observers setting up here. The open area provides a clear view of the skies in all directions with nearby hills and trees limiting views only at very low altitudes. The ground is dirt which is typically dust in the fall given the fact that no rain will have fallen for 5 months. There is a band of trees off to the west which provide shade during the day but do not interfere much with sky views.  There is an section just to the east of the ball field which is about twice as large interspersed with open areas, trees and bushes. This is the late arrival, early departure section with less strict light enforcement so the people set up here are fewer and further in between. There are porta potties and some old beat up but serviceable picnic tables in the overflow campground. There are also spigots with water which must be boiled before use. No open fires are permitted due to the fire danger, but camping on propane stoves set off the ground is ok. The nearby Redondo Vista campground has bathrooms and shower houses. There are also RV pads with power hookups. This time of year the park is not too densely populated so one can use the power outlet at an empty RV site to recharge their batteries during the day. The park also has some cabins for rent down by the lake. Most people dry camp in tents, cars, trucks or RVs in the overflow campground. There is a gas station and a small store down by the lake. The store has water, ice, propane and a very limited selection of groceries due to the star party being held at the end of the camping season. There is a full service grocery store just 20 minutes west of the park at a shopping plaza called Heritage Park. It also has a gas station, pizza parlor and coffee shop. The pizza parlor is a great place to visit in the afternoon to cool off when it gets hot, have a salad, burger, sandwich or pizza and watch some sports on the TV, sit and talk with friends, work on your image processing or surf the internet. Paso Robles is 34 miles to the southwest of the park which takes about 40 to 45 minutes to get to. It has a Walmart, Target, several supermarkets, gas stations, restaurants and a nice library, a park and a movie theater. The weather is typically very hot during the day, in the 90s and even reaching 100 degrees. Night time temperatures are usually in the low 50s or 40s, but I have been there when the temperature dropped into the 30s. It has never rained while I have been at CalStar. You will see jack rabbits, deer and the occasional rattle snake or wild pig in the park. The park has lots of hiking trails and, when the lake is full there is a beach where you can swim in the lake.  The skies are very dark, I measured 19.74 to 20.11 with my SQM over many different trips. There are some small light domes in the direction of Paso Robles and King City, but these are very low in the sky and not much of a problem. The seeing is usually very good with steady skies being that the park is not far from the ocean as the crow flies. Now that there are two Calstars every year I look forward to the opportunity to have dark skies and good seeing conditions for the different deep sky objects visible in the spring and early fall. 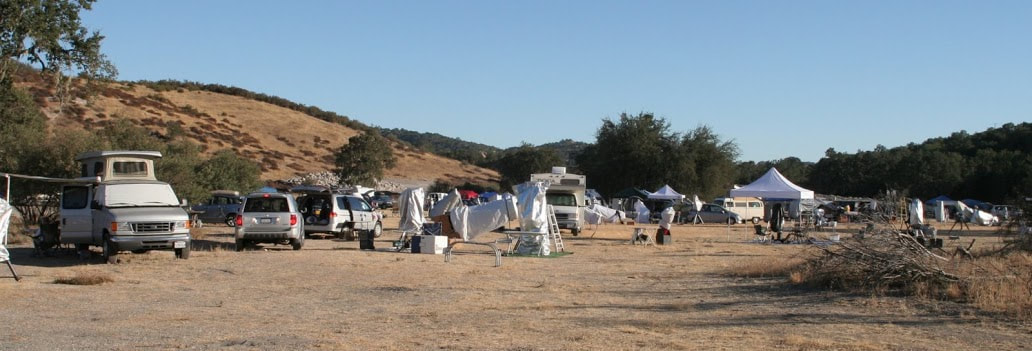 Image credit John Pierce 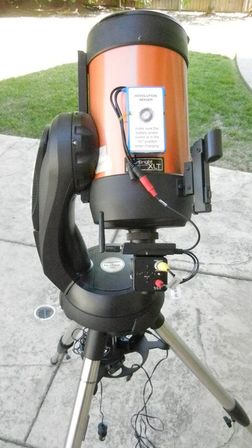
Many people who do video astronomy like the option of keeping things as simple as possible. This is one reason to choose an analog video camera at a time when many are moving to digital video cameras like those from ZWO. The analog cameras do not require a computer unlike the digital cameras. An analog camera only needs a video display device which will accept an analog input. A light weight 7" or 9" LCD will suffice for viewing by 2-3 people. Simply connect a video cable between the camera and the display to view images. The camera can be controlled with the 5 control buttons on its back, or with a hand control if the camera is configured for one.
But what if you want to ditch the video cable and LCD monitor to further simplify the setup? That is quite easily done with a WiFi Emitter and your phone or tablet making the gear requirements including power all that much simpler. The WiFi Emitter connects to the camera analog video output and is compact and lightweight enough to be attached to the telescope with the accompanying double sided adhesive. It can be powered with the same 12VDC battery used to power the camera further minimizing the number of required cables. If both the WiFi Emitter and battery are attached to the telescope there will be no need for long cables nor any concern about cord wrap or snags on the mount, etc. The WiFi Emitter works with Android and Apple devices, both phones and tablets and is very simple to setup and connect. With this you can view your video images on your cell phone or tablet completely untethered by cables over distances of 150ft or more depending upon intervening obstacles. I was able to connect to my camera in the back yard from inside my house. If you also have WiFi control for the telescope mount, say through Sky Safari or similar, this setup makes for a very comfortable viewing from inside your home. 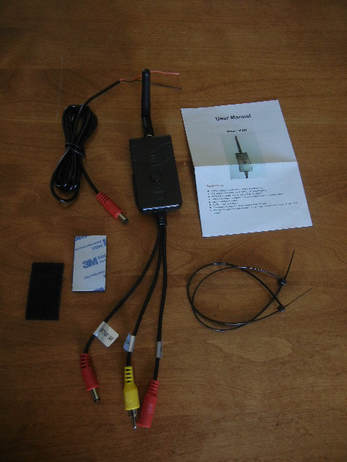
You can get a WiFi Emitter from Orange County Telescopes (OCT), the home of the Revolution Imager 1 and 2, for $90. If you are more of a DIY person you can obtain one on Amazon for less than $40 if you search for"AV WiFi Emitter". The WiFi emitter comes with 3 short cables hard wired to the unit, a screw on antenna and an instruction book. The one I bought from Amazon also came with double sided tape which I used to attach the emitter to my camera but you could also attach the emitter to your scope instead. It also included plastic cable ties and another power connector in case I wanted to hard wire the power input to a power source. The emitter sold by OCT does not have the tape, cable ties nor the extra power connector but does include an RCA to BNC adapter which is needed to connect the emitter to the camera. If the emitter you purchase does not have this adapter, you can purchase one on Amazon for a couple of dollars.
The emitter has three short cables. The yellow cable connects to the video output of your camera. This cable has a male RCA jack so you will need an RCA to BNC adapter to make this connection. The other two cables are red and are for the power connections from the battery and to the video camera. Connect the power from your battery to the red input connector which has a female DC plug and connect the other red cable with a male DC plug to the power input of your camera. The WiFi unit runs on 9 -30V DC so a simple 12V battery used to power your analog camera will suffice to power it as well. 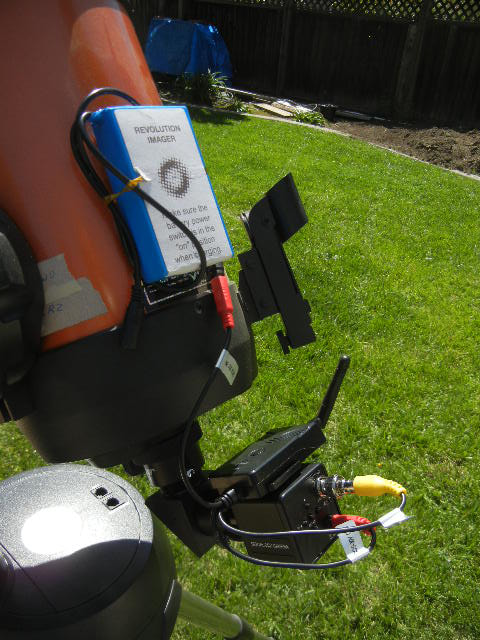
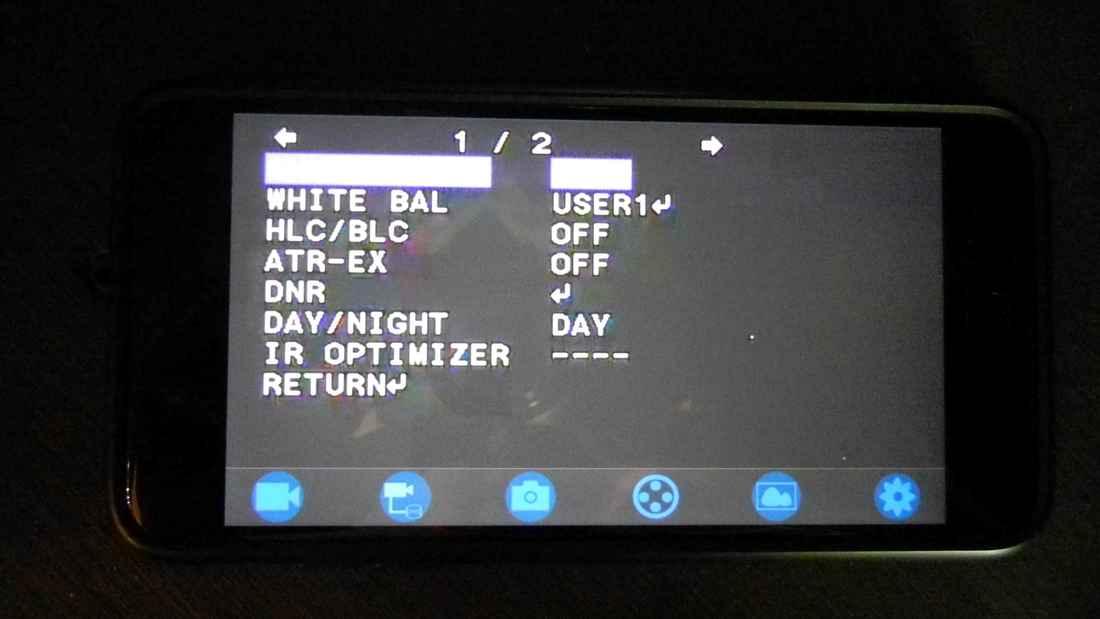
A one time setup of the required software is necessary to get started. Using you phone or tablet connect to your APP store, simply search "WIFIAV" software and install it. For iPhones and tablets this would be the Apple Store and for Android phones and tablets this would be the Google Play Store. You will see an icon on your phone that looks like the emitter broadcasting a signal from the antenna. This is the app you will need to launch whenever you want to connect wirelessly to the camera.
When you are ready to connect to your camera, turn on the power to your emitter and camera and you should see the Red LED on the emitter light up. Next, push the button on the emitter and you should see the green "Link" LED on your emitter light up. Now go into your phone or tablet settings and connect its WiFi to "WIFIAV". You may need to type in a password the first time you connect which is probably "12345678", and will be included with the instructions which came with the emitter. Launch the WIFIAV app on your phone or tablet and you will see a screen with 6 blue icons at the bottom and an image from your camera if you are already pointed to an object and focused. Or, you may see the camera menu screen if you have enabled that. Shown here is the camera menu for the Revolution Imager 2. At the bottom of the screen are 6 WiFi controls to capture a video, record to a DVD, save an image, check the emitter signal, go to a file folder which contains the saved images and videos, and change settings. If you plan to only view images live you need not use any of these. If you would like to save images to your phone or tablet just click on the camera icon. You can retrieve these using the file folder icon. 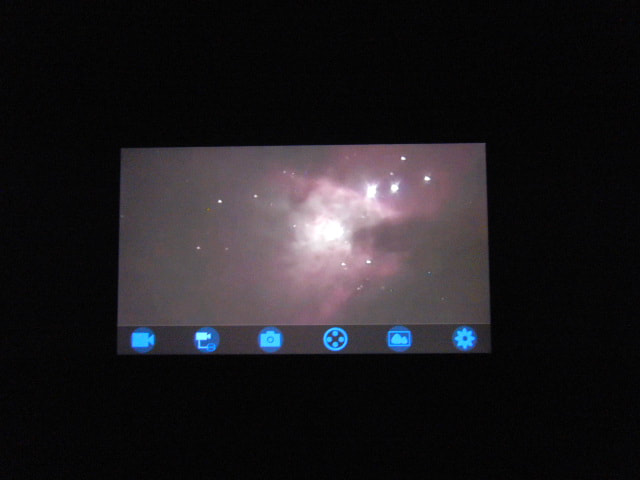
You are now ready to view images from your camera remotely. Just move your telescope to the object of interest and adjust the camera settings as you normally would and you are ready to view objects from planets to DSOs wirelessly on your phone or tablet. While this device makes wireless viewing a simple reality, I have to say that the image quality is definitely not as good as what I can see with the video hard wired to an LCD. I believe there is some video compression which occurs in the wifi transmitter which causes this. Nonetheless, this device enables one to step away from the telescope, view effortlessly from inside or walk around at a public outreach event and share images live without having to crowd around the telescope.
You can find the WiFI discussed in this blog and which I use in the link provided below. As an Amazon Associate I can earn from qualifying purchases through my site with no additional cost to you. This helps to defray the cost of this website. 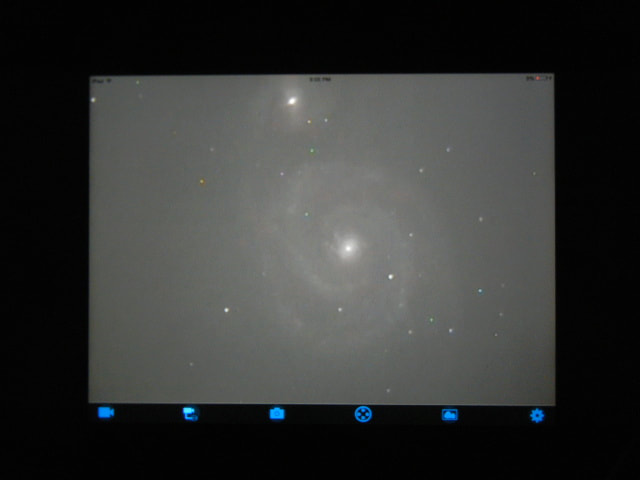
What makes a great star party is a broad question that varies from person to person. However, there are some features which most everyone would agree are essential for a great star party. These would include dark skies and good observing weather. Fortunately, the major star party sites are chosen specifically for their dark skies. Some, like the Okie-Tex, Texas and Nebraska star parties are noted for their extremely dark skies. Weather is another factor which weighs heavily in the minds of star party organizers. That is why you will find the majority of major star parties occur during the months of June-September when the weather is warm and snow is a forgotten memory. A key exception is the Winter Star Party held every February in the sunny and warm Florida keys. There are a lot of other things which distinguish one star party from another which I will divide into 6 areas:
1. Observing Conditions 2. Observing Field 3. Typical Weather 4. On Site Facilities 5. Local Area Amenities 6. On Site Activities Observing conditions include sky darkness, seeing, light domes, 360 degree clear views, altitude, total hours of astronomical twilight, and number of days the star party is held. Star party sites are typically located away from major cities in in order to provide the darkest skies possible. Sometimes, light domes from nearby small towns can limit visibility in certain directions, but this is usually not a major problem. Clear views in all directions will depend upon the star party proximity to nearby mountains/hills and the presence or lack of shade trees onsite. Since most star parties take place in the summer months, there are significantly less hours of darkness compared to the winter months so it is helpful to have many nights over which to take advantage of the dark skies. Aside from weekend star parties, the major star parties are usually held for 5 days or as long as a week which gives plenty of time to enjoy the dark night skies and daytime activities. Observing Field features include the size of the observing field and camping area, type of field surface (grass, dirt, hard/soft), availability of shade, and grade of the field. Large observing fields are necessary for plenty of room between individuals for tents, shelters, and cars/trucks/RVs. It is also important to have a fairly level surface for both the telescope and for sleeping. While I have never attended the Nebraska Star Party (I do hope some day to attend) the video on their web site shows that they offer a lot of fairly flat open space for observers to spread out and great unobstructed 360 degree views. The two star parties I regularly attend, Golden State Star Party (GSSP) and CalStar, are held on large, flat fields which provide plenty of space. But both are dirt fields which tend to generate lots of dust. When I get home I have to wipe down all my equipment before I bring it back into my house. I look forward some day to attending a star party on grass. GSSP has no trees to obstruct views, but that also means no shade other than what we bring with us. On the other hand, CalStar has trees scattered throughout which help a lot during the day but can limit sky views. It is a good idea to bring a pop up shelter like an EzUp to provide shade during the day. Many people also use a shade cloth like aluminet which they put over the EzUp, a tent, car, etc. to further cut down on the sun's heating. Aluminet can be found on line, for example www.shadeclothstore.com/depts/aluminetshadecloth.html. This allows you to sleep longer in the morning or stay more comfortable in the afternoon sun. Most star parties provide for sleeping and parking next to one's equipment which is a definite advantage, but some do not allow driving on-off the observing field during the day. This limits the ability to drive to surrounding points of interest and stores during the day, or forces one to park their car away from their setup. It is no accident that most star parties take place over the warm spring and summer months. Still, weather can turn nasty at any time of the year and one needs to be prepared for rain, cold, and wind. The first night I brought my 11 year old son to a star party a thunderstorm rolled in shortly after sunset on our first night. Nevertheless, we had a great time watching a movie on our portable DVD player while staying dry and warm inside our tent. Sometimes a big rain storm will bring exceptional seeing the next night making the wait worthwhile. Wind can be another troublesome visitor especially in the afternoons at some star parties so be sure to tie down tents and shelters well and be careful with big Dob telescopes. Scopes and anything important should always be covered to keep them cool in the hot sun and to protect them from rain and dust. I use a Telegizmos 365 scope cover which works very well to keep the sun and elements off my scopes, but there are other brands which I assume work equally well and many people use a much cheaper option of a tarp with bungee cords. Dew can be a concern at some star parties as well so be prepared with some sort of dew control for your scope. Star party site facilities may include bathrooms, showers, sleeping facilities, food, water, ice, power and RV hookups. Since many star parties are held at a secluded open field, standard bathroom facilities are not always available. Bathrooms vary from porta potties to camp style brick buildings with sinks and toilets. Showers may or may not be available on site. GSSP rents a shower truck which provides both showers and a place to shave and brush teeth. Some star parties are held at sites which are campgrounds or some other permanent site which may have cabins, bunkhouses, or Yurts for rent. Food can run the range from a dining hall, a food truck, barbecues or nothing at all. If you are preparing your own food at a star party, it is most likely that open campfires are not permitted so propane stoves will be needed for cooking. Water and ice are sometimes available at the star party site but many do not provide one or both of these. There are some very good, but expensive coolers like the Yeti cooler that will keep things cold for many days. The other option is to drive to a nearby town for additional water, ice and other supplies which can be as much as an hour away. Fortunately, a small town general store is only 10 min away from GSSP and they have water, ice, groceries, and a deli counter which is sufficient to resupply for the duration of the star party. When I retire, I hope to purchase an RV which will make camping at star parties much simpler allowing me to concentrate on observing and meeting with fellow astronomers. Local area amenities include nearby grocery, hardware and electronics stores, restaurants, gas stations, small town libraries, national and state parks, astronomical observatories, historical sites, quaint towns and so on. Because of the need for dark skies, star parties are found in sparsely populated areas with very small towns nearby. Some are so small you would miss them if you blinked while passing through. But this can add to the enjoyment of getting to see things off the beaten path. I have made it a habit to venture out during the day to the nearby towns for the two star parties I regularly attend so that I am aware of what is available in case the need arrives. Some of these are 5-10min away and others are 1 hr away. Nearby grocery stores are great to provide additional water, ice and food as required. If there is a hardware store or Walmart close by they can be helpful for picking up an essential camping item that you forgot to pack or broke. If there are parks nearby, these can provide a nice opportunity to take a hike through forests, near waterfalls, swim in a lake, etc. while cooling off in less hot conditions. When my son was little, we would drive to the closest town, take in a matinee move and have a nice dinner at a local restaurant. It was a good way to get out of the heat, but I admit I almost fell asleep a couple of times during the movie. If a nearby town has a local library, it can be a place to go and cool off while checking in on the internet. The overall experience of a star party is further shaped by the on site activities at the star party. These can include guest speakers, equipment vendors, swap meets, workshops, contests, raffles, barbecues, public nights, equipment walk abouts, organized tours, etc. Most star parties will have several of these activities available. The Stellafane Star Party in Vermont is famous for it's fantastic telescope making competition. And it may be the only one to host a lobster dinner. On the other side of the country, the Riverside Telescope Makers Conference (RTMC) held in southern California also provides a great opportunity for telescope makers to show off their handiwork and is noted for the many equipment vendors attending. Some star parties have organized day trips to nearby attractions, especially to a local observatory or historic site. The Almost Heaven Star Party in West Virginia hosts a tour of the Green Bank Radio Telescope Observatory. For many of us, the overall star party experience is also a social one. This is where we meet old friends who we met long ago and may only see once or twice a year the same star party. And this is where we can make new friends as well. I invite you to make your preferences known by taking a Star Party Survey that I have put together on this web site. It will only take a few minutes and no personal information is required. When enough people fill out the survey, I will post another blog with a summary of the results. The survey can be found under the "More" tab on this web site, or a direct link to the survey is available here: www.californiaskys.com/star-party-survey.html |
Categories
All
Archives
January 2024
|
 RSS Feed