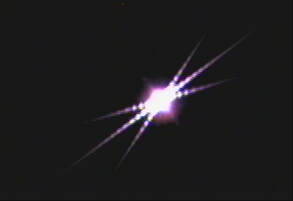
 In the first four installments of this series on EAA we have covered the big ticket items needed to get started including mounts, telescopes and cameras. Now we will look at the accessories most necessary for EAA. There are many possible accessories one could use to enhance the EAA experience, but in this installment we will discuss only the ones which are most essential to have right from the start. Of course, there can be differences of opinion as to what is essential and what is optional, but based upon my personal experience and what I see posted by other practitioners of EAA I feel fairly confident that you will find the items below extremely useful. Bahtinov Mask Before an EAA session can begin, even before the telescope can be aligned, it is necessary to focus the telescope. If you have a good view of a distant power pole, tree or similar object you can rough focus on that with an inexpensive wide field eyepiece (EP) like this 32mm or longer focal length example along with a cheap diagonal which may have already been included with your telescope. This is especially helpful if the telescope is way out of focus which can lead to a great deal of frustration. This was the case after I configured my SCT with my 2X Televue Powermate for the recent Jupiter-Saturn conjunction. I find it much harder to use my camera to get back into focus when I am initially far out of focus than using an EP. If you are like me with a backyard that is obstructed from such views you will have to use the moon when it is up, or work with the brightest star visible to make it easier to get close to focus. Once close to focus you will need to fine tune the focus to get a sharp image. If you are using imaging software which has a focus feature like FocusMax or Sharpcap you can use that to fine tune the focus. If not, the best option to assure sharp focus is a Bahtinov mask. Invented by the Russian amateur astrophotographer Pavel Bahtinov, the Bahtinov mask has become the go to tool for astronomers for quick, easy and accurate focusing. Usually constructed with pliable but sturdy plastic it consists of three grids designed to create three angled diffraction spikes for each bright object in the FOV when placed on the front objective of the telescope. Two of these spikes form an "X" while the third forms an "I" through the "X". As the focuser is racked in and out, the "I" shifts from one side to the other. When the "I" bisects the "X" in the center, best focus has been achieved. You can read more about how this works and view a simulation on this Wikipedia page. Once focused, the Bahtinov mask must be removed. If your telescope needs to be re-focused throughout the night, you will have to repeat the procedure each time which is really the only disadvantage of this technique compared to software focusing. 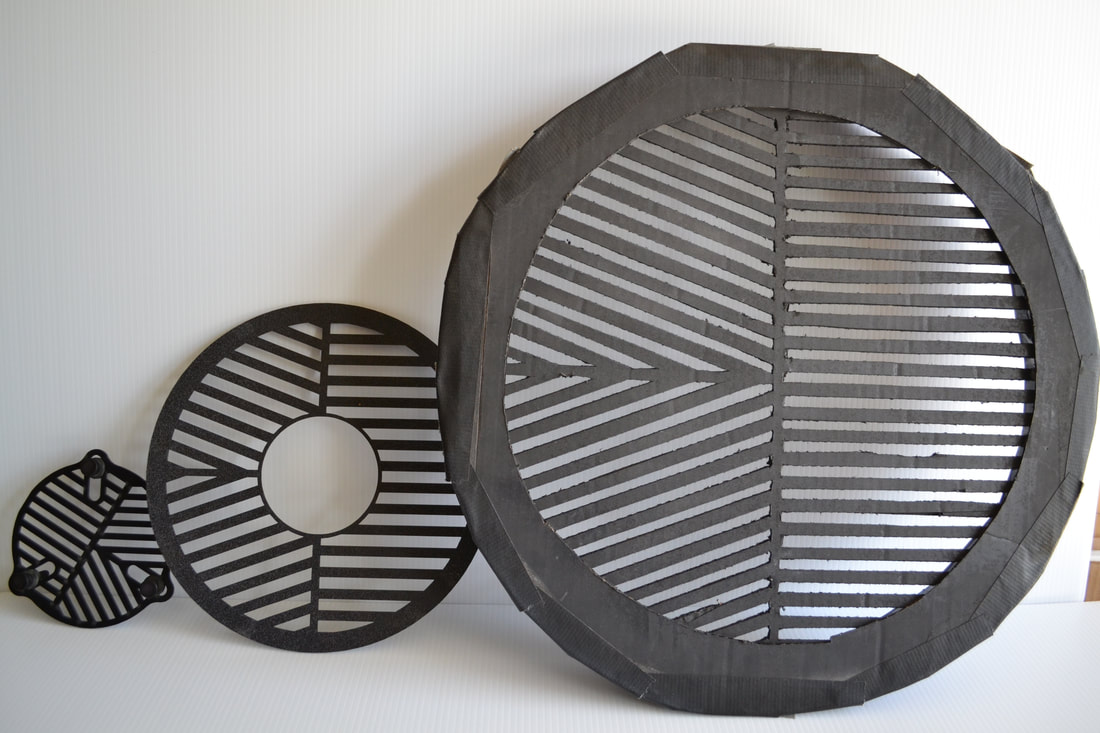 • Commercial Bahtinov masks for a 127mm refractor and 9.25" SCT. Homemade cardboard mask for a 14" SCT The Bahtinov mask must be sized for the particular OTA. Some versions like the smaller one shown in the image above are adjustable and can fit several different telescope sizes. Masks for SCTs typically have a hole in the center to accommodate the secondary mirror or a Hyperstar adapter. The ones from Farpoint are fairly inexpensive, work well and are the ones I typically use. Some telescope manufacturers like Williams optics now incorporate the Bahtinov mask into the dew cover for their 81mm doublets. One can even make their own masks like the cardboard one I made for my 14" SCT shown above. 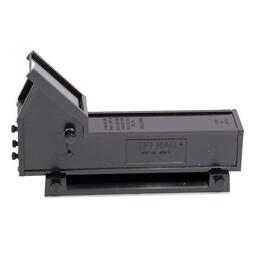 Telrad Unity Finder Telrad Unity Finder Finder Scope Once focused it is time to align the telescope. Most, but not all, telescopes come with a finderscope, either an 8 or 9 x 50. That is a magnification of 8 or 9 and a 50mm lens. I find that it is much easier to use a Unity Finder than the typical 8 or 9 x 50 finder scope. If using a telescope like my 9.25" SCT or larger I use a Telrad Unity Finder which uses a red LED to project 3 concentric circles onto a clear plastic screen. The circles cover 1/2, 2 and 4 degree FOVs. The LED can be dimmed and is powered by 2 AA batteries. By sighting through the circles I can see the alignment stars through the clear screen with the red circles superimposed as I adjust the mount to bring the intended star into the FOV of the telescope. For me, this is faster and usually less confusing compared to looking through an 8X or 9X finder with a greatly magnified image and many more stars. After all, the alignment stars are most always naked eye stars and the final alignment of the mount will use the camera view through the telescope and not the finder. An optional dew shield and optional dew heater are available to prevent dew formation on the clear screen. Like any finder, the Telrad must first be aligned to the telescope which is best done at night with a bright star. The moon can be used for rough alignment followed by a star for more precise alignment. The Telrad attaches to a base with two thumb screws for easy removal for travel. The base attaches to the telescope using supplied double sided tape. Another advantage of the Telrad is that it is less expensive than a typical optical finder scope. Rigel makes a similar unity finder with concentric circles but with a smaller base and a higher stance off the OTA compared to the Telrad. It is powered with a lithium battery and has an adjustable led intensity and a pulse mode as well. I use this one on my 80mm refractor as the Telrad is to large for that size telescope. Other options are the Red Dot finders which are also unity finders which project a red LED as a dot on a clear plastic window. Simply look through the window and adjust the mount until the red dot is on the star to align the mount. I use these smaller finders on my 6" SCT. The one thing to keep in mind with all of these unity finders is that if you view through the finder from an angle instead of from directly behind the star will appear to move of the red dot which will lead to an offset in the alignment. This is not difficult to manage but if you want the state of the art in unity finders, Tele Vue makes a version where the star remains fixed even when viewed from 2 feet off axis. The catch is that instead of costing under $50 the Tele Vue Star Beam costs $347. 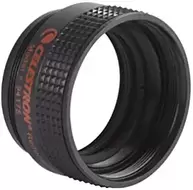 Celestron f/6.3 focal reducer/corrector Celestron f/6.3 focal reducer/corrector Focal Reducer One of the most common and useful accessories for EAA is the focal reducer. Unless your telescope is already at f/6 or faster like many Newtonians, you will find that a focal reducer is an essential tool to make EAA more enjoyable. A focal reducer does two important things. First, it increases the field of view (FOV) of the optical system. A large FOV makes it much easier to find very dim objects, especially with a small sensor and a rough GoTo alignment. In addition, a large FOV is necessary to fit large DSOs like M33 fully into the camera frame. Likewise, a focal reducer can be helpful for fitting multiple smaller DSOs into the frame. While full screen views of the galaxies M81 and M82 can be wonderful in their own right, adding a focal reducer to the optical path to bring both galaxies into a single FOV which gives an entirely different perspective on the these two interesting but very different galaxies. And there really is no other way to appreciate galaxy clusters like the Virgo cluster without a focal reducer to capture them with the necessary large FOV. As we discussed in the third article in this series, "Choosing a Telescope for EAA" a focal reducer has the effect of reducing the native focal length and focal ratio of a telescope. Since the FOV is inversely proportional to the focal length, an f/5 focal reducer will decrease the focal length of the telescope by a factor of two Focal Length with f/5 reducer = Native Focal Length x 0.5 which conversely increases the FOV by a factor of two. The second important function of a focal reducer is to increase the speed of the telescope so that images can be captured and viewed with much shorter exposures. For instance, the Celestron f/6.3 focal reducer combined with an f/10 SCT will reduce the focal ratio to f/6.3. Since the speed of a telescope is proportional to the inverse of the focal ratio squared, the X6.3 focal reducer speeds up the telescope by 2.5X Telescope Speed = (10/6.3)^2 = 2.52 So the exposure for a given object can be reduced by a factor of 2.5 to provide an equivalent brightness view compared to the one at f/10. Of course, the trade-off is the reduction in the magnification resulting in an image which appears equivalently smaller. In other words, the same photons are captured but concentrated into a smaller number of pixels in the camera which both reduces the exposure and reduces the size of the object. This is demonstrated in the images below using the free analysis software CCDCalc to show the FOV for an ASI533 camera and an 11" SCT at its native f/10 and using a Hyperstar lens to reduce the focal ratio all the way down to f/2. As illustrated by the white rectangles overlaying the images of M81/M82 below, the FOV is sufficient at f/10 to capture only M81 while at f/2 both galaxies fit nicely in the FOV. Focal reducers can be found with a range of focal reduction values from ~0.8X to 0.5X. Many focal reducers combine focal reduction with field flattening to bring the entire field into focus at the same point resulting in round stars all the way to the edge of the FOV. The popular Celestron f/6.3 focal reducer/corrector has a reduction factor of 0.63X and is designed to work with non-Edge SCTs, as is the very similar Meade f/6.3. These provide focal reduction, correct for coma and also flatten the field of view. Celestron has a separate 0.7X focal reducer for its Edge series of SCTs. Focal reducers for refractors generally come in 0.8X and 0.75X versions and may or may not also provide a flat field. In general, focal reducers are available from telescope makers like Televue, Explore Scientific, Sky Watcher, Orion, etc. and are optimized for their specific telescopes. Examples are the Celestron f/6.3 for their non-Edge SCTS, the TeleVue 0.8X reducer/flattener for their 102mm refractor, The Sky-Watcher 0.77X reducer/field flattener for their Esprit 120mm refractor, and others for most every brand of telescope. In addition to these telescope specific reducers, there are a number of generic focal reducers which can be used for most any telescope from the likes of Optec, Starizona, Baader Planetarium, etc. For modest budgets there are many different 0.5X focal reducers in the 1.25" and 2" formats from, GSO, Antares, Svbony and others. These use an inexpensive single lens commonly found in binoculars and work very well for cameras with small sensors, less than 10mm. On larger cameras one may notice distortions and aberrations at the edge of the FOV with these inexpensive reducers. For focal reducers to achieve the stated focal reduction without causing aberrations or distortions in the image they must be positioned at the manufacturer's designed spacing from the camera's image plane. This distance varies by design and is usually measured from the base of the mounting threads on the back of the focal reducer to the camera sensor. In some cases it is measured from the center of the rear lens of the focal reducer to the camera sensor. For example, the ideal spacing is 105mm for the Celestron f/6.3, 146mm for the Celestron Edge f/7 for the 9.25", 11" and 14" models but only 133.35mm for the 8" Edge. Focal reducers for refractors are most commonly designed for a spacing of 55mm. Typically, to get the correct reduction factor and avoid optical aberrations, the spacing must be correct within 1 to 2mm so the proper set of spacers will be required. It is important to note that a focal reducer will move the image plane closer to the focuser so it is critical to make certain that the focuser has sufficient in focus travel to accommodate this. Also, if the focal reducer is spaced further from the imaging plane the reduction factor increases so the FOV gets even larger. However, in most cases this will cause optical aberrations and vignetting which may or may not offend the user. On the other hand, if the focal reducer is spaced closer to the imaging plane the reduction factor the reduction factor decreases which does not cause vignetting issues. For those willing to accept some amount of vignetting and image distortion near the field edge, two focal reducers can be combined to achieve an even greater reduction and faster imaging platform. An excellent overview of focal reducers is available on the Agena Astro web site here. Dew Control Unless you only observe from a desert, you will eventually encounter dew buildup on your optics. The first line of defense is a dew shield which attaches to the front of the telescope and keeps the corrector or objective from forming dew in moderate dew conditions. Fortunately refractors come with a dew shield as part of their design. Many retract for storage and extend when in use. Newtonians are less susceptible to dew formation on the primary mirror since it sits well back in the tube which acts like an extra long dew shield. The main concern for Newtonians is dew on the secondary which is why many are designed with the secondary set back inside the tube allowing it to act as a fixed dew shield like on many refractors. If you have an SCT you will need a dew shield. These are available from many manufacturers and come either as either a flexible plastic or rigid aluminum cylinder. These are usually felt lined to prevent stray light from reflecting of the sides and into the telescope. As such, these dew shields serve the secondary purpose of deflecting any off axis light from interfering with the image. The flexible version is held in cylindrical form with velcro attached to one side which means it can be flattened for storage or transport. Both the flexible and rigid type also come in versions with notches to fit around dovetails and with additional notches for camera cables when using a Hyperstar lens. The aluminum versions add more weight at the front end of the SCT which will have to be balanced by moving the SCT back in the mount saddle. When the dew shield is not sufficient to prevent condensation of water on the optical surfaces active measures are required and this is typically achieved with a dew strap and dew heater. Dew straps come in sizes to fit most every telescope. Simply wrap the dew strap around the outside of the telescope near the optical element at the front of the telescope exposed to dew such as the objective of a refractor or the corrector plate of an SCT and run the included wires down to a dew controller for power. The dew strap has a series of resistors which produce a mild heat at the surface of the telescope to keep the temperature near the glass surface above the dew point. A good practice is to add a layer of reflectix to top of the dew strap to minimize the heat loss to the air which will help to minimize the power required for the dew heater. Reflectix can be found at your local Home Depot or Lowes hardware stores. There are many dew controller options. These all come with multiple channels to power two to four separate dew straps. The outputs can be adjusted from 0 to 100%. I use the Astrozap which has four channels, controlled in pairs. The Thousand Oaks model also has four channels but each channel can be independently controlled. I have never had the need for more than two channels so the Astrozap has worked well for me. A nice feature of the Thousand Oaks controller is the addition of a 12V power outlet to provide dc power to an additional accessory. I recently purchased a Pegasus Astro Pocket Powerbox Advanced as a power and USB hub for my setup and it has 2 independently controlled dew control channels which can be adjusted in the included software. The nice feature of this controller is that it comes with a temperature and humidity sensor which can be used to automatically control the dew controller settings. Another option in dew control is a dew shield with built in dew heater strap. I have used these for my Celestron 14" and Celestron 9.25" SCTs but prefer the stand alone dew strap and separate dew shield. Astrozap dew strap and dual channel dew controller 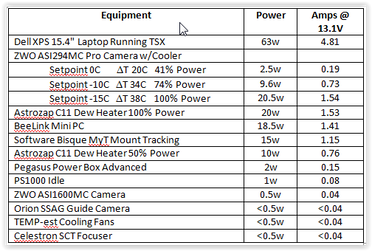 Power I have posted a comprehensive review of power options which addresses power needs, distribution of the power from the source to the equipment and the many different power source option pros and cons. It can be found here so I will not repeat all of that in this blog article. If possible it is best to measure the power needed by using a watt meter or a digital multimeter, DMM. A watt meter is easiest as it measures both current and voltage at the same time. A little more effort is required to measure current and voltage with a DMM as these need to be measured one at a time or at the same time with two DMMs. On the other hand, a reasonable estimate of power needs can be made from the data in the table shown below. These are actual measurements of the power used by each device in my own setup. An EAA setup does not need a guider and does not need a cooled camera although both can be used. Most cameras will use less than 0.5W of power and a typical tracking mount can be expected to consume ~10W. The biggest power hogs are laptops and dew heaters. A relatively simple EAA setup with camera, mount, power/USB hub, and dew heater should need between 15W and 30W not counting the laptop. Add ~10W if you use a cooled camera as you do not need to run the camera cooler at full power for EAA. There are so many power supply options that it can be confusing for many. The cheapest upfront option is an AGM battery. These are available in capacities of 50Ah for ~$100 and 100Ah for ~$200. Keep in mind that AGMs should not be discharged more than 50% to 80% of their capacity depending upon the manufacturer's specifications. Exceeding this will cause permanent damage and a shortened life. Many prefer to use only 50% of the capacity to extend the life of an AGM battery. For those with the long term view, an AGM is not the cheapest option given its depth of discharge (DOD) constraint. LiFePO4 batteries are much more cost effective when viewed over the long term, although their upfront cost will be much higher. LiFePO4 are used extensively as replacements for AGM batteries in the RV and boating industries. These batteries have an internal battery management system (BMS) which allows for a 100% DOD without damaging the battery. The trick is the BMS holds some power in reserve when it shuts down so the lithium cells have not actually be fully depleted. For those who need a large capacity LiFePO4, something like the Battleborn battery which is manufactured in Sparks Nevada is a good option. For lesser power needs, the Talentcell line of small capacity batteries tend to be more cost effective than the astronomy specific Celestron or Meade batteries. For those who need more than just a dc power source, the all-in-one solar generators from companies like Jackery and Maxoak Bluetti are solar re-charge ready, have a built in pure sine wave inverter which can be used to power any AC devices like a laptop, have several different USB type charging ports, meters, a display and more. These use Lithium Nickel Manganese Cobalt Oxide, commonly abbreviated as NMC. NMC batteries have a higher energy density per unit weight than LiFePO4 and are used in electric cars, ebikes, power tools, etc. The all-in-ones come with a range of capacities from 167Wh to over 2400Wh. and are the most expensive options out there. But, they are multi-purpose and make good emergency power backups at home since they can be safely operated inside the house unlike a gas generator. So, these are the accessories that I consider essential for EAA. One can certainly start without them, but I believe these will be the most helpful accessories one could buy and the sooner you have them the better your EAA sessions will be. There are certainly many other accessories which people find helpful but these can be added in time. Amazon and OPT links are Associate/Affiliate links from which I can earn commissions at not cost to you. 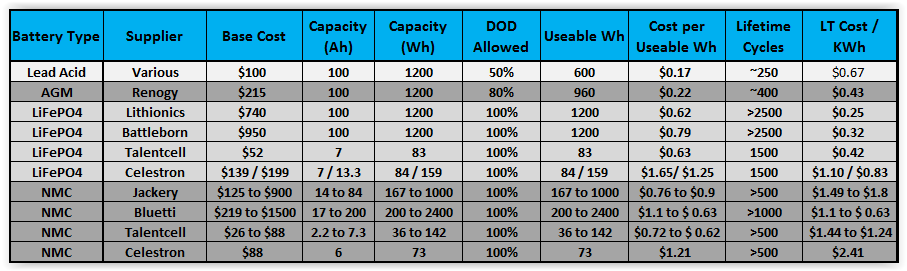
1 Comment
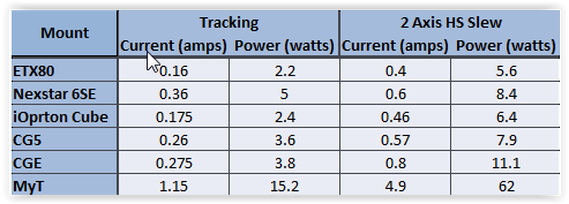 A visual observer can operate all night long without worrying whether power will run out since visual astronomy needs little if any power at all. Not so for astrophotographers or those doing camera assisted viewing (EAA). Tracking mounts, cameras, dew heaters, computers, etc. all demand a continuous supply of power. How this demand is satisfied mostly depends upon whether we set up at home or in the field. At home we usually have access to a plentiful supply of AC power and AC transformer can supply the dc power needed for many but not all of our equipment. At a distant dark site or star party we most likely need to bring our own dc power with us. There are three key questions to address when thinking about power. First, how much power is needed for a nights activities? Second, how will we distribute the power to each device? And, third, which among the many power sources is best for our particular case? Before we consider how much power we need, let's first determine the proper metric. When assessing power needs most discussions focus on the number of amps a mount, camera, etc. uses. This is not surprising since battery capacities are given in amp-hours (Ahs). This leads to an assessment of the total number of amps used by our equipment times the number of hours we plan to use it, leading to an Ah capacity determination. But since most batteries are not voltage regulated their voltage will drop during use and the current drawn will increase to keep the power constant. So it is better to work in terms of the total power consumed since that, not the current, is constant (unless of course we change the power settings on a dew heater, camera cooler, etc.). Another point to consider is whether or not to use AC adapters which may come with our equipment. At home it is a simple matter to plug the AC transformer into a nearby outlet but in the field without access to an AC outlet an AC transformer is an inefficient way to produce the dc power needed. Most AC transformers and inverters waste 10% or more of our precious power. It is generally much better to stick with dc when in the field. This is especially true of power hungry laptops if you can find a dc power source which works with you laptop. There are two way to determine our power needs, measure it or estimate it. If possible it is better to measure the actual power consumed with our own particular setup and under our typical use conditions. It is fairly easy to measure the AC power during an actual session using a Kilowatt meter in line between the power supply and the AC transformer. To measure DC power requires splicing a dc power meter in line between your dc power source and your devices. I attached Anderson PowerPoles to the wires of an inexpensive watt meter placed in between the battery and the equipment being powered. This is how I was able to check the power consumption for my complete astrophotography setup turning on one item at a time and running for 20 to 30min to get a good average of the power requirement for each. An alternative is to use a volt meter to measure the current and voltage separately and calculate the power used. I was able to measure the current used by each of my mounts while tracking and during high speed slews with my digital volt meter. Because I was using a regulated voltage source at 13.8V, I simply needed to measure the current to determine the power used. It might be surprising to many but mounts do not draw as much power as one thinks. As the table shows , most mounts generally use less than 0.5 amps at 12V during tracking. Even when performing a slew in both axes at once, less than 1amp or 6-12W is typical of all but the largest mounts. When estimating power for a mount use the tracking power since slews will be infrequent during a session. However, when sizing the maximum current required use the High Speed (HS) slew current with a 25% margin to avoid mount stalls. The maximum current measurement is also needed to properly size any fuses in line and to calculate the wire gauge needed between the power source and the equipment.  In addition to the mount, we need to determine the power requirements for all the other equipment we use. Once again, most would be surprised at how little power cameras, guiders, focusers and filter wheels require. In fact, focusers and filter wheels draw so little power and are active for so tiny a fraction of the observing session that they can be ignored as background noise. Computers, camera coolers and dew heaters are the biggest consumers of power. And, since coolers and heaters have variable settings the power they consume can span a wide range. The table below shows measurements for my astrophotography setup using the power meter built into my Jackery solar generator. The same measurements were also verified using the above mentioned method of an in line dc power meter. By far the 15.4" laptop is the biggest consumer of power and is typical of many similarly sized laptops. To minimize my power needs I have moved to using a mini-pc, Beelink U57, to run the software controling my equipment. I use my laptop to monitor the imaging session while wirelessly connected to the Beelink. That way my laptop's internal battery will last through most of my session before needing to plug it into my power supply greatly reducing its power needs. In contrast, the Beelink consumes less than a third the power of the laptop. If you have a tablet and can wirelessly connect to a mini-pc like the Beelink you can likely run for 10 hours on the tablet's internal battery. If you cannot or do not want to measure the power yourself, you can use the table above to make an estimate of your own power needs. While everyone's equipment is different, the difference in power consumption for similar equipment will not be dramatic. The items most likely in need of adjustment for each individual case are the dew heat and the laptop. Kendrik has a nice table showing the power and current for different sizes of dew straps which can be used to estimate different actual use cases. A typical astrophotography setup with a cooled camera and dew heater can be expected to consume somewhere between 30 and 50 watts not counting the computer. Computers are the big wild card and adding as little as 20w for a mini-pc up to 65w or more for a laptop depending upon the size and type. Once you have an estimate of your power needs you will need to determine how to distribute that power to your equipment. There are two basic ways. The first is to run individual power cables from the power supply directly to each device. This is the method that I used for 10 years with a 12V lead acid battery inside a plastic battery box equipped with a cigarette socket connection. To connect the individual dc power cables from the battery to the device I used a cigarette plug splitter. This is simple, inexpensive and easily adapted to varying numbers of connections but results in many power cables running from the supply to the mount and telescope. 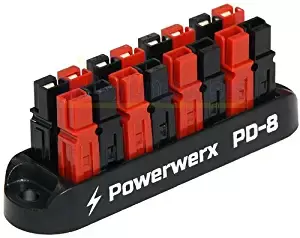 A more elegant option is to use a central power distribution hub at the mount from which to supply power to all the devices. Power is routed to the hub from the battery with a single cable and from there out to each individual device. Each output of the hub can be fused to protect the equipment from damage and can even be computer controlled. The hub can be attached to the telescope so that only a single power cable hangs from the mount. Alternatively the hub can be attached to the tripod underneath the mount to avoid adding additional weight to the mount. If the mount is equipped with through the mount cabling like my MyT, dangling power cables are easily avoided. One of the least expensive power hubs is a Powerwerx Power Distribution Block. This comes in 4 and 8 position configurations. It has multiple Anderson PowerPole connector pairs tied to a common buss bar. Simply connect a battery to one pair with a heavy duty 14AWG cable with a cigarette plug on the battery side and Anderson PowerPole connectors on the other side to provide power to the distribution block. From there power can be supplied to each device using individual cables with Anderson PowerPole connectors on one end and 5.5mm x 2.1mm dc connectors on the other end. DC extension cables can be used wherever longer connections are needed. I have made my own cables to specific lengths for each piece of equipment by using genuine Anderson PowerPole connectors and a simple crimping tool. One tip is to use the 30amp connectors even though none of our equipment will draw that much current because the 15amp connectors are too small to attach 18AWG or thicker wires. Also, I highly recommend the genuine Anderson PowerPoles rather than the more cheaply made copies which I have found to be lacking. Alternatively there are Chinese versions of the power hubs which have the advantage of including fuses on the distribution block for each power position. Even more sophisticated solutions are the power distribution hubs made specifically for astronomy with even more functionality than the Powerwerx type hubs. An example is the Pegaus Astro Pocket Powerbox Advance which I use. This has 4 12VDC outputs along with 2 variable dew heater outputs, 1 regulated adjustable dc output port and 4 powered USB3.0 ports. It has built in current and volt meters, can supply up to a total of 12A, has short circuit and reverse polarity protection, and functions as a stand alone device or with computer control. The Powerbox can be mounted on the OTA or at the base of the mount as pictured below. I use a heavy duty 18 gauge cable with a cigarette connector on one end and a 5.5mm x 2.1mm connector on the other end to supply power from the battery to the Powerbox. From there, power is routed to each device with the power cables included with the Powerbox. The ASIAir Pro and the PrimaLuceLab Eagle Core are other examples of astronomy specific devices which provide power and USB hubs. However, these also include a Raspberry Pi computer to also serve as a mini-pc at the telescope. These all-in-one solutions are designed to provide seamless integrated control of all the equipment and software needed for astrophotography. 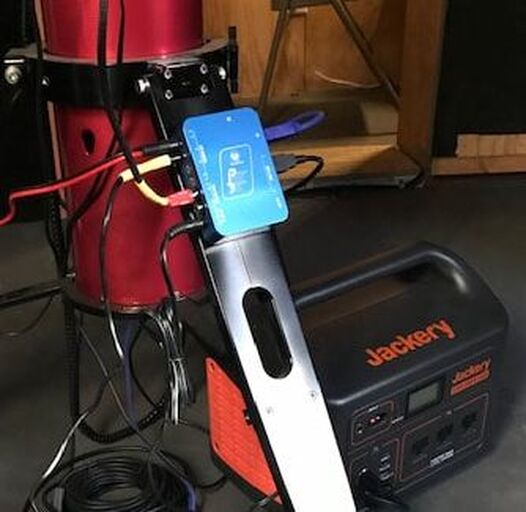 When designing the power distribution layout it is best practice to keep the power distribution cables as short as possible with the proper gauge wire to avoid voltage drops across them which just wastes power. Here is a voltage drop calculator which will help in selecting the right gauge and length of wire to minimize voltage drops. For instance a 22AWG wire 4 ft long expected to carry 3A of current will experience a voltage drop of 0.39V which will reduce the voltage at the equipment from 12V to 11.61V. Using an 18AWG wire instead will cut the voltage drop by more than half to 0.15V. The challenge becomes making cables with the tiny 5.5mm x 2.1mm dc connectors with wire gauges of 16AWG. 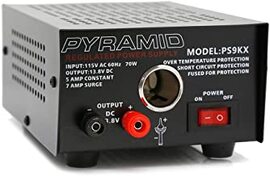 Once the amount of power needed has been determined and a power distribution plan is chosen, the next step is to decide which of the many power sources is best for ones own situation. Let's first consider the case where AC power is readily available but an AC transformer is not available for every piece of equipment. In this case a regulated AC to DC power supply is a good choice. An excellent example which I use in my home observatory is a Pyramid AC to DC regulated power supply. These come in different current capacities from 5 amps on up along with screw terminal connections and/or a cigarette lighter socket connection. The Pyramid supplies are voltage regulated to supply a constant 13.8V which works with all of my mounts and equipment without issue. I prefer to use the Pyramid instead of the AC power adapters that come with some of my equipment as it allows me to simplify my power distribution with less power bricks running all over the place. When in the field or at a star party we usually do not have access to AC power. In these cases a battery is the usual alternative. For many years flooded lead acid batteries were the only power option available. They have the advantage that they are cheap with a deep cycle flooded 100Ahr battery available for ~$100. But they are heavy, weighing ~60lbs, can only be discharged to 50% of rated capacity without damage, must be kept upright to avoid acid spills and need monthly upkeep. These days AGM batteries are more popular as they are sealed to prevent spillage and offer additional capacity with a depth of discharge (DOD) of 80% without damage to the battery. At a cost of $170 to $215 for a 100Ah battery they cost twice as much as lead acid batteries, also weigh ~60lbs and still need monthly upkeep. The 100Ah Renogy Deep Cycle AGM battery is just one example of these types of batteries. Recently lithium ion batteries have become more readily available. Be aware that there are competing lithium chemistries used with each having its particular advantages and disadvantages. The two most applicable to astronomy are the LiFePO4 and NMC. LiFePO4 is the less expensive of the two and is commonly found in RV and boating applications which can require daily charge and discharge cycles. Examples of these types of batteries include the highly rated BattleBorn and Lithionics 100Ahr batteries which have capacities of 1200Wh of energy. They weigh less than 30lbs and include an onboard battery management system (BMS) which protects the battery from overcharging, short circuits, overheating, etc. LiFePO4 can be fully discharged without damaging the battery and most manufacturers spec their LiFePO4 batteries at >2500 full discharge cycles before the battery begins to lose some of its original capacity. A full discharge cycle means the battery is taken down to 0% capacity and then fully recharged. Even after the ~2500 full discharge cycles the batteries will still have ~80% of their original capacity. Celestron has two PowerTank Lithium battery models which use LiFePO4 technology and come with capacities of 84 and 159Wh. These have a cigarette socket and 5.5mm x 2.1mm dc outputs, two USB charging ports and a power level display. There is a lot of confusion as to whether or not Lithium batteries can be fully discharged without damaging them. The confusion seems to stem from the fact that a battery can be a single cell, like a AA battery, or a multi-cell like a standard 6 cell lead acid battery. It is true that single cell batteries, whether LIthium or other chemistries, will be damaged if they are fully discharged. However, what we are talking about is not a single Lithium cell battery but instead a collection of cells designed to provide 12V and higher current capacity than a single cell can provide. Lithium batteries like those mentioned above and the ones to be discussed below are all collections of cells with a BMS designed to make certain that no cell is fully discharged even when the battery capacity level indicates that it is fully discharged or the battery shuts off. This is why the manufacturer's can rate them for 100% DOD without any damage. Of course, the life of any battery can be increased by using a lower DOD but the tradeoff is less useable power from that battery. The other popular Li chemistry is Lithium Nickel Magenese Cobalt Oxide or NMC for short. The advantage of NMC over LiFePO4 is its higher energy density, hence lighter weight for the same capacity. These batteries are commonly found in power tools, ebikes, electric vehicles and solar generators. Solar generators have become very popular for outdoor adventurers because of their light weight and high energy capacities which makes them a good choice for astronomy applications. Examples are the line of solar generators by Jackery and Maxoak's Bluetti. These highly rated generators come in models from 160Wh to 2400Wh and can supply 10 to 12A of current. Jackery and Bluetti also sell portable solar panels for recharging in the field. The solar generators are more than just bare batteries as they include a regulated 12Vdc output, a BMS, a pure sine waver inverter for AC power, multiple USB charging ports, a built-in MPPT solar charge controller, an AC charger, a display to monitor battery capacity, On/Off switches and an integrated carrying handle among other nice features. These all-in-one portable power stations are light weight as well with the 1000Wh model from Jackery weighing only 20lbs and the 500Wh model from Bluetti weighing under 14lbs. Celestron has an NMC battery with 73Wh capacity called the PowerTank Lithium LT. It has a regulated voltage output and USB charging capability as well but can only support a maximum of 3A while the all-in-one power stations can supply 9 -10A. If power needs are very low such as my setup with a Celestron 6SE and ASI224MC camera, a fairly small lithium battery like those from TalentCell work just fine. These can provide power for a full night. TalentCell offers a range of small and lightweight NMC batteries with capacities ranging from 36Wh to 142Wh with prices from $26 to $88. They recently came out with an 83Wh LiFePO4 battery rated for 1500 cycles to full discharge for $52. All of their batteries come with a wall charger and a 5V/2A USB port as well. The smaller capacity batteries can supply a maximum of 3A at 12V while the larger ones max out at 6A and also have a 9V outlet as well. I have the 100Wh model which which has worked well for my simple EAA setup as described above. I do not believe that the TalentCell batteries are voltage regulated. All battery types should not be left in storage fully discharged to avoid damage to the cells. On the other hand, while lead acid batteries should be stored fully charged, Lithium batteries should not be stored with a charge of more than 80 or 90% of capacity to prolong their useable life. Just top them off to their full capacity before taking them into the field for use. As we have seen the options for portable power sources run the gambit in terms of capacity, price, weight, size and features. What is important to one person may not be important to another. For someone with a limited budget the lowest cost option may be the best choice. For someone else the cost spread over the useable life of the battery might be the most important factor. And for still others an abundance of features might dictate the optimum choice. Table 1 below shows the different battery options available from different vendors, their base cost, and rated Ah and Wh capacities. Obviously not all options can be summarized in a single table. For instance, flooded lead acid and AGM batteries with smaller capacities and base costs are also available, however, the ones listed here are representative of the overall cost analysis which follows. One simple metric for comparison is cost per Useable Wh. This is simply the capacity times the maximum DOD allowed to avoid damage. Table 2 shows the maximum DOD for lead acid batteries is 50% which means that a 100Ah lead acid battery can only supply 50Ah or 600Wh of power to avoid damage to the cells. AFMs have a maximum DOD of 80% while LiFePO4 and NMC batteries have a maximum DOD of 100%. With this the Useable Wh for each battery can be calculated and is provided in the table which shows that a 100Ah LiFePO4 battery has twice the useable power of a flooded lead acid battery. One would have to buy and carry 2 lead acid batteries to a dark site to supply the same power as a single LiFePO4 battery with the same Ah rating. On the other hand, lead acid batteries are the cheapest on a cost per Wh basis. Another metric is the cost averaged over the total number of cycles during the expected lifetime of the battery. Table 2 shows the number of discharge cycles expected for each battery type. We can immediately see that traditional lead acid batteries are at a big disadvantage to all other battery types and that LiFePO4 batteries have the highest number of lifetime cycles. Of course the lifetime cycles can be increased for any battery chemistry if the battery is not discharged to the maximum DOD shown in the table. But that means that capacity is sacrificed for a longer battery life. The last column in Table 2 shows the cost averaged over the power one can expect from the battery over its lifetime. With this metric, lead acid batteries are no longer the cheapest option as LiFePO4 batteries with their much longer number of cycles are as much as 1/3 the cost per lifetime power of lead acid batteries. So what is the best battery choice. If the up front cost is the dominate factor, AGMs are the best choice since their cost per Wh is only slightly higher than flooded lead acid batteries while a 34% smaller AGM battery will supply the same total power of flooded lead acid battery. If longevity, weight and safety are the prime factors then the LiFePO4 batteries are the obvious choice by far but the upfront cost is significant. In this category, the Lithionics or Battleborn batteries provide the largest capacities while Talentcell is the best cost option for under 100Wh capacity. On the other hand, if the added features of the all-in-one power supplies are important, then one of the models from Jackery or Bluetti with capacities of 167 to 2400Wh are good options. Keep in mind that the all-in-one models include a BMS, a pure sine wave AC inverter, USB charging ports, an MPPT solar charging controller, a charger, a power meter and display, convenient power ports and more. They are also voltage regulated and hold their voltage all the way down to zero capacity. These additional features would add upwards of $300 to the total cost if bought along with one of the other battery options. And the all-in-one models come in a fully integrated, compact and rugged package. Personally I have made the switch to Lithium based solutions for field power. I like the light weight, voltage regulation, high capacity and added features of the Jackery 1000Wh model that I currently use. There are models both from Jackery and Maxoak Bluetti which will fit any budget and capacity requirement. For my lightweight and portable EAA setup which requires much less power I rely on my Talentcell 100Wh battery. Edit: I created a video showing how easy it is for you to measure your power needs yourself on my YouTube Channel Amazon links are Associate links from which I can earn a commission at no cost to you. If you would like to support my web site and its content please consider using my links when ordering products. 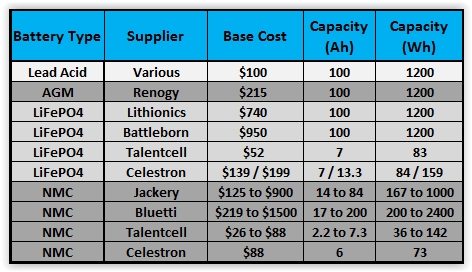 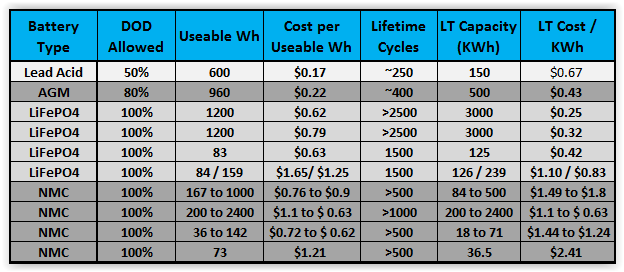 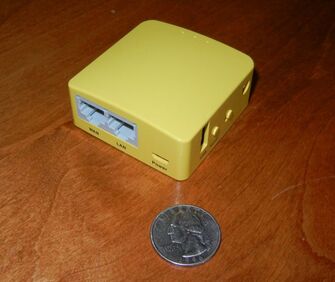
After years of sleeping first in a tent and then in the back of my van at star parties and dark sky excursions, I finally decided to go in style with an RV. My plan is to sit inside my nice cozy RV with my laptop and control my telescope, cameras, etc. wirelessly with WiFi. I bought a Beelink U57 mini-pc which sits at the telescope and runs all my software while I remotely log into the mini-pc with my laptop inside the RV. The mini-pc is headless (i.e. has no display to suck power) and therefore draws an order of magnitude less power than the laptop would running the same software. I can use the laptop as a terminal inside the RV and, with proper shielding, be able to view images on the screen unfiltered without disturbing anyone else with the light from my computer. Also, if I need to conserve power I can let the laptop go to sleep as I only need it to check in on the mini-pc's progress if I am doing a long imaging run. If I am doing EAA (camera assisted viewing), I will to use the RV's power to keep the laptop running during a session.
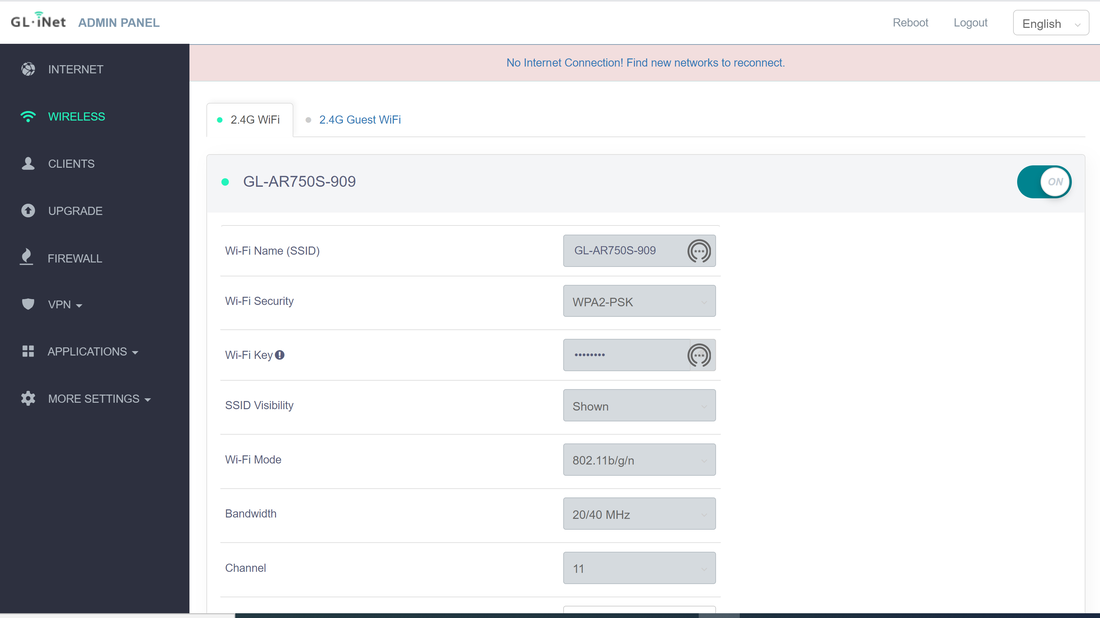
Up till now I set up inside an EZ Up shelter with side curtains and with the pc shielded so that the light is minimized. I use a 32ft active USB3.0 cable between the scope and the laptop for connectivity. I could do the same with the RV running the cable through a partially open window but I want to minimize the use of cables which are easily tripped over in the dark. Instead I decided to find a portable wireless router which can provide a reliable connection throughout the night from inside my RV to my rig outside. And since I may not always be able to park right next to my scope, the longer the range of the router the better. The router needs to run on dc and require as little power as possible. So when I read about the GL.iNET GL-MT300N-V2 Wireless Mini Portable Travel Router for less than $20 ($27 these days) I decided to give it a try. At this price I figured there was not much to lose. This mini router is less than 2.5" square and about 1" tall with a bright mango yellow plastic case weighing less than 2 oz.. It has 2 Ethernet ports, 1 USB2.0 port, a Micro USB port for input power and 128Mb of RAM. It uses 5V/1A so it can easily be powered by one of the USB ports on my mini-pc and draws less than a couple of watts of power by my measurements. It comes with an Ethernet cable and a USB2.0 to Micro USB cable which connect to my mini-pc, a Beelink U57 with an Intel Core i5-5257u Processor. It has LED lights to show that it is powered and has a reset button and a mode switch. The GL-MT300N-V2 only supports the 2.4G band at 300Mbps and not the faster 5G band. It can function as a portable router, mobile hot spot, WiFi repeater bridge or range extender. I only need it to function as as a portable router to set up its own WiFi network which I can connect to from my laptop inside my RV. The setup was simple and straight forward with the included instructions. You simply apply power to the router and it begins broadcasting a WiFi signal. You connect to the WiFi with the default password printed on the bottom of the router which is simple to change once connected. To access the router settings you simply connect to the IP address in the instructions. This will take you through a screen to choose your language, a screen to change your Admin Password and finally to the main page with access to an Internet, Wireless, Clients, Firewall, etc. pages where you can change settings for each of those if desired. For my application using this as a wireless router, the only thing I needed to change was the password. Closing out the connection to the router I was set. Then I simply connected the router to my Beelink mini-pc with the Ethernet cable and powered up the router with the Micro USB cable also connected to the mini-pc. Now I could see the GL-MN300N-V2 WiFi signal on my laptop and connected to it using the password I had just created. To connect between my laptop and the mini-PC I use TeamViewer but you can use Remote Desktop or any other such software. 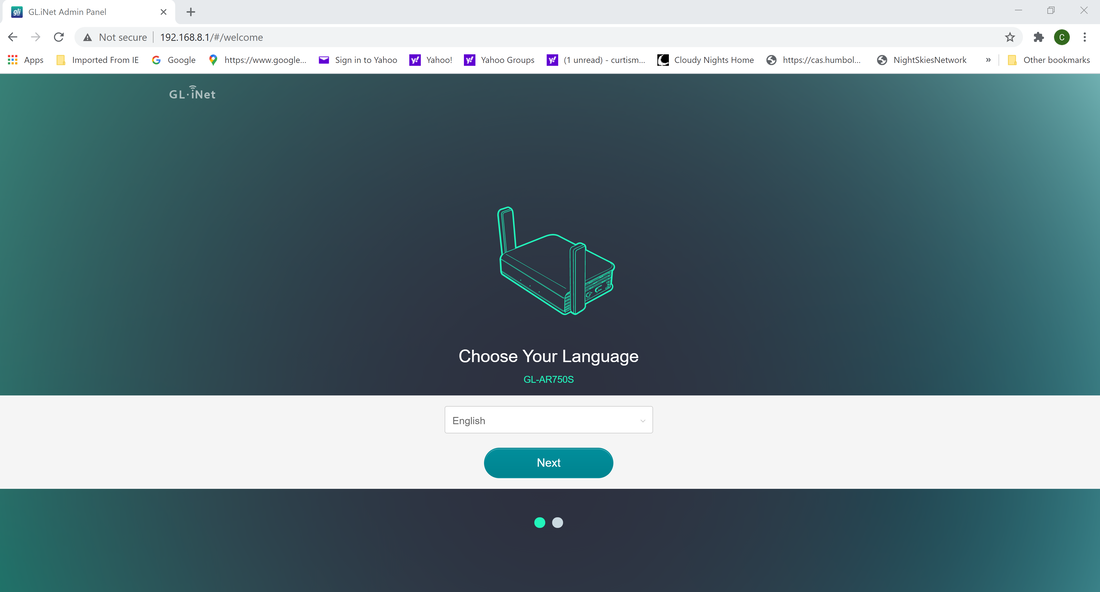
Since I do not have my RV yet, I set about to test the quality and stability of the wireless connection with the GL-MT300N-V2 connected to my Beelink mini-pc inside my observatory and my laptop setup in the back yard at different distances from the observatory testing the connection at successively longer distances. Once connected, I observed how long it was able to maintain the connection while performing a dummy astrophotography run with the telescope tracking and the camera taking exposures of 1 minute duration while watching progress on my laptop. The objective was to find the maximum distance that a a continuous connection could be confirmed for at least 8hrs. At 75 ft I could not get a connection at all. At 65 ft I could connect to the wireless network but the connection would drop repeatedly. I was able to maintain a solid connection at a distance of 60 ft to the Travel Router inside the observatory without dropping for in tests of up to 8 hours. I repeated this test two more times and satisfied myself that I could reliably maintain a connection through the observatory walls at a distance of 60 ft. In addition to maintaining a solid connection I tried opening files and changing settings in The Sky X (TSX) running on the Beelink mini-pc. At 60 ft I did not see any issues of a sluggish or poor connection. Keep in mind that the quality and stability of the connection depends both upon the Travel Router's wifi strength and also on the strength of the wifi hardware inside my laptop. Other laptops or pcs may support longer or shorter distances than mine. Also while the wooden walls of the observatory are not the same as the fiberglass and aluminum walls of my RV I expect that I will be able to connect reliably to my telescope out in the open at a similar distance. Encouraged by the 60 ft distance I tested the connection from inside my house on a straight line of sight through glass doors to the observatory only 40 ft away. While I could make a connection it would always drop within an hour or less so I deem this unreliable for a connection through a pair of walls or other multiple obstacles.
Although the GL-MT300N-V2 worked well for my application and I think it will serve my needs in the field I wanted to try a slightly more expensive router from the same company equipped with a pair of antennae to presumably provide greater distance capability along with 5G (433Mbps) for faster connection speed. The GL-AR750S-Ext travel router sells for $54.90 and comes with 3 Ethernet ports, a USB2.0 port and a micro USB port for power input. It also has LEDs for power, 2.4Ghz and 5Ghz WiFi signals, 128Mb of RAM, a reset button and a mode button, a micro SD card slot and 2 antennas which can be rotated from the compact travel position to 90 degrees during operation for better signal range. This router is also quite compact with dimensions of 3.9 x 2.7 x 0.9 inches with the antenna folded down and weighing only 3 ounces. It has over 1600 reviews on Amazon with 89% of them rated 4 or 5 and only 7% rated 1 or 2. Setup is the same as for the GL-MT300N-V2.
I performed the same tests as with the GL-MT300N-V2 above. In this case I could reliably connect at a distance of 100 ft from my observatory at 2.4G for repeated tests of 8 hours and longer. 100 ft is the maximum distance I can be from the observatory in my back yard so it is possible this will work at a longer distance. Using the faster 5G connection, although I was able to make and maintain a connection repeatedly at 100 ft for 6 hours or longer, several times I had trouble making the initial connection and multiple times the connection dropped around 6 hours. It is well known that the higher frequency of 5G does not have the range of the lower frequency 2.4G so this is not surprising. The higher frequency signal has more difficulty penetrating walls. Tests from inside my house confirmed that I could not obtain a reliable connection at 5G but could easily maintain a connection all day long at 2.4G. This is at a distance of about 50ft from inside my house to the router inside the observatory. So it is clear that the GL-AR750S-Ext can provide a wireless connection at a greater distance than the GL-MT300N-V2. This is not a surprise since that is obviously the point of the antenna. I did not test transfer speeds or other performance metrics as I merely want to be able to remotely control the mini-pc and keep an eye on an imaging run with the laptop remotely. I did test downloads of data which worked without a problem over this WiFi network but did not try downloading images as they are captured as that is not my objective. As I mentioned above, differences in the wifi antenna of the laptop or pc being used, local interference from neighboring wifi signals and even RF interference from electrical equipment like a microwave can change the distance at which a reliable connection can be made and/or cause connection disconnects. As far as my tests, I think either travel router will work well for my application with the GL-AR750S-Ext giving me a greater distance capability. I would recommend either so long as your situation is similar. Links are Amazon Associate links. 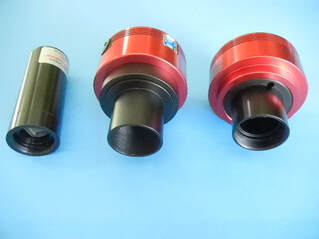 Lodestar X2C, ASI1600MC, ASI224MC Lodestar X2C, ASI1600MC, ASI224MC You might ask, "What is the difference between a camera for EAA and one for astrophotography?". The answer is, nothing really. There is no hard and fast line between the two activities. Any camera that will work for astrophotography will work for EAA and vice-a-versa including DSLRs. Now, there are cameras that are more commonly used for EAA and these are the cameras with CMOS sensors selling for a few hundred dollars to no more than ~$1500. Based upon posts on multiple forums, I would estimate that the most common EAA cameras fall into the price range of $250 to $1300. Again, there is no hard and fast rule here. But you will find that the cameras costing more than ~$1500 are generally used by astrophotographers and not those doing EAA. Astrophotographers have traditionally used cameras with CCD sensors because of their higher sensitivity compared to CMOS sensors. But that is changing as the sensitivity of CMOS sensors is approaching that of CCD sensors while the CMOS sensors have the advantage of much lower read noise. Lower read noise makes live stacking of short exposures extremely practical for EAA. In addition, the two major suppliers of CCDs are Sony and On Semiconductor. In 2015 Sony announced that it would stop development of new CCDs by 2017 and On Semiconductor announced it would stop production of all CCDs in 2020. So as supplies of CCDs on hand dwindle, new astronomy cameras will eventually only use CMOS sensors. Therefore, in this blog we will concentrate on those with CMOS sensors costing no more than ~$1500 and only discuss a few using CCDs. That will leave out many CCD cameras from companies like SBIG, QSI, FLI, Apogee, QHY, Starlight Xpress, and Atik which are more often used by astrophotographers. Another important point that needs to be made is the distinction between cameras for Deep Sky Object (DSO) viewing and cameras for planetary viewing. Once again there is no hard and fast line between the two, but typically cameras for planetary work have smaller sensors, fewer pixels and higher frame rates. This is because the planets are small bright objects and lucky imaging is employed to capture thousands of sub-second frames from which a few hundred of the best images are used to create a final image. In contrast, DSOs are much larger and fainter and exposures are several seconds to tens of seconds in length. Having said this, both types of cameras can produce pleasing images of both types of objects. Cost For most of us, the cost of a camera for EAA is the primary driver of what we ultimately buy. Fortunately, it is not necessary to spend a lot of money for a camera for EAA. An entry level camera like the 1.2 Mega Pixel (MP) Rising Tech IMX224 camera with the 6.1mm diagonal Sony IMX224 color sensor is available for $165. If you already have a telescope on a motorized mount the cost of entry is very minimal. While the IMX224 sensor is small, it is quite capable and provides a cost effective option for the EAA beginner. In fact, when first introduced around 2015, the ASI224MC using this sensor and costing $300 was widely popular as one of the earliest CMOS cameras to be employed by the EAA community. As larger CMOS sensors became available, cameras with increasing pixel count and sensor size have been widely adopted for EAA. It is now possible to find CMOS based astronomy cameras prices from the $165 camera mentioned above to many thousands of dollars. The most commonly used EAA cameras today have color sensors with pixel counts of ~9MP to ~20MP, and sensor diagonals of ~15mm to ~23mm. Obviously as the sensor size increases, the cost goes up as well. Other drivers of cost include a Peltier cooler to minimize thermal noise , an internal memory buffer to prevent lost frames during image download and a USB hub for connection to a focuser and guide camera. We will review a comprehensive list of available cameras and cost once we discuss the key camera attributes we need to understand before choosing which camera is best for our needs. Color or Mono (B&W) Perhaps the most important consideration when choosing a camera for EAA is whether to choose a color or monochrome camera. Many cameras are available with either color or mono (black and white) sensors. Color sensors are just mono sensors with a red, green and blue filter matrix on top of the individual pixels. This matrix is called a Bayer matrix after the Kodak scientist who invited it in 1976 to turn a mono camera into a color camera. Because the human eye is most sensitive to green light, the Bayer matrix is typically arranged as a 2 x 2 matrix of pixels with 2 green and 1 each red and blue filters. These days, the filters also act as micro lenses to focus off axis photons onto the pixel thereby maximizing the light collection sensitivity of the sensor. Sometimes cyan, magenta and yellow filters are used instead of red, green and blue but the result is the same. To realize the full real time viewing experience only a color camera can show the rich colors present in nebulae, star forming clusters in distant galaxies and the different colors of stars at various stages of their lives. Being able to view objects in color is one of the major advantages of EAA compared to viewing with an eyepiece (EP). Because of the filter matrix associated with a color camera, some sensitivity is lost compared to a mono camera as a trade off for the simplicity of a one shot color camera (OSC). While there is nothing preventing the use of a mono camera for EAA, they are more often used for astrophotography combined with external filters to capture images at each color which are combined later to form a full color image. Some EAA'rs use a mono camera to view DSOs in black and white in real time to take advantage of the added sensitivity of a mono camera, or even use a mono camera with one of the possible narrow band filters available (hydrogen, oxygen, sulfur) to view specific detail in deep sky objects. This may be a good approach if you ultimately want to pursue astrophotography as well. We will see below that cameras with the mono version of a particular sensor cost significantly more than the color version which is another reason for the greater popularity of a OSC camera for EAA. Chip Size The size of the sensor chip will determine many important attributes of the camera. Most important, the larger the size of the chip, the bigger the field of view (FOV). In the Blog "Choosing a Telescope for EAA" we made the point that the FOV for an optical system consisting of a telescope and a camera is given by the equation: FOV ~ 57.3 L / F where L is the length of one side or diagonal of the sensor chip in mm, F is the telescope focal length in mm and FOV is in degrees. So the larger the sensor chip the larger the FOV. For instance, let's take the case of an 8" SCT with a Celestron f/6.3 focal reducer to achieve a focal length of 1260 mm (2000 mm x 0.63). Assume we are using one of the cameras like the Rising Tech 224 or the ASI224MC, with the 6.46mm diagonal Sony IMX224 chip. The FOV will be 0.29 degrees along the diagonal, slightly larger along the long axis and slightly smaller along the shorter axis of the chip. Now, if instead we use a camera with the Sony IMX294 chip with a diagonal of 23.2 mm the FOV will be 1.05 degrees along the diagonal which is 3.6 times larger. The larger chip size has several advantages. First, it allows us to capture much larger DSOs in a single image frame. An excellent tool for calculating FOV and image scale for different optical configurations is Ron Wodaski's CCDCalc. The side by side images below were generated by CCDCalc using a telescope with a focal length of 1260mm (our 8" SCT with f/6.3 focal reducer or any other telescope combination to achieve the same focal length) and the IMX224 and IMX294 camera dimensions. Clearly, something like the Triffid Nebula is too large to fit into a single frame with the much smaller chip of the IMX224, but fits nicely into the chip of the IMX294. In addition to enabling larger DSOs to fit inside a single frame, the larger FOV can make it much easier to align the telescope and to find objects because of the larger FOV. In effect, the sensor diagonal acts like the focal length of an EP in determining the FOV. So, the IMX224 with a diagonal of ~6.5mm gives a similar FOV as a 6 to 7 mm focal length EP, while the IMX294 gives a similar FOV as a 23 mm focal length EP. On the other hand, the smaller sensor, like the smaller focal length EP, provides higher magnification of an object compared to the larger sensor. Compare the image frames for M61 below between the IMX224 and IMX294 sensors. Obviously, the image will appear larger on the computer screen with the IMX224 sensor and will fill the frame while the image appears much smaller with the IMX294 sensor. Now there is a trick here. The IMX224 has only 1.2MP while the IMX294 with 11.3MP has nearly 10X the number of pixel. The image from the IMX294 can be zoomed in or viewed on a much larger screen like a 60" TV without producing a blocky or pixelated image whereas the IMX224 image doesn't have enough pixels to do that. The IMX224 image will support a 720p video display format which is just below full HD or 1080p, while the IMX294 has more resolution than a 4k video display. Having said that, the IMX224 resolution is more than 2X that of the analog video cameras with 0.4MP which were the only options for EAA up until ~ 2015. Another thing to be aware of as the sensor size increases, vignetting of the image will become more obvious. As the light travels through the optical path any narrowing of that path due to baffling inside the tube, the diameter of the opening at the back end of the telescope, the focuser, any adapters, focal reducers, filters, etc. can block some of that light toward the outer radius of the FOV. This will show up as a halo toward the outer edge of the image. This is typically not a problem in the very small sensors less than 10mm in diagonal. Focal reducers will make vignetting worse as they push the light cone further back from the exit of the telescope. Vignetting may or may not be an issue for the individual viewer depending upon how severe. This is why APS-C (28mm) and full frame cameras (43mm) can be challenging. However, vignetting can be corrected with flat frames applied to the image on the fly with live stacking software. It should also be noted that as the sensor size increases, so does the number of pixels which means that file sizes get larger fast. This directly impacts the the amount of computer storage necessary if one wants to save images. It also can impact the ability to stack images live in software if the computer used doesn't have sufficient CPU capability. 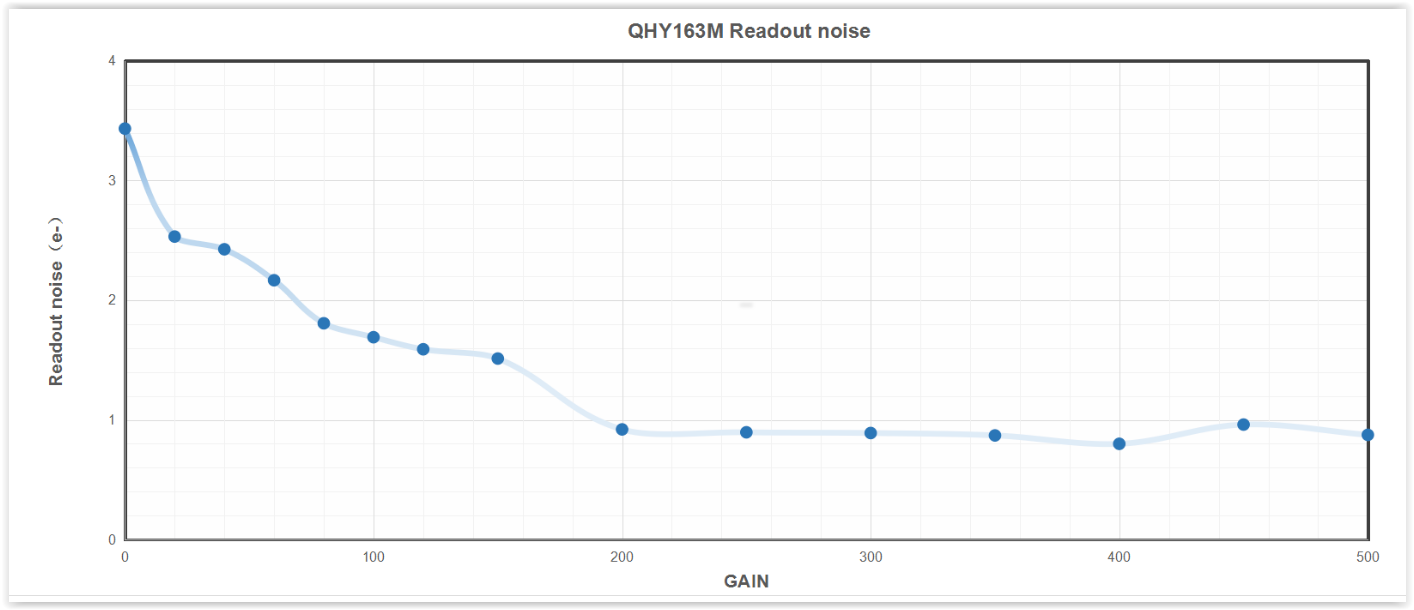 Read Noise vs Gain for the QHY163c camera, from QHY website Read Noise vs Gain for the QHY163c camera, from QHY website Read Noise The biggest driver of the move from CCD cameras to CMOS cameras after cost has been the fact that CMOS cameras have amazingly low read noise. What is read noise? It is the random noise due to the uncertainty in counting the number of electrons created in each pixel by the photons striking that pixel. Read noise is independent of the signal, or amount of photons collected, so it is independent of the exposure. This noise is introduced into the image data when the captured image frame is downloaded from the sensor to the output device, display and computer hard drive. Read noise for CCD cameras is typically greater than 5electrons (5e). The Atik Infinity camera with the Sony ICX825 CCD has a read noise of 6e while the Starlight Xpress UltraStar using the Sony ICX825 CCD has a much better read noise of 3.5e. CCD cameras used for astrophotography like the SBIG STF-8300 have as much as 9.3e of read noise. In contrast, CMOS cameras can have a read noise less than 2e depending upon the gain setting used. At this level, the read noise is less than the other sources of noise which impact the image and can effectively be ignored for EAA. The read noise is a strong function of gain used as shown in the plot from QHY below. A lower read noise means that there is no penalty for taking many short exposures and stacking them live rather than taking a single long exposure. In fact, commensurate with the introduction of these low read noise CMOS cameras, live stacking software like SharpCap became widely available. Whereas in the bygone days of analog cameras with CCD sensors we used exposures of 30 seconds to several minutes to bring out detail in our images, EAA has moved more toward stacking many very short exposures, 5 and 10sec, to achieve the same total exposure time now that live stacking software is readily available. The ability to use many short exposures has had multiple effects on EAA. First, instead of waiting a minute to see something on our display, we begin to see the faint evidence of a DSO in very short order. This gets better in real time right before our eyes with more detail and less noise with each additional frame added to the stack. Second, the use of short frames means that a less than perfect polar alignment of our equatorial (EQ) mount does not cause objectionable star trailing since the exposure is not long enough to show the effect of an imperfect alignment. Third, with very short exposures we can now use Alt-Azimuth mounts for EAA which are simply out of the question for traditional astrophotograpy. Alt-Az mounts have the advantages of being much easier to set up since a polar alignment is not needed nor is one possible. Also, Alt-Az mounts tend to be less expensive than EQ mounts. Fourth, shorter exposures can also help to avoid saturation of bright stars in the FOV, thus improving the dynamic range of the viewed image. So, low read noise can be a big plus for EAA enabling short exposure live stacking, the use of less expensive mounts, and a simpler setup routine. Fortunately, most CMOS cameras have exceptionally low read noise and one can concentrate on other features in deciding which camera is best suited to their EAA needs. 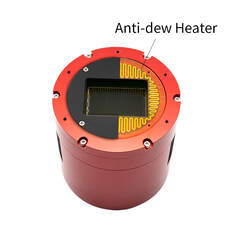 Cut-away view of anti-dew heater Cut-away view of anti-dew heater Cooling Yet another choice one must make in selecting a camera is whether to purchase a cooled or uncooled camera. Many models are available with Peltier or Thermo Electric (TEC) cooling of the camera sensor to minimize thermal noise. Thermal noise is the result of heat buildup inside the camera from the camera electronics and from the background air temperature. Thermal nose results in a dark current within the camera sensor which shows up as random noise in the background of an image frame. Thermal noise is fairly predictable at a given temperature and can be controlled with a well regulated TEC. A TEC typically allow for temperatures to be maintained ~ -35 to -40 degC below ambient. Cooling is more important for long exposures as the heat built up in the camera during these long exposures is greater than in short exposures. Therefore, if the strategy is to stack many very short exposures, say 10sec or shorter, the advantage of TEC cooling may not be worth the added cost and complexity. Also, the background noise from the dark current can also be very effectively removed by using dark frame subtraction. A set of dark frames, typically 16, can be collected and averaged at the exposure planned for live viewing. The dark frame average is used as a master dark frame which can then be subtracted on the fly with live stacking software like SharpCap to remove the dark noise from each frame. For this to be effective, the dark frames must be collected at the same exposure time, gain and temperature as the frames during live viewing. Also, because ambient temperatures can drop significantly during the night, new dark frames may need to be taken and a new master dark frame used throughout the night. On the other hand, with TEC cooling, a library of dark frames can be made ahead of time at different exposure times and temperature offsets from ambient to be used as needed throughout the night. This library can be made during the day or during a cloudy night so that no time is wasted on nights with good visibility. Several things need to be considered when using a camera with a TEC. First, the lower temperature at the sensor can result in dew buildup on the sensor and on the camera's glass window. Many cooled cameras come with a sealed chamber to minimize water vapor causing dew build up inside the chamber. This still leaves the outside glass window of the chamber exposed to dew buildup which is why many cooled cameras now come with a dew heater strip surrounding the chamber window. Second, while the camera itself requires very little power, typically less than 2.5W which can be supplied via the USB connection to the camera, cooling requires an additional 12V power supply capable of supplying ~20 - 35W and an additional cable to the camera. Consideration for extra battery capacity when visiting a remote dark site is also necessary with a cooled camera. 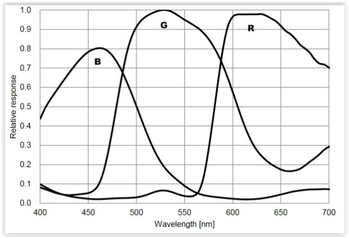 Quantum Efficiency for ZWO ASI294MC from ZWO website Quantum Efficiency for ZWO ASI294MC from ZWO website QE, Full Well Depth, Bit Depth, Frame Rate With so many different specifications for the sensors inside astronomy cameras, there is not single ideal camera. Most likely, once you determine the price range you plan to spend, whether to go with color or mono, cooled or uncooled and the chip size that will work best for your application, the remaining specs will already be determined. Nonetheless, it is worthwhile to go over those additional specifications as they will impact the performance of the camera. Quantum efficiency (QE) is a measure of how well the pixels in the sensor convert an incoming photon into electrons. The silicon which makes up the sensor is responsive to light over a range of wavelengths centered in the visible but extending into the near infrared and ultraviolet, typically from ~300nm to 1,000nm. The QE varies with wavelength and is usually expressed in a graph with separate curves for red, green and blue light. Quantum efficiencies can vary quite a bit with values ranging from 50% to 84% for typical EAA cameras. The lower the QE the longer the exposure needed to collect the same amount of photons compared to a higher QE. 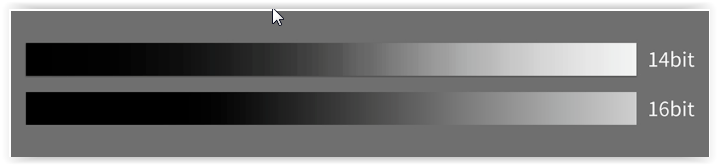 A 16bit sensor has a finer graduation grey scale compared to 14bit. Source ZWO A 16bit sensor has a finer graduation grey scale compared to 14bit. Source ZWO Another important attribute of the sensor inside a camera is called the full well capacity. This is a measure of the maximum number of photons that a pixel can collect before it is full of electrons and cannot detect any additional photons. The full well capacity is proportional to the size of the pixels with larger pixels capable of capturing more photons before they become full. Full well capacities can vary significantly from camera to camera with a range of about 15K electrons for the IMX183 sensor with a 2.4 micron pixel size to 64K electrons for the IMX294 sensor with a 4.63 micron pixel size. Full well capacity will determine the range between the brightest object and the dimmest object. If the full well capacity is small, bright stars will saturate unless the exposure is shortened which will reduce the intensity of the dimmer objects in the FOV. All other things considered, a higher full well capacity is preferred. It should be noted that the stated full well capacity is measured with zero gain. Gain is equivalent to the ISO setting on a DSLR camera which multiplies the number of electrons captured at each pixel thereby increasing the camera's sensitivity by allowing resolution of smaller differences in the number of electrons captured. Gain values can be anywhere from 0 to ~450 depending upon how the camera manufacturer sets it up. The trade-off with higher gain is reduced dynamic range. Dynamic range is the ratio of the largest signal (brightest object) to the smallest signal (dimmest object or background sky). A large dynamic range is desired to show the full range of objects without washing out the brightest ones in the image. For instance, a large dynamic range is needed to capture the dark dust lanes without blowing out the core of a galaxy. As gain is increased the full well capacity of the camera is reduced because the multiplication factor uses up more the the well capacity. This, in turn, causes the dynamic range to decrease. So gain helps with sensitivity but hurts with dynamic range. Yet another specification that you will find with each camera is bit depth. Typical cameras used for EAA have bit depths of 12 or 14 but some of the newest higher prices cameras are 16 bit. What is bit depth? After the camera captures an image frame an analog to digital converter (ADC) converts the analog voltage associated with the number of electrons in a pixel into an integer or digital value. With a 12 bit device, 2^12 or 4096 discrete values are possible for each pixel. At 12 bits, the camera uses a bit value of 0 for no voltage detected and 4096 for the maximum voltage detected. A 14 bit device has 4 times as many possible values so it also uses 0 for no voltage but can now use 16,384 bits for the maximum voltage detected providing a finer scale with which to better differentiate details within an image. A bit depth of 14 is most common among the current batch of CMOS cameras, but 16 bits is starting to show up in the latest high end CMOS cameras. A 16 bit device has 65,536 possible values. The more bits possible, the finer the resolution in the photon levels detected. All other things considered, a camera with a higher bit depth is desirable. Above is a comparison from ZWO showing the increased grey scale resolution with more bits Cameras will also have a maximum frame rate specification which indicates how many full frame images can be downloaded from the camera per second. The download rate may be limited by external cabling, with USB3 supporting higher data rates than USB2. Frame rates are not super important for EAA since exposures are a few seconds or longer. Frame rates of 10 to 23 frames per second (FPS) are typical for cameras commonly used for DSOs. This is in contrast to planetary cameras with frame rates of 20 FPS to 170 FPS. Which is not to say that a camera used for DSOs cannot also be used for planetary imaging; just that it is not optimized in terms of pixel size and frame rate for planetary work. Another point to note, with binning the frame rate will increase since there are less individual pixels of data to transfer. 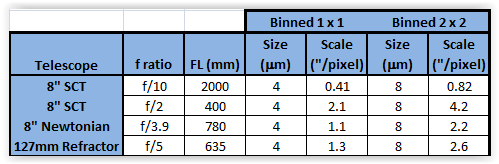 USB Hubs, Internal Memory, Binning, etc. There are several other features to consider when choosing a camera which will be discussed here. Most CMOS cameras today allow binning of the sensor pixels which simply merges the signal from adjacent pixels into one larger pixel. Typically binning is available in 2x2, 3x3 and even up to 4x4. Binning 2 x 2 means that four adjacent pixels are combined into one, which effectively increases the pixel size by a factor of 4, improves the sensitivity by a factor of 4, but reduces the resolution by the a factor of 2. Binning 3 x 3 combines a 3 pixel square of 9 pixels into one and 4 x 4 binning combines a 4 pixel square of 16 into one very large pixel. Because of the increased sensitivity, binning is helpful when searching for objects, doing an alignment and framing targets as it shortens the time needed to get a recognizable image. How does binning with a OSC camera keep the color since the adjacent pixels have different (R, G, B) color filters? The answer is that the binning is done in software which allows the camera to deBayer the image before binning so as to preserve the color information. Now that we are discussing binning, we need to also visit the concept of image scale. Recall from the Blog " Choosing a Telescope for EAA" that image scale is determined by the ratio of the sensor pixel size to the telescope focal length. Image Scale (arcsec/pixel) = 205 x Pixel Size (microns) / Focal Length (mm) Now, it is widely accepted that typical seeing limits observable detail to ~ 2 arcsec per pixel. On nights of better seeing an image scale less than 2 arcseconds per pixel is possible. Consider an 8" SCT at f/10 with a focal length of 2000 mm. Let's use 4 microns as an approximate size of a pixel in a typical EAA camera. This gives an image scale of 0.41 arcsec/pixel which is much smaller than the typical seeing which means that we are oversampling relative to the sky conditions. Now, what if we use a Hyperstar lens to achieve a focal ratio of f/2 so that the telescope focal length is now 400mm. In this case we are operating at ~2.1 arcsec/pixel which is perfect for typical seeing conditions. Take another example of an 8" Newtonian at f/3.9, or 780mm which gives an image scale of ~1.1arcsec/pixel. And last, consider a 127mm refractor at f/5 with a focal length of 635mm which leads to an image scale of ~1.3 arcsec/pixel. The point is that with the small size of CMOS sensors, with most telescope setups we will be oversampling relative to a 2arcsec/pixel seeing limit. There is no harm in this, but it does say that we can bin 2x2 and get the advantage of 4X the sensitivity without loosing significant resolution in all but the best seeing conditions. With 2x2 binning of a 4 micron pixel the pixel size becomes 8 microns and the image scale increases accordingly as shown in the table below. Because the image scale with typical CMOS pixel sizes is much smaller than 2arcsec/pixel, binning will not reduce the resolution unless the seeing conditions are sub 2arcsec/pixel or even sub 1arcsec/pixel. Another concept we should discuss is amp-glow. In the days when we used analog cameras with CCD sensor all cameras had to deal with amp-glow. Amp-glow appears as a bright region at an edge or corner of the image which is caused by IR radiation from the read out amplifier. These IR photons are picked up by the nearby pixels and show up as a background glow, hence the name amp-glow. Now, CMOS sensors have completely different circuitry but can still suffer the effects of glow from the other on board circuitry and this varies from camera to camera in intensity, number and shapes of glowing regions. The pictures below show several different types of amp-glow possible with different sensors. Amp-glow can be handled with dark frame subtraction which, for EAA, means live stacking software must be used. Some cameras advertise amp-glow control which can virtually eliminate the effect without dark frame subtraction. An internal memory buffer is used to increase the readout speed thereby reducing the time the readout circuits are active. Several camera makers also have "Anti Amp-Glow" hardware and software which reduces the power in the CMOS circuitry thereby minimizing amp-glow but no real details are given about how they do this. Minimum and maximum exposures vary by camera but typically have a minimum of tens of micro seconds which is sufficient for bright planetary objects and maximums of 30 to 60 minutes which is much more than is needed for EAA. The Atik Infinity has the shortest maximum exposure of 120 seconds but because it uses the very sensitive Sony ICX825 CCD this is more than sufficient for most EAA applications but does limit the total time for live stacking to 2 minutes. Most dedicated astronomy cameras these days come in a cylindrical shaped body which are designed to have a small footprint. This is important when using the Hyperstar adapter on an SCT as it minimizes the amount of incoming light blocked by the camera. The bodies are typically ~3" or smaller in diameter. The ATIK Infinity is an exception as it has a rectangular body 70 x 113mm in dimensions. On the other hand, cooled camera bodies are 4" to 5" long which means that they will run into the base of some Alt-Az mounts like the Celestron Nexstar mounts. 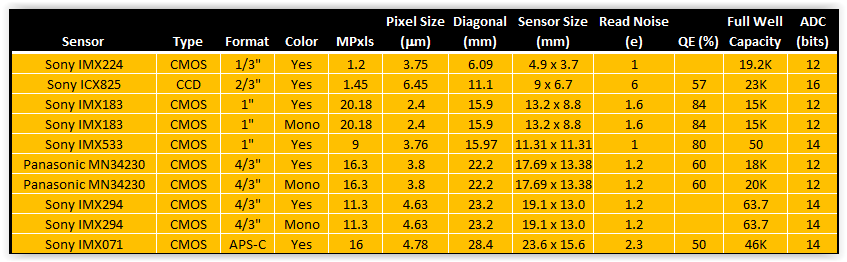 Camera Options for EAA Like mounts and telescopes, there are far too many cameras available for EAA to cover them all. We will concentrate on CMOS cameras with two exceptions for popular CCD cameras. Also, it is important to note that the manufacturers of the cameras we will discuss use the same sensors from Sony and Panasonic so one can find very similar cameras from ZWO, QHY, Mallincam, Rising Tech, Altair Astro, etc. Below is a table of the key characteristics of the most commonly used sensors in EAA cameras. The table is arranged from smallest to largest diagonal. Many of these sensors come in both a color and mono version, although color is much more commonly used for EAA to get the full benefit of real time viewing. The advantage of the mono sensor is its higher sensitivity, especially when used with narrow band filters to cut through local light pollution. The smallest sensor is the IMX224 which was discussed above and can be found in the least expensive cameras. Most sensors have diagonals in the range of 16mm to 22mm which can result in obvious vignetting especially if significant focal reduction is used. Vignetting can be addressed with flat fields when using live stacking software or minimized with a telescope which has a large fully illuminated image circle. Vignetting is especially problematic when an APS-C format sensor like the IMX071 is used or a Full-Frame sensor like the IMX455. We will not discuss the Full-Frame format sensors and cameras here as they are much more suited to astrophotography even though certainly can be used for EAA. The values of the Read Noise given in the table are the minimums as Read Noise varies with the Gain used. Quantum Efficiency (QE) is not available for all sensors for some reason. Cameras are available for most of the sensors shown with TEC cooling. Also, all but a very few of the cameras come with a USB3.0 connection to the camera which provides faster download speeds compared to USB2.0. Camera bodies are all cyclindrical with the exception of the Atik Infinity. TEC cooling requires a much larger camera body length which will not clear the base of an Alt-Az mount when pointing near the zenith unless it is one of the side mount Alt-Az telescopes. 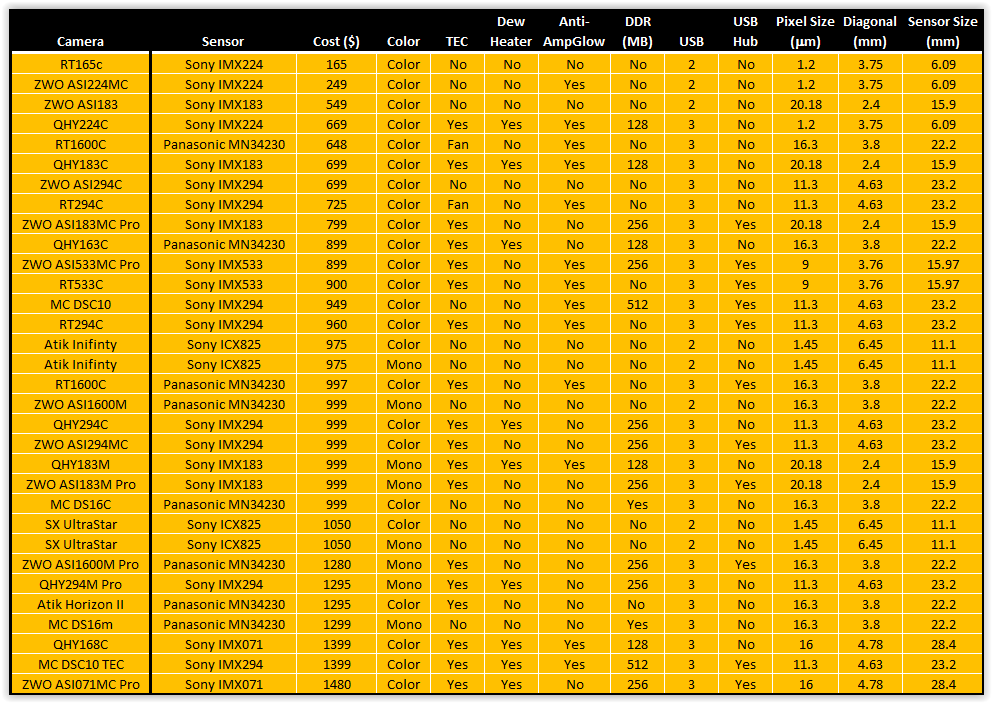 When choosing among cameras with the same sensor but from different manufacturers here are some additional things to look for: 1. DDR Memory: Built in DDR memory comes in either 128MB or 256MB. Note that 1 MB is the same as 8Gb as some express the memory in Gb instead of MB. It takes 8 bits (b) to make 1 byte (B). This added memory prevents frames from being dropped when transferring the data from the camera to the computer due to the high pixel count of many cameras. It can have the added benefit of reducing amp-glow as discussed below. ZWO cameras typically uses 256MB as does Mallincam while QHY uses 128MB except in their highest end cameras. Rising Tech generally does not indicate whether or not any of their cameras have memory. 2. USB Hub: Typically, cameras with cooling come with a 2 port USB2.0 Hub which can be used to connect two other devices such as a filter wheel, focuser or guide camera. This simplifies cabling and reduces the number of cables which must hang from the telescope to a computer or a USB Hub below. ZWO, Rising Tech and Mallincam provide 2 port USB2.0 hubs on their cooled cameras but QHY does not. 3. Anti-Amp Glow: In addition to DDR memory, some cameras have additional methods to combat amp-glow which may include software and additional hardware tricks which they do not explain in any detail. QHY indicates Anti-Amp-Glow features on some of their cameras while Rising Tech and Mallincam indicate it on almost all of their cameras. ZWO claims Anti-Amp-Glow for their ASI224MC and on their newest full frame camera the ASI240MC Pro. 4. Anti-Dew: Cooled cameras will often cause water condensation on the sensor window which may even ice up completely bringing a viewing session to a grinding halt until the camera is warmed. All cameras come with a sealed window using a gasket to keep water vapor outside the sensor. QHY and Mallincam add a thin heater on the chamber window which keeps water from condensing on the window. QHY cameras and the Atik Horizon II have a removable and re-chargeable silica gel pack to absorb any water vapor inside the sensor chamber which must be removed and baked from time to time to remain absorbent. Mallincam vaccum seals the chamber on some of its cameras. Rising Tech does not indicate the presence of a heater. ZWO seems to only have the heater on its latest designs like the ASI240MC Pro, but does does offer an after market heater kit which can be easily attached to the camera window although the power connection is not integrated into the camera itself. 5. Fan: A few of the lower cost Rising Tech cameras use a fan instead of a TEC for cooling which will not produce the same low temperature noise reduction as a TEC. Some cameras with TEC also have a fan to assist with heat dissipation. 6. Accessories: Additional accessories vary greatly. ZWO includes USB cables for both the camera and the Hub (if present), as many as a half-dozen adapters/spacers which are helpful in setting the correct camera spacing. They also supply a camera cover and a soft carrying bag. Rising Tech includes a 1.25" adatper, one 2m USB3.0 cable, and a 2m guider cable with its non cooled cameras. With its cooled cameras Rising Tech supplies 1.25 and 2" adapters, a 1.5m USB3.0 cable, a power supply for the cooler and a hard plastic carrying case. Similarly Mallincam provides a 2" adapter, one 15ft USB3.0 cable, and a guider cable with its non-cooled cameras and adds a power supply for the cooler and a hard plastic carrying case for its cooled cameras. QHY supplies their cameras with a 2" adapter, 1.5m USB3.0 cable, power and guider cables, a car power adapter, a desiccant tube and desiccant. 7. Software: Camera control and live stacking software has become very common for EAA since Robin Glover introduced SharpCap in 2010. SharpCap works natively with both ZWO , QHY and Starlight Xpress cameras and will work with other cameras using an ASCOM driver. The free version of SharpCap has camera control and live stacking capability. ZWO also has their own proprietary software called AstroLive which only works with their cameras. Rising Tech cameras come with Rising Sky software and Mallincam cameras with Mallincamsky. Atik cameras have their proprietary softwaren called Infinity which is considered one of the easiest and most intuitive software applications to learn because it does not have all of extra features not absolutely needed for EAA as does SharpCap. Starlight Xpress's software is called Starlight Live. While all of these do live stacking and on the fly processing, SharpCap is arguably the most complete package, especially if one uses the subscription version which includes plate solving, polar alignment and many other useful functions which are not necessary for EAA but make the process of setting up, aligning, focusing, etc. much easier. But it can have a steep learning curve. Certainly camera manufacturers try to distinguish themselves from their competitors so there are other differences among them including the use of AR coatings on chamber windows, DDR3 vs DDR2 memory, global vs rolling shutters, etc. Check competing manufacturer's sites for these additional details. We will only consider cameras under $1500 even though there are a multitude of cameras beyond that price range because cameras need not cost so much to bee fully sufficient to meet every EAA need. More expensive cameras can be considered if one anticipates using a single camera for EAA and astrophotography. The table above lists the wide assortment of cameras within this price range from ZWO, QHY, RisingCam, Mallincam, Atik and Starlight Xpress (SX). For those in Europe, Altair Astro in the UK has a wide assortment of the same cameras. It is widely understood that cameras from RisingTech, Altair Astro and Mallincam originate from the camera manufacturer ToupTek in China. (Note that cameras from RisingCam are commonly referred on the astronomy forums as RisingTech as I think this was their original name). These re-branded cameras are able to select different options from the original equipment manufacturer and may even provide different specifications to distinguish their cameras from their competitors. For instance, Mallincam specifies ZWO, QHY, Atk and SX all manufacture their own cameras but, as mentioned above, choose from the same supply of sensors as everyone else. Cameras using the Sony IMX224MC color sensor were the first CMOS cameras used for EAA. Since the sensor only has a 6mm diagonal and 1.2MP, cameras with the IMX224 are now more often used as planetary cameras but can still be a great entry level EAA camera due to their low price. Because of the very small diagonal of this sensor the FOV will be very narrow for any telescope at a focal length of 1000mm or longer. Therefore it is common to use a focal reducer to get closer to 500mm focal length which will provide a FOV close to 0.5deg. Otherwise, it can be difficult to find DSOs unless you are using a plate solving software. Cameras with the IMX224 sensor can be obtained from Rising Tech on AliExpress for $165 or from ZWO from most astronomy retailers for $199. Both are uncooled cameras with a small form factor body which will not have a problem working at the zenith in an Alt-Az mount like the Celestron Nexstar. QHY offers a cooled version with anti-amp glow and internal memory for $669 but it will not work near the zenith on mounts like the Nexstar because of its large body. Soon after the IMX224 cameras were introduced, the Panasonic MN34230 sensor with 16MP became available in cameras from a number of different manufacturers. These immediately became popular for EAA due to their larger sensors and reasonable prices. Cameras with the Panasonic sensor come in cooled, uncooled, color and mono versions. Cameras with mono sensors are always significantly more expensive than their color cousins. Rising Tech offers an uncooled color camera with the Panasonic IMX1600 chip for $648 and a cooled version for $997 while QHY offers its cooled color version for $899. ZWO discontinued their color version of this camera a few years back and now only offers the mono cameras in uncooled and cooled versions for $999 and $1280, respectively while Risking Tech's uncooled mono camera sells for $990. Mallincam's cooled color camera is available for $999. More recently, the Sony IMX294 sensor with 11.3MP started showing up in cameras from ZWO, QHY, Rising Tech and Mallincam. With a similar sensor size as the Panasonic MN34230, the Sony IMX294 provides a much deeper well depth, slightly larger pixels for greater sensitivity and 14 bits instead of 12 bits ADC. ZWO offers its ASI294MC uncooled color camera for $699, or its ASI294MC Pro cooled color camera for $999. QHY has a color cooled version, QHY294c, for $999. Rising Tech has an uncooled color version for $725 and a cooled color version for $960. Mallincam's DSC10 is an uncooled version for $949. 1" format sensors with ~16mm diagonals can be found in the 20MP IMX183 and the 9MP IMX533 Sony sensors. The least expensive camera in the 1" format is the uncooled ZWO ASI183 for $499. The QHY183c and the ZWO ASI183MC Pro cameras are both cooled color cameras and retail for $699 and $799, respectively. Cooled mono versions are $999 from both QHY and ZWO. The IMX533 sensor can be found in the cooled ZWO ASI533MC and Rising Tech 533c for $799 and $900, respectively. Just under $1000, Atik offers their Infinity camera with its signature rectangular shape and Sony ICX825 CCD with 1.2Mp on an 11.2mm diagonal. When first introduced about 5 years ago the Infinity was well received because of its performance and its Infinity live stacking software which is regarded as one of the easiest to master. But at $975 I believe it is now over priced given the fact that one can obtain a much larger sensor with cooling and internal memory for about the same price. If you have your heart set on one of these, look for a used camera for ~$450 on the Cloudy Nights classifieds. I have the same thought on the SX Ultrastar also with the ICX825 which sells for $1050. The camera table above lists 9 cameras above $1000, 4 of which are with mono sensors which always sell for much more than their color cousins. Unless you want to do mono EAA for the higher sensitivity, or want to use narrow band Ha or OIII filters to bring out specific details in nebulae, these are overkill for EAA. The QHY and ZWO cameras with the Sony IMX071 sensor are listed here because these have an APS-C format sensor with the largest diagonal at 28.4mm of all the cameras listed here. This would be a good camera if one wants to do both EAA and traditional astrophotography, but with such a large sensor expect to deal with significant vignetting. Summary
Clearly there are many possibilities when it comes to cameras for EAA. With so many choices it can be challenging to decide which camera is best suited to ones' needs. A good approach may be the following. First decide your price range. When doing so, consider waiting to to buy something with a much larger sensor than the IMX224 like the IMX183 cameras from ZWO or QHY rather than rushing into one of the low end cameras with the idea of buying a better camera later. While the IMX224 cameras are a great choice for someone on a tight budget, cameras like those with the IMX183 or even the IMX294 are a better choice for the long run if you can eventually work it into your budget by waiting. Or, pick up a higher end camera on the used market to move up in features right away. Cameras are pretty robust so there is not a great deal of risk to buy used. In that case it is a good idea to ask for a recent 60sec dark frame to make sure that the camera does not have too many hot pixels. Cooling is nice to have and essential for astrophotography, but for the short exposures used in EAA exposures cooling is not absolutely necessary. This will keep the cost down. If you are planning to use an Alt-Az mount with the telescope centered on the mount a cooled camera will make it impossible to view objects around 80 to 90 degrees in altitude. A sensor in the 15mm to 23mm range gives a good FOV for large objects without having to be too aggressive with focal reducers. Color cameras add a satisfying dimension to real time viewing which mono cameras cannot. When you do purchase a camera make sure that you have the necessary spacers to place the sensor at the correct distance from the back of the telescope to get an image without artifacts. Screw on spacers are better than slide on spacers since they will have less flex, but both will work. You can look through more detailed summaries of most of the cameras discussed here on the Oceanside Photo & Telescope (OPT) or the High Point Scientific web sites. OPT and High Point Scientific links are Affiliate links from which I can earn a commission at no cost to you. If you would like to support my web site and its content please consider using my links when ordering products. Almost any telescope can be used for EAA. There are a few telescopes which will not work at all although some will require modification and a few will not provide the best user experience. Any telescope that will work for astrophotography will also work for EAA, but a high end astrograph is certainly not a requirement for EAA. When we talk about telescopes, here we are talking about the optical tube only, not the combination of an optical tube and mount which is often how telescopes are sold. Three important general considerations for choosing a telescope for EAA are focal ratio, aperture and focal length. Another factor that must be considered is whether or not the telescope can be focused with a camera attached as some Newtonian telescopes will not.  Focal Ratio (f ratio) EAA is all about viewing as much detail as possible in real time. This is not astrophotography where lots of sub frames are captured for post processing the next day to obtain a high quality image suitable for publication. Even when using live stacking the objective is to enjoy the view in real time. To achieve this a fast telescope is preferred or at least one which can be made faster with the addition of a focal reducer. In fact, having the ability to work at two different focal ratios with the addition of a focal reducer provides greater flexibility in choosing targets of different size. A fast system allows for shorter exposures and more immediate views. Shorter exposures also put less demands on the mount's tracking accuracy which means a less expensive mount can be used. It also means that a good, but not necessarily a precise polar alignment is required when using an EQ mount. And, as discussed in the blog, "Choosing Mounts for EAA", shorter exposures make it practical to use Alt-Az mounts for EAA. The speed of the optics is determined by its focal ratio which is the focal length divided by the aperture. The focal length is the length of the path the light travels from the primary optical element (objective or mirror) of the telescope to the focal plane. An 8" SCT has a focal length of 2000mm and a 20 mm aperture. It has a focal ratio given by the formula: Focal ratio = Focal Length / Aperture = 2000 / 200 = 10 which is written as f/10. For comparison, a 4" (100mm) refractor with a focal length of 500mm has a focal ratio of f/5. One might be inclined to think that because the 8" SCT has a larger aperture it would require a shorter exposure time to achieve the same image quality since it should capture more light with the bigger aperture. But the fact is that the f/5 refractor has the faster optical system and requires the shorter exposure to achieve a pleasing image. How much shorter? The exposure is reduced by the square of the ratio of the focal ratios: Reduced Exposure = t x (5/10)^2 = 0.25 x t where t is the exposure at f/10. So with the f/5 refractor the exposure required is only 25% as long as at f/10. A 20 second exposure is reduced to 5 sec. The faster the focal ratio the shorter the exposure no matter the size of the telescope aperture. You can immediately see the benefit of shorter focal ratios for EAA. So how is it possible that the larger aperture telescope requires a longer exposure compared to a smaller telescope with a faster focal ratio? To understand this we must compare the image scales for these two telescopes. Image scale is defined as the amount of sky in arcsec which is focused on an individual pixel. It is a measure of the concentration of photons falling on a pixel for a given camera. Image scale is determined by the focal length of the telescope combined with the size of the pixels in the camera used. Longer focal lengths produce smaller image scales for a given pixel size. Image Scale (arcsec/pixel) = 205 x Pixel Size (microns) / Focal Length (mm) Let's compare image scales for our 8" SCT at f/10 to our 4" f/5 refractor. Using the ASI1600MC sensor which has a 4656 x 3520 array of 3.8 micron square pixels the refractor has an image scale of 1.56 arcsec/pixel while the SCT has an image scale of 0.39 arcsec/pixel. The area of sky covered by the sensor is 127.3 arcmin x 96.2 arcmin for the refractor and 31.8 arcmin x 24 arcmin for the SCT. The area of the sky covered by the SCT is 1/16th the area covered by the refractor. Now since the 8" SCT has an aperture twice the size of the 4" refractor it has 4X the light gather area. The net is that the SCT has 4X the amount of light per area of sky but collects light from only 1/16th the area of the sky. Hence, the SCT requires 4X the exposure of the refractor. If we add a focal reducer to the SCT to change its focal ratio to f/5, the image scale increases to 0.78 arcsec/pixel. The area of the sky covered by the SCT increases to 63.6 x 48.1 arcmin which is now 1/4th that of the refractor but since 4X as much light is gathered over that area, the exposure is now the same as for the refractor. When it comes to exposure time, focal ratio is the only thing that matters. The larger aperture of the SCT provides a higher magnification at the same focal ratio so the image appears 4X larger in the SCT given the image scale. Now, as they say, there is no free lunch. With focal reduction comes a concomitant reduction in the field of view (FOV). For focal lengths greater than 200mm the following equation is a very good approximation for the FOV in degrees: FOV ~ 57.3 L / F where L is the length of one side of the sensor chip in mm and F is the telescope focal length in mm. Let us continue with the example of the ASI1600 which has the Panasonic MN34230 CMOS sensor with dimensions of 11.7mm x 13.4mm. Also, let us look at 3 different focal ratios for the SCT, the native f/10, f/6.3 which can be achieved with a Celestron or Meader 0.63X focal reducer, and f/2 which is obtained using the Hyperstar adapter. Taking the long side of the chip we can calculate the FOV for these 3 focal ratio configurations of the SCT as well as for the 4" refractor. Looking at the table we see that for a given aperture, the FOV increases as the focal length decreases. In other words, more of the sky is focused onto the sensor for shorter focal lengths. Now with the shorter focal length and wider FOV, the image captured is smaller than for a longer focal length. Looking at the above table we see that the FOV at 2000 mm is 5X smaller than the FOV at 400 mm. So the object will appear larger in the longer focal length image. The trade-off with focal reduction is an increased speed but a reduced image size. As a general guide for EAA, most DSOs are best viewed at f/4 to f/6, saving the much smaller (distant) objects for larger focal ratios. So when choosing a telescope it is important to look for a naturally fast scope or one which can easily be reduced to f/4 to f/6 with a focal reducer. This is why SCTs and ACFs are popular for EAA as they can be used across a wide range of focal ratios. On the other hand, telescopes with focal ratios greater than f/10 are not preferred for EAA. Examples are the Matsutov-Cassegrain design like the Celestron 4SE, Meade ETX 90 observer and the Explore Scientific First Light 127mm with focal ratios of f/13 to f/15. Yes, they can use focal reducers too, but too much focal reduction can result in severe vignetting causing the light intensity to fall off toward the edge of the FOV which distracts from the quality of the image viewed. So a good rule of thumb is to select a telescope with a native focal ratio of ~f/6 to f/7 or less, or one which can use a focal reducer to obtain a focal ratio of f/6 or less. Aperture Aperture is the the size of the primary optical element in the telescope. For a refractor it is the lens or lenses at the front of the telescope and for a reflecting telescope (SCT, ACF, Newtonian, etc.) it is the large mirror at the back of the telescope. As discussed above, contrary to first thought, while a larger aperture does collect more light, it does not ensure shorter exposures. Focal ratio alone determines the length of the exposure. Aperture determines the minimum resolvable detail or magnification of an object. For a given focal ratio, aperture determines the focal length which in turn determines the image scale or magnification of the object to be viewed. The focal length of a 16" f/10 SCT is 4000mm while the focal length of an 8" f/10 SCT is 2000mm. That means that the resolution of the 16" SCT is 1/2 that of the 8" SCT and the area of the sky covered by the 16" SCT is 1/4 that covered by the 8" SCT which is a magnification of 4x. So the larger aperture telescope provides more resolution or detail than the 8" SCT at the same focal ratio so long as the seeing conditions are sufficient to support the smaller image scale of the 16" SCT. Aperture is the primary driver of the cost of a telescope. Prices for refractors increase almost exponentially as the size of the aperture increases. Typically, as aperture increases so does the complexity of the objective going from a singlet to doublet and even a triplet objective designed to improve or eliminate chromatic aberrations. The same is also true for the prices of SCTs and Newtonians but not as dramatically as for refractors since mirrors are less costly to produce in general than lenses which need 2 sides figured and polished versus a single side for a mirror. The price increases fast as the objective or primary mirror size increases due to the increasing difficulty of manufacturing larger optics. Large apertures also mean more weight. My 9.25" SCT weighs a mere 20lbs, while my 11" SCT weighs 27.5 lbs. After nearly 10 years I decided to sell my 14" SCT because I could not safely mount and demount it at 45 lbs. Not only does the 14" weigh 45 lbs, but because most of the weight is in the primary mirror which is at the back end of the telescope, it is awkward to handle with the uneven weight distribution. Since reflecting telescopes with apertures of 10" or more are common, one also needs to consider cool down times. The primary mirror is a large piece of glass and since glass is not a good thermal conductor, very large mirrors can take a few hours to cool down especially if the day time and night time temperatures are very different. This is especially true for any sealed tube design like and SCT where there is very little natural air flow. Cool down cycles can be increased with the use of fans attached to the backsides of mirrors. Truss tube telescopes allow for more air flow and will cool down faster. Another consideration is dew formation as this becomes more likely the larger the aperture. Dew shields will help but in many cases dew heater straps have to be used around the optical element in the front. Solid tube Newtonians have less of a problem since the tube acts as a very long dew shield. SCTs are particularly susceptible to dew on the front corrector plate, including on the inside of the corrector if a dew shield and/or dew strap is not used. Focal Length While focal length is determined once focal ratio and aperture are defined, it is still worth looking at the impact of focal length separately. As we discussed above, a short focal length telescope provides a large FOV which is much less demanding on the mount's tracking capability and the quality of the polar alignment (assuming an EQ mount). Larger FOVs make it a lot easier to find and identify DSOs. A shorter focal length, less than 600 - 800mm is less impacted by the seeing conditions since it means a larger image scale. Very long focal lengths, greater than 2000mm, can make the image you view a bit soft appearing to be slightly out of focus and displaying less detail due to the effect of turbulence in the air with poor seeing conditions. Very short focal length telescopes are better suited for very large objects, like the North American Nebula, or for sweeping views of a rich field of DSOs such as a cluster of galaxies like Markarian's Chain. On the other hand, there are many DSOs which are better viewed at higher magnification such as the Ring Nebula or the Whirlpool Galaxy. The long focal length images, while more challenging to obtain, will show richer detail including star clusters and nebulae in nearby galaxies which are not possible to see in wide field views. Short focal length telescopes typically have short tubes, are lighter and less expensive. These can be mounted on a lighter and less expensive mount while achieving good tracking capability. A short focal length telescope, like an 80mm refractor with a focal length of 600mm or less is a good choice for a beginner providing an easier and less costly introduction to EAA. Focus If a telescope will not come to focus with an attached camera it obviously will not work for EAA. In order to focus, the camera must be placed at the back focus position which is the distance from the back of the optical tube to the point where the image is focused. The backfocus position changes if an additional optical component such as an eyepiece, focal reducer or tele-extender is placed in the optical path. If the telescope's focuser does not have sufficient travel inwards or outward it will not bring the image to focus on the camera's sensor. A Schmidt-Cassegrain (SCT) or Meade ACF telescope has a large focus range since focus is achieved by moving the primary mirror so it does not have a problem achieving focus with cameras used for EAA. The proper threaded spacers will be required, but those are commonly available. Unless a refractor is designed for astrophotography, called an astrograph, it likely will not have sufficient outward travel to achieve focus without the addition of extension tubes or a diagonal. Once again, extension tubes are readily available for this and refractors are another common choice for EAA. Extension tubes are preferable to diagonals as they eliminate the need for another optical surface, the diagonal's mirror, in the optical path which will slightly reduce the light intensity reaching the camera. Also, extension tubes are available which either slip into or thread onto the refractor's focuser. Threaded connections are preferable as they create a more rigid connection and better ensure the camera is centered in the optical path. Even slip fittings with a centering ring and a thumb screw to lock the extension in place can sag under the weight of the camera, reducer and filters. In contrast to refractors, Newtonian telescopes often do not have sufficient inward travel to achieve focus. In this case a diagonal or spacers will not help since it is necessary to position the camera closer to the primary mirror not further away. A few very small analog cameras like the Revolution Imager I and the cylindrical shaped Lodestar X2 digital camera can slide into the focuser sufficiently to achieve focus on some Newtonians, but none of the more recent vintage of CMOS and CCD cameras are small enough to achieve this feat. In that case, the only solution is to modify the telescope by moving the primary mirror closer to the secondary mirror and, in so doing, push the image plane further outside the focuser enough to achieve focus with the camera. There are a few truss tube Newtonians which are designed with the ability to move the primary mirror toward the secondary mirror to switch from visual mode to imaging mode and these will work for EAA. Otherwise, for EAA it is necessary to purchase an imaging Newtonian or Newtonian astrograph. These have the primary mirror correctly spaced for imaging and EAA. 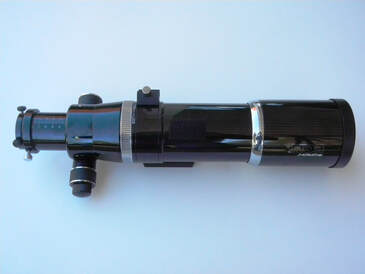 Orion EON f/6.25 Doublet Refractor Orion EON f/6.25 Doublet Refractor Putting it All Together While focal ratio, aperture and focal length are the key attributes which determine a telescopes performance capabilities, cost is typically the biggest factor affecting the final choice. As the aperture increases the price increases quickly. Fortunately, there are good telescope options for EAA in all price ranges and telescope types as we will discuss below. The best option may be to use a telescope already on hand to get started before investing in additional equipment. In that case, you will want to consider your next possible telescope choice before investing in a mount and camera to make sure that they are compatible with your future telescope purchase. The choice of telescope type, reflector or refractor, will play a major role in the price of the telescope for a given aperture with refractors costing the most per inch of aperture compared to reflectors. Reflectors can be broken into multiple sub-types with the two most of interest to EAA being the Newtonians and Schmidt-Cassegrains. Newtonians tend to be priced lower at a given aperture than SCTs. And Newtonians typically have natively fast focal ratios compared to SCTs. On the other hand, SCTs are more compact for a given aperture and can be more versatile given the options for focal reduction. Refractors are much more expensive per inch of aperture than reflectors but provide some of the sharpest images given that they have no obstructions (secondary mirrors) in the light path. Given the variety of sizes and brightness of DSOs there is no single perfect telescope. That is why more advanced EAA'ers often have two or more scopes to choose from, or use focal reducers for greater versatility with a single telescope. As of this time, most telescopes are in high demand because of the Corona Virus social distancing protocols which means most are on back order. Apparently some retailers have raised prices substantially so shop around before you buy. Refractors Refractors with fast focal ratios (f/3.9 to f/6) or even moderate focal ratios (f/7 to f/7.5) are well suited to EAA. The fast focal ratios provide a wide field of view which enables large objects like the North American Nebula or the Andromeda Galaxy to fit into the image frame. Fast focal ratios as mentioned above will enable the use of shorter exposures to achieve pleasing images quickly. And short exposures mean less demand on the mount's tracking capability and less precision required in the polar alignment with an EQ mount. Like other telescope designs, native focal ratios can be further reduced with the addition of a focal reducer which typically come in the 0.7X or 0.8X range for refractors. These can take an f/7 or f/7.5 refractor down to ~f/5 or f/6 speeding up the system by a factor of ~2X. Refractors inherently suffer from three optical aberrations: chromatic aberration, spherical aberration and field curvature. Chromatic aberration is the most significant and results from the fact that a single lens does not bring all wavelengths of light to focus at the same plane. Red, green and blue light focus at different focal plane distances so that bright objects will appear to have a purple halo caused by the out of focus blue and red light in a low end refractor. In addition to the halo, extended objects may appear to have a "soft" or incomplete focus. A partial solution to this employed in Achromats is to use two glass lenses in the objective, one made of low dispersion crown glass and the other made of high dispersion flint glass. This helps to focus the red and blue light closer to the same focal plane while the green light is still focused in front. Chromatic aberration can be further improved with the use of a yellow or green filter or a UV-IR filter which helps by eliminating the extreme red and blue wavelengths of light which appear most out of focus. Apochromatic (APO) refractors use two (doublet), three (triplet) or four (quadruplet or Petzval) lenses of different shapes with at least one lens made from higher quality and more expensive Extra-Low dispersion (ED) glass. This enables all three wavelengths of light to focus close enough to the same focal plane so as to produce little or no discernible chromatic aberration. The best APOs use the highest quality ED glasses in one or more of the lenses. While a triplet should show less chromatic aberration than a doublet it really depends upon the quality of the ED glasses used and the overall design of the lenses themselves. As the complexity of the design increases the cost of the refractor goes up quickly. High quality refractors are noted to produce tack sharp in focus stars. Spherical aberration results from the fact that light entering the objective near its edge focuses closer to the lens than light entering closer to the center of the lens. This problem is solved by using multiple lenses with different curvatures and is likely part of an objective design to eliminate chromatic aberration. Field curvature is caused by light entering the objective at different angles which results in a curved focal plane. This is not a problem for visual work but will produce soft or out of focus images with a camera. A higher quality refractor will be designed through the use of multiple lenses to minimize field curvature. A field flattener can be used to correct for field curvature if the native design is not sufficiently flat. The Petzval design incorporates a field flattener in its objective. Refractors are widely available ranging in objective size from 2" to 6". There are far too many manufacturers and models to give a comprehensive list here so we will discuss a few different options. Keep in mind that an refractor with higher quality ED glass will do a better job of suppressing chromatic aberration, eliminate spherical aberrations and provide a flatter field than one with a cheaper type of ED glass. Also note that some doublets are advertised as APOs and others as Achromats. If the doublet doesn't have ED glass it should be considered an Achromat as it will be expected to have noticeable chromatic aberration. For lower cost wide field views Williams Optics has a 61mm f/5.9 and a 71mm doublet at $538 and $648, respectively. At 80mm models include the Williams Optics (f/6.9) and SkyWatcher (f/7.5) doublets for $800 and $825 while Explore Scientific has an f/6 triplet model for $850. Moving up in price, Explore Scientific, Meade and Orion all offer 80mm f/6 triplets at $850 and $1000. There are quite a few options for 4" or ~100mm refractors. At the lower cost end is the Explore Scientific 102mm f/6.5 doublet Achromat for $550. Explore Scientific, iOptron and Orion offer a 102mm f/7, a 108mm and a 110mm f/6 refractor in the $1200 to $1300 price range. The Explore Scientific is a triplet while the other two are doublets all with different ED glasses to qualify as APOs. Meade and Explore Scientific have triplets at $1900. At the high end in both price and performance of this size apeture are the Takahashi f/8 100mm and the Televue f/5.4 NP101is. The Takahashi is a doublet with the most expensive ED glass made of fluorite for $2900. The Televue uses 4 glass elements in a Petzvalwhich for $4000.  Explore Scientifc 127mm f/7.5 CF Triplet Refractor Explore Scientifc 127mm f/7.5 CF Triplet Refractor Moving to 4" models (100mm to 110mm) Explore Scientific has a doublet at f/6.5 using non ED crown and flint glass at $550 and a triplet with one ED element at f/7 for $1200. iOptron has an f/6 doublet with ED glass for $1250 while Orion has a f/6 doublet with ED glass for $1300. Higher end models range in prices from $1900 like the Explore Scientific f/7 triplet or their carbon fiber tube version at $2200, the Takahashi f/7.4 doublet with expensive fluorite ED glass at $2400 and the Televue quadruplet f/5.4 model at $4000. You can find still more expensive models than these but even the higher priced ones described here are better suited to astro-imaging and may be overkill for EAA. A 5" refractor starts to get fairly large but can certainly be used for EAA. One of the less expensive models is the Explore Scientific f/7.5 ED127 Essential triplet with ED glass at $1900 which I purchase for my son has and which I have used on occasion for EAA. In addition to Explore Scientific, Meade, Orion, SkyWatcher and Williams Optics all have 5" models at f/7 to f/7.5 for under $3000. Notice that as the aperture increases the focal ratio tends to increase as well. While f/7 is not fast it is perfectly useable for EAA and these telescopes can be used with focal reducer/field flatteners, typically 0.7x to 0.8X, to get the focal ratio down to f/5 to f/6. 6" refractors can certainly be used for EAA just as they are for astrophotography but their cost and size goes well beyon what is needed for EAA. There are many reasons why a quality refractor is an excellent choice for EAA. In addition to fast optics, refractors are lightweight, especially in comparison to reflectors. For example the Explore Scientific 80 mm weighs 7.5 lbs and the 127 mm weighs 18 lbs, making them very easy to carry and mount. However, the large aperture refractors have long tubes such as the Explore Scientific 127 with a 34" tube length. The longer the tube the larger the moment of inertia. This must be taken into account when selecting an accompanying mount since the larger moment requires a stronger mount compared to a shorter tube telescope with similar weight like the Celestron 9.25" SCT which weighs 20lbs but is only 22" long. Since refractors do not use mirrors, they do not have coma, an optical aberration which makes off axis stars appear to have tails like comets. Since there is no obstruction in the optical path like that of the secondary mirror of a reflector there is no light lost which produces the highest contrast telescope design. Refractors rarely, if ever, need collimation and have short or no cool down times compared to large mirror reflectors. Because they typically have smaller apertures they also have smaller cross-sections which minimizes vibrations which can elongate stars on a windy night. Also, their sealed tubes tend to keep out dust, dirt and bugs. And most refractors come with a convenient slide out dew shield. When selecting a refractor there are other important considerations including whether or not the telescope tube is made of aluminum or the more expensive carbon fiber and the size and type of focuser. Carbon fiber tubes have a lower coefficient of thermal expansion than aluminum and therefore exhibit less focus shift during the night as the air cools. Carbon fiber tubes are also much lighter than aluminum which reduces the weight of the optical tube which can allow for the use of a less expensive mount. Focuser types and sizes can vary greatly ranging in size from 1.25" up to 4" with the larger focusers available on the higher priced telescopes.. The larger the camera chip size the larger the focuser required to avoid vignetting of the image. The focuser should be mechanically sturdy to handle the weight of the camera, focal reducer, etc. without any sag in the optical train. A two speed focuser allows for finer focus adjustment. Inch for inch, refractors tend to be significantly more expensive than reflectors. The table below shows the cost per inch of Achromat doublets and APO triplets from Explore Scientific, Imaging Newtonians from Skywatcher and SCTs from Celestron. Achromat doublets are 50% more expensive on average than Imaging Newtonians and nearly as expensive as SCTs. APO triplets are more than 3X as expensive as the Imaging Newtonians and almost twice as expensive as SCTs. This reflects the higher cost to manufacture lenses compared to mirrors which climbs the more elements and the higher quality the glass used.   Orion StarBlast 6" f/5 Newtonian Orion StarBlast 6" f/5 Newtonian Newtonians As the table shows, measured in cost per inch of otpics, Newtonians are the least expensive telescopes and are therefore a very good option for EAA. As noted above, care must be taken to be certain that a camera will come to focus either by design (imaging Newtonians or astrographs) or by moving the primary mirror closer to the secondary. Some truss tube Newtonians are designed for adjustment of the primary mirror distance so do not need user modificaiton. Newtonians are typically designed with fast optics with f ratios typically between f/3.9 and f/5.3. Because of the fast optics coma is an inherent problem with Newtonians. This is caused by light from off axis angles coming to focus at different distances and results in stars looking like comets toward the outside edge of the FOV. A coma corrector is typically desired to eliminate or minimize this. The long tubes of a Newtonian help to minimize dew formation but acts as a sail on windy nights. And the long moment arm of most Newtonians requires a sturdier mount per inch of aperture compared to the more compact Schmidt-Cassegrain designs. The open tube helps to minimize thermal stabilization time but also allows dust and bugs to get into the telescope so covers for the primary and secondary mirrors are recommended. Newtonians require frequent collimation (maybe at every use) which can be challenging at first but with practice this can be done in short order. The central obstruction of the secondary mirror results in reduced contrast compared to refractors. Straight vanes used to hold the secondary will produce diffraction spikes around bright stars which you may or may not find objectionable, but curved vanes will not. At the lowest price range, 6" f/4 imaging Newtonians from Apertura and Orion are available for $299 and $400, respectively. These are light weight at 9.6 and 12.7lbs each with tube lengths of 22.5" so they are relatively easy to handle. Expect to sacrifice build and optical quality at this price range, but for the very price limited case these may be worth considering.  SkyWatcher Quatro 8" Imaging Newtonian SkyWatcher Quatro 8" Imaging Newtonian An 8" telescope tends to be a sweet spot in terms of light gathering capability versus size and weight. One can find quite a few options at this aperture including three at or just under $500 from Apertura (f/4), Orion (f/3.9) and Explore Scientific Bresser 208mm (f/3.9). SkyWatcher has an 8" Quattro at f/4 for $640 while Explore Scientific has an f/3.9 carbon fiber tube model for $1000. Weights are ~ 20lbs and tube lengths ~30" so with the longer tube lengths and heavier weights, these telescopes will require a higher capacity mount. A 10" aperture begins to get heavy, 25 to 36lbs, and tube lengths approach 39" in length. These require a higher end mount to avoid vibrations and tracking issues. Because Newtonians are relatively inexpensive to build, one can find multiple 10" models for under $1000 including an f/4 from Apertura, and f/3.9 from Orion and and f/4 from SkyWatcher. Even larger and more costly Newtonians are available but will not be discussed here since they are not widely used for EAA.  Celestron 9.25" SCT Celestron 9.25" SCT Schmidt-Cassegrains Schmidt-Cassegrains (SCTs) are a specific type of reflector consisting a primary and secondary mirror like the Newtonian but with the addition of a corrector plate at the front of the telescope. The corrector plate is designed to eliminate spherical aberration caused by the use of a spherical primary mirror which is easier to form than a parabolic mirror keeping the cost of SCTs down. SCTs may be the most widely used telescopes for EAA due to their relatively low cost per inch of aperture and their versatility to function at a range of focal ratios from f/10 to f/2. The design of an SCT is compact for its focal length as the optical axis is folded upon itself. This results in a shorter tube compared to a similar focal length Newtonian which helps to make the large aperture SCTs easier to handle and less susceptible to winds. Because an SCT has a corrector plate the optical tube is sealed against dust, bugs and dew, although the corrector itself will still collect dew. Because there is no air flow inside the tube a large primary mirror will have a long cool down time which can be mitigated by after market fans like the Tempest fans from Deep Space Products. Because SCTs are focused by moving the primary mirror they have a lot of focus range to easily accommodate cameras, filters and focal reducers in the optical train. The downside is focus shift where the object being viewed shifts in the FOV during focusing as the mirror shifts a bit on its rails while focusing. This is more of an annoyance for EAA than a serious problem. Also, the weight of the secondary mirror can cause it to move or flop as the telescope rotates across the sky which results in another shift in the image within the field of view. This is less of a problem for 9.25" and smaller SCTs but can be at least partially mitigated if the telescope has mirror locks. Also, since EAA does not require hour or longer imaging on a single object, mirror flop is less of a problem than it is for astrophotography. Despite these nuisances, SCT are still very common for EAA. 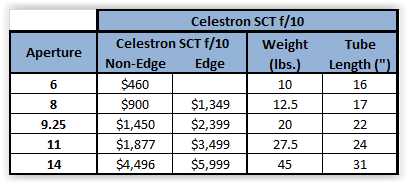 SCTs also exhibit coma and field curvature unless they are corrected with a focal reducer/field flattener like the Celestron and Meade f/6.3 reducer/correctors. Modifications of the SCT designs such as the Celestron Edge and Meade ACF add optical elements in the light path to correct for coma and flatten the field so that stars are sharp to the edge of the FOV. Since SCTs have a large central obstruction they provide the least contrast compared to Newtonians and refractors. Because SCTs use a primary mirror at f/5 and a secondary mirror at f/2 (the Celestron 14" has a secondary mirror at f/1.9), the native focal ratio is f/10. While this works well for very small DSOs, it requires long exposures and is too much magnification for many objects. Fortunately, the SCT focal ratio can be easily reduced with the aforementioned f/6.3 reducers from Celestron or Meade. With a Celestron Edge telescope a more expensive f/7.5 reducer must be used instead due to the complexity of the Edge optics. Celestron has two lines of f/10 SCTs, one with and one without Edge optics. The non-Edge SCTs have apertures of 6', 8", 9.25", 11" and 14" with prices, weights and tube lengths shown in the table above. The Edge line of SCTs has an additional optical element after the secondary mirror designed to provide a flat focal plane and reduced coma out to the edge of the FOV, hence the product name "Edge". In addition, the Edge line includes filtered tube vents at the rear of the optical tube to help reduce cool down time and tension clutches which help to reduce mirror flop. Both the Celestron Edge and non-Edge designs from 6" to 14" can replace the secondary mirror with the optional Hyperstar adapter from Starizona which reduces the focal ratio to f/2 (f/1.9 for the 14" aperture) making for a FOV 5 times larger and imaging speed 25X faster than at its native f/10. Many, but not all, of the older non-Edge SCTs can be retrofitted to accept the Hyperstar. This is one reason for the popularity of these scopes. As the apertures of SCTs approach 12" weights become challenging to carry and attach to the mount as most of the weight is in the primary mirror at one end of the optical tube. Having used a 14" SCT for 10 years both at home and in the field I can attest that such a large scope is a wonder to use but a challenge to handle for all but the very sturdy individual. Compared to Newtonians, SCTs have tube lengths which can be as much as ~50% shorter making it possible to use a larger aperture SCT on a given mount. Meade has their own versions of modified Cassegrain telescopes with their Advanced Coma Free optics, hence the moniker ACF for this line of telescopes. These are offered in four different groups. The LX65 and LX85 have the same optical tube but the LX85 comes with 2 eyepieces instead of one and an 8 x 50 finder instead of a unity finder for a small price differential. The LX200 series steps up to a Losmandy dovetail instead of the Vixen used on the LX65 and LX85. It also has an oversized mirror which allows for better performance to the edge of the FOV. And the LX200 has mirror locks to prevent shifting of the primary mirror. The fourth version has three key differences. First, it has a slightly faster focal ratio of f/8 which provides a 25% larger FOV and a 56% faster imaging system. It also has a more rigid mirror mechanism which uses a 2 speed focuser instead of the single speed version on all of the other versions of ACFs providing finer focus adjustments. 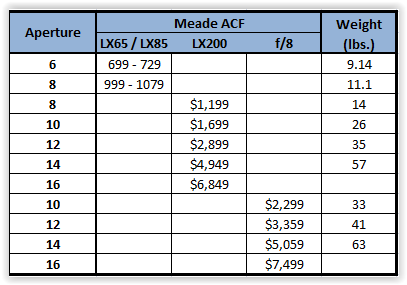 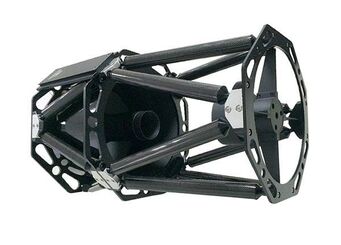 GSO 10" Truss Tube RC GSO 10" Truss Tube RC Other Options There are many other variations of reflecting telescopes which are not common for EAA but cannot be ruled out. The least expensive among these are Maksutov-Cassegrains (MCTs) but these tend to have even higher focal ratios, f/12 to f/15, than the SCT so they are not common for EAA. Guan Sheng Optical (GSO) produces a relatively inexpensive line of f/8 Ritchey-Cretien (RC) telescopes with 6", 8", 10", 12", 14" and 16" apertures priced from $399 to $6995. You will find re-branded versions from iOptron, TPO, Orion, etc. RCs are designed to eliminate coma and are natively faster at f/8 compared to SCTs. The 6" version comes with a steel tube while the 8" version comes in a both a steel tube and a carbon fiber model for $500 more. The 10" and larger models use an open truss tube design to minimize weight. Focusing is done with a separate focuser as the primary mirror is fixed eliminating the possibility of mirror shift or flop. Perhaps the most interesting option for EAA is the Rowe-Ackerman Schmidt Astrograph (RASA) from Celestron. The design has no secondary and, like a Hyperstar, places the camera where a secondary would be which provides very fast f/2 optics. The RASA has filtered mag-lev fans for cooling and a modified focusing system to minimize focus shift and mirror flop. Celestron has an 8" version for $1700 which weighs only 17lbs while the 11" version for $3500 weighs significantly more at 43lbs. The downside is that it can only be used as a wide field telescope since the focal length cannot be modified. Another option is to start with very wide field EAA using a 100mm or 200mm telephoto lens. These need one of the readily available adapters to connect the lens to the astro camera and you will need a clamp or other method to mount the lens to a mount. Because of the light weight and short focal length, this type of setup can use one of the less expensive Alt-Az or EQ mounts to obtain satisfying results. And this approach has the advantage of being light weight and highly portable. Summary The good news is that there are many options available in telescopes for EAA. The bad news is that so many options can make for difficulty deciding, or paralysis of analysis. If you already have a telescope and mount the best advice is to start with what you have. If you will have to purchase a camera to go along with your current telescope, take into consideration any future telescope purchase you might already have in mind. Using what you have now will help you get your feet wet and make it less likely you purchase something that will not work well for your interests. If you do not already have a telescope it is difficult to go wrong with an 8" SCT. An 8" SCT has the versatility of multiple focal ratios, has a light weight and compact design making it easy to transport and setup and is relatively inexpensive. If you can afford the cost, a Celestron Edge version will give you the ability to work at f/2 if you purchase the Hyperstar adapter now or at a later date. Another good option if you are starting fresh is an f/6 or faster triplet 80mm refractor which will likely stay with you for a lifetime. With its fast focal ratio and wide field it will be easy to get started avoiding many of the frustrations of long focal length imaging. Once your skills improve and you begin to get aperture fever you can continue to use the 80mm as your scope of choice on those nights when you want to view large DSOs. Telescopes That I have used successfully for EAA:
Celestron 9.25" SCT - excellent aperture to weight combination, reasonable cost Available from High Point Scientific Celestron 14" Edge SCT - large aperture, excellent optics, but heavy Available from High Point Scientific Celestron 11" Edge SCT - good compromise between aperture and weight Available from High Point Scientific Orion ED80T - this is the carbon fiber version whereas mine has a metal tube Available from High Point Scientific Explore Scientific 127mm - very nice sharp stars Available from High Point Scientific If you are interested in other telescopes you can find lots of options in each category of telescope on the High Point Scientific web sites. OPT and High Point links are Affiliate links.  Celestron 6SE with Revolution Imager 2 Camera Kit Celestron 6SE with Revolution Imager 2 Camera Kit The most common advice given to anyone thinking of getting into astrophotography is to invest most heavily in a good equatorial (EQ) mount with excellent tracking stability for the best chance of success. This is because astrophotography requires the telescope to remain fixed on an object within a fraction of a pixel during exposures many minutes long. And this requires the mount to track the rotation of the earth relative to the stars with a motor driving the Right Ascension (RA) axis of the mount at the same rate as the earth's rotation. Otherwise, stars will move relative to the pixels and they will appear elongated in each frame and not round as they should be. Furthermore, astrophotographers often employ a separate guide camera to continuously make small corrections to the mount's tracking accuracy to keep the stars fixed to the sensor in hopes of obtaining pin point stars in their images. Without a doubt, an equatorial (EQ) mount is an absolute necessity for astrophotography and typically the most expensive component in a serious imager's setup. Fortunately, for EAA the requirements of a mount are not quite as demanding, although a stable tracking mount is still essential for success and an EQ mount will provide the greatest flexibility. Neither is a guide scope necessary. This is because EAA typically involves much shorter exposures than those used for astrophotography. Exposures are much shorter than 1 min, and often less than 10 sec when using live stacking software to get a pleasing view of a Deep Sky Object (DSO) in real time. Because of the short exposures used, EAA can even be done with an Alt-Az mount despite the fact that it's tracking axes do not fully counteract the effect of the earth's rotation on the apparent movement of the stars. Tracking Mounts Visual observing is very forgiving of the motion of the sky, but astrophotography and EAA are not. As the earth slowly rotates on its axis at 15 arcseconds per second, the view through a telescope will begin to appear to rotate. This field rotation makes the constellation Orion appear to rise above the eastern horizon on his back while rotating to set in the west on his face. Our eyes do not mind if the object in the eyepiece moves slowly across the Field of View (FOV) while we observe. The human eye integrates the light over extremely short time periods so we are able to adjust to the motion and do not see a blurred image or trailed star patterns. And, we can manually adjust the mount to keep the object relatively centered in the FOV while observing visually. However, this is not the case when using a camera to capture an image a few seconds to tens of seconds long. With a non-tracking mount the image will suffer from objectionable star trailing with even a very short exposure. The number of pixels traversed by an object during the exposure defines the amount of star trailing. It depends upon the declination of the object (dec), the focal length (f) of the optical system, the size of the pixels (Pxl) in the camera's sensor, and the length of the exposure (t): Star Trail Length in pixels = 2 Pi x f x t x cos dec /(86.2 x Pxl) where f is in mm, t is in seconds, dec is in degrees and Pxl is in microns. As an example, assume we are using a camera with 4 micron pixels and are trying to image an object at 60 degrees declination. Using an 8" SCT at f/5 (1000mm focal length), a star will cross a path 9.1 pixels long during a 1 sec exposure. This is more than enough to create noticeable star trails and cause blurring of the deep sky object. In fact, 5 or more pixels is enough to result in objectionable star trailing. Even an 80mm refractor at f/5 (400mm focal length) produces a star trail 3.6 pixels long with a 1 sec exposure. The situation gets worse closer to the celestial equator and better toward the pole. Since many exposures will be 5 sec or longer, a mount that will track the motion of the stars is an absolute necessity for EAA. An Equatorial mount (EQ) solves this problem as the mount rotates in RA at the same rate as the earth' rotation canceling out the apparent motion. To do this, the mount must have its RA axis aligned with the celestial pole and the better the alignment the better the tracking accuracy. Since EAA employs much shorter exposures than astrophotography one of the lower cost mounts will provide sufficient tracking capability to get the job done. Also, while a good polar alignment is still important, it is not necessary to obtain as accurate of an alignment as for astrophotography to have success with EAA. This is particularly true when using very short exposures and live stacking. For certain, a well polar aligned and solidly built EQ mount will provide the longest single frame exposure and the longest stacked frame total exposure without star trailing. And an EQ mount is the only choice for EAA if you think you would like to also try astrophotography with the same setup at some point in the future. 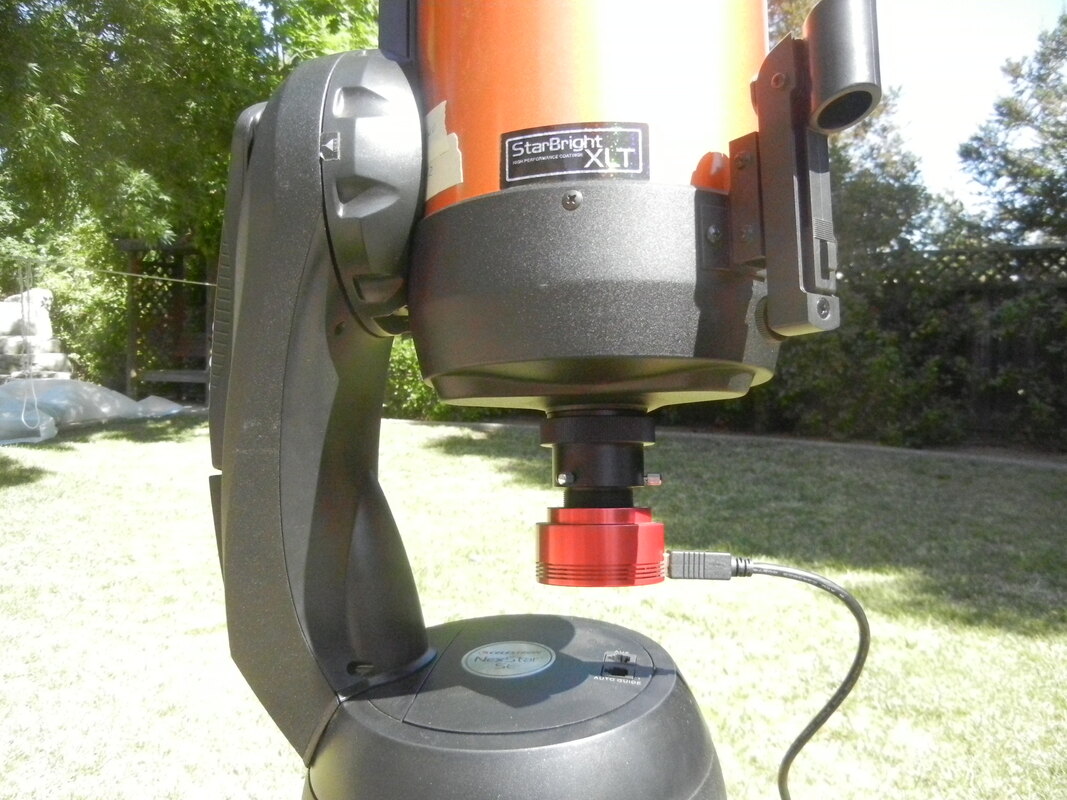 6SE with the short ASI224 Camera which just fits at 90 degree angle without crashing into the mount 6SE with the short ASI224 Camera which just fits at 90 degree angle without crashing into the mount An Alt-Azimuth (Alt-Az) mount will also track the stars but because it does not move along the same axes as the earth's rotation the stars will slowly drift tracing out an arc. However, one can get away with exposures of 30sec or less with an Alt-Az mount without appreciable star trailing. The length of exposure possible depends upon where in the sky the telescope is pointed as well as the focal length of the telescope. Star trailing is worse when pointing due south or due north and least pointing due east or due west. Star trailing increases with altitude, i.e. directly overhead, and least at the horizon with an Alt-Az mount. Longer focal length telescopes will also make star trailing more obvious since a smaller portion of the sky is focused on the sensor. In other words, the optical system is working at higher magnification. Just like an EQ mount, Alt-Az mounts can be used with live stacking software to obtain total exposure times of many minutes without suffering from significant star trailing due to the fact that the software accounts for the field rotation when stacking individual image frames on top of one another. Alt-Az mounts for EAA have several advantages compared to EQ mounts. First, they tend to be much less expensive than EQ mounts. For instance, a Celestron 6SE is a combination 6" SCT with an Alt-AZ mount which can be had for $679 while the same 6" SCT on Celestron's least expensive EQ mount sell for $1329, or nearly 2X the price. Second, Alt-Az mounts tend to be much lighter than EQ mounts making them easier to transport from house to back yard. Also, since Alt-Az mounts cannot be polar aligned, they are very simple and quick to setup requiring only a couple of starts for a good GoTo alignment. This is why Alt-AZ mounts are increasingly popular for EAA, especially for those on a limited budget. However, keep in mind, that an Alt-AZ mount will not work for astrophotography if you think you may wish to move in that direction later. Another disadvantage of many At-AZ mounts is that they cannot be pointed very close to the zenith since the camera can crash into the base of the mount unless a diagonal is used. This is because the way that the optical tube is attached to many Alt-Az mounts like the Celestron and Meade. Mounts like the iOptron Cube models are slightly better in this respect since the mounting arm is to the side, however, a long tube OTA can still crash into the tripod legs of the mount unless an extension tube is used to attach the mount to the tripod. Whether an EQ or an Alt-Az mount, it is important to match the mount's rated load capacity with the OTA and any additional equipment including camera and adapters which the mount will carry. In general, it is assumed that all but the very high end mounts overstate their load capacities so it is probably a good idea to assume no more than 50 - 70% of the stated capacity, not including counter weights, as the true capacity for EAA. To get maximum benefit it is also important to do a good job of balancing an EQ mount in both axes and an Alt-Az mount in its Alt axis. GoTo Mounts Most mounts with tracking, whether an EQ or an Alt-AzA motorized mount , will also have GoTo capability. GoTo allows one to tell the mount where to point the telescope in the sky through a hand control or software on a computer connected to the mount. This enables the user to swiftly and painlessly find and view any number of objects in the night sky over the course of an evening. While the GoTo feature is not absolutely essential, it will certainly make it a lot easier to locate and center deep sky objects quickly and allow you to spend more time observing instead of searching. One reason for this is that many cameras used for EAA provide small FOVs. Typical analog cameras use a sensor with a diameter of 6 mm (Revolution Imager I and II) or 8 mm (Mallincam Xtreme or Xterminator). The corresponding FOV is similar to that of an EP of the same focal length as the sensor diagonal. For instance, a camera with a 1/2" CCD on an 8" SCT at f/5 produces a FOV of 16.6 x 22.1 arcmin (28 arcmin diagonal) which is very close to the 29 arcmin FOV of an 8 mm EP. This is about the size of the moon which is much harder to manually point to with a telescope than one thinks. Cameras with the Sony 1/3" CCDs on the same scope produce an even smaller FOV of 12.6 x 16.8 arcmin (21 arcmin diagonal) which is similar to the FOV of a 6 mm EP. While the popular new breed of CMOS cameras such as the ASI1600, ASI294 and ASI071 with sensor diagonals of 22.2 to 28.4mm have FOVs 2X to 4X those of analog cameras, GoTo will still make life much easier to quickly hunt down DSOs and spend one's time observing rather than looking around for dim objects. Another issue is that even with a wide FOV, DSOs can be difficult to see with very short exposures. It may take 30 sec or longer to verify that the object is within the field of view. Without a GoTo telescope it is likely that the object will not be in the FOV and you will have to make adjustments in the telescope position, take another exposure and repeating the process until it is. This can be very frustrating and waste a lot of precious time under the night sky. With GoTo and a good pointing alignment, one can be more confident that the DSO of interest will be somewhere in the FOV. GoTo or pointing alignment and PA are not to be confused as they are two completely different things. You can have a very good GoTo alignment with a poor PA and vice versa. A good GoTo alignment is possible on both an EQ mount and an Alt-Azimuth mount while PA is only possible with an Equatorial mount. A GoTo alignment is obtained by pointing the telescope at a number of bright stars or planets in the night sky, centering them in the FOV and letting the mount know that it is centered. This is done either through the hand control or through software which is connected to the mount and taking the place of the hand control. Typically 1 -4 stars are used but a high end telescope using TPoint modeling can use hundreds of points for more accurate alignment. For instance, my Celestron 6SE asks for 1-3 bright objects, my Celestron AVX and GCE use between 2 and 6 stars and my Software Bisque MyT uses TPoint and anywhere from a couple of dozen to a few hundred point for a TPoint model. A GoTo mount uses its internal readings for the RA and Declination (Dec) of the centered start to build a model of the sky which enables it to GoTo and put any object in the sky somewhere in the FOV or very close to it. In the next sections we will review the different mounts available. Keep in mind that manufacturer's constantly update, replace and introduce models to keep their offerings current and up to the start of the art. The mounts discussed below are a snapshot of what is currently available. Also, pairings of telescopes to mounts given below are estimates based upon the mounts rated capacity and the weights and lengths of the telescopes. Some may prefer to stay well below the rated mount capacity for best overall performance and others may choose to push the limits. If care is taken to carefully balance the load, shield the telescope against winds and vibrations, add additional weights to the bottom of the tripod and even use an auto focuser, one can achieve the best results for each combination. 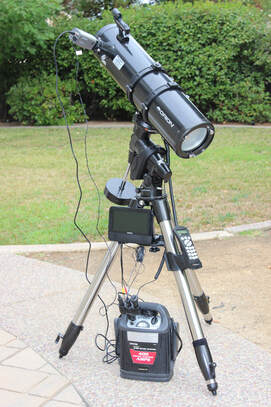 Celestron CG5 EQ Mount with Orion 6" Newtonian and Samsung Analog Video Camera Celestron CG5 EQ Mount with Orion 6" Newtonian and Samsung Analog Video Camera EQUATORIAL MOUNTS Just as an equatorial mount (EQ) is an excellent choice for astrophotography, it is also an excellent choice for EAA. And if you expect EAA to eventually lead you into astrophotography an EQ mount is the right choice. Since the EQ mount's RA axis can be accurately aligned to the earth's rotation by performing a polar alignment, it will keep an object fixed in the FOV enabling long exposures with sharp images. In addition to longer exposures than an Alt-Az mount, an EQ mount does not have any trouble with targets approaching and at the zenith, whereas cameras and/or optical tubes will run into the base of many Alt-Az mounts when approaching the zenith. The main downsides of EQ mounts are their higher cost compared to an Alt-Az mount with similar capacity and higher weight of the mount and tripod. The need for polar alignment of an EQ does make setup a bit more tedious compared to an Alt-Az mount, but with experience and the simple polar alignment routines in EAA software like Sharpcap the process is greatly simplified and shortened. While there is a continuous range of EQ mounts in terms of cost and quality we will look at mounts priced up to $4000 and break them down into 4 classes for simplicity: 1) Budget Under $750 and capacities of 11 to 22lbs 2) Moderate $800 to $1150 and capacities ~30lbs 3) Intermediate $1500 to $2900 and capacities of 40 to 50 lbs 4) High End $3400 to $3600 and capacities of 60 to 75 lbs Keep in mind that new mount designs appear over time so the list below may not be accurate several years from now. And this list is does not include every EQ mount as that would be overwhelming. Finally, capacities are often overstated, especially in the lower to mid-end mounts. Budget mounts are the least expensive but also the most limited in overall capability including weight capacity and tracking accuracy as these are made with the cheapest components to keep costs down. However they will work for EAA and may be the only option for someone on a very limited budget. A few models in the $400 to $740 price range are available such as the Explore Scientific iEXOS100, the iOptron Smart EQ Pro, and the SkyWatcher Star Adventurer GTI. These have capacities limited to 11 to 22lbs. The low capacity ratings limit the choices of telescopes which can be paired with these mounts. On the lower capacity end an small 80mm refractor or camera lens attached to a camera for wide field viewing would be appropriate while on the higher capacity end a 6" or smaller SCT, Newtonian, or a 90mm refractor would be possible. These are extremely light with weight mounts ranging from 13 to 23lbs including tripods so they are highly portable. Tripods are made with 1.5" or smaller diameter legs and may not provide as solid of a footing as needed without hanging extra weight from the bottom to provide more stability against vibrations. These would not be good options if astrophotography is in your future. This class is best for anyone with a very tight budget and a need for an extremely light weight setup. Moderate class mounts can be found for ~$800 to $1150 and include examples like the Celestron AVX, Meade LX 85, Orion Sirius EQ-G, iOptron GEM28 and the Explore Scientific EXOS-2GT among others. Rated capacities are ~30lbs which opens up the options on telescopes with which these can be paired. The mechanics on these mounts is better than the Budget class mounts but these mounts are still best suited to short exposures and light weight optics such as a 6" Newtonian, an 8" SCT , a 4" refractor or smaller telescopes of each type. These mounts are generally light ranging from 23 to 43 lbs making them easy to transport assembled from inside the house to the backyard. These can be used for astrophotography, but would be considered lower end performers. 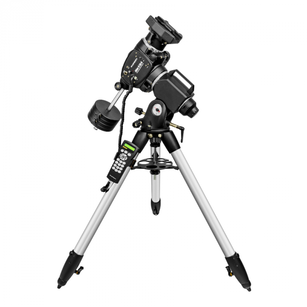 Orion Atlas II EQ-G Orion Atlas II EQ-G Intermediate mounts can be classified as those with stated capacities of 40-50lbs. There are multiple models from most manufacturers in this range such as the Celestron CGEM II, the Losmandy GEM811G, iOptron CEM40, Atlas II EQ-G, Sky-Watcher HEQ5 Pro. Prices vary from $1500 to $2900. These mounts have better mechanical tolerances than the Moderate class mounts so they will provide more precise tracking and GoTos. Mounts in this class will weigh significantly more than in the moderate class with a range of 31lbs to nearly 60lbs. While they are still well suited for transport to dark sites and star parties, they need to be disassembled and reassembled even if they are being taken from the garage to the backyard. Many people have some sort of cart which can be used to move the assembled scope and mount from inside to outside in one piece. With their higher capacities these mounts can handle up to 9.25" SCTs, up to 8" Newtonians and up to 5" refractors. Tracking and GoTos are excellent provided one does a good job of PA and GoTo alignment. These are also quite capable for astrophotography. 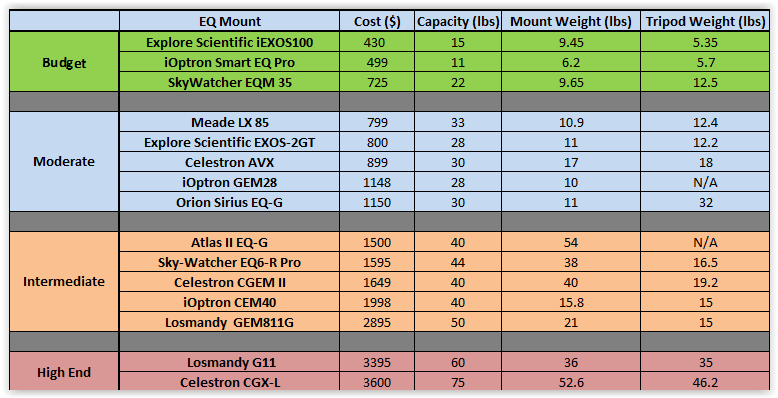 Equatorial Mount Options Equatorial Mount Options The last class consists of mounts with capacities of 60 to 75lbs. These include the Losmandy G11 at $3395 and the Celestron CGX-L at $4649. These larger mounts can handle up to 14" SCTs, 10" Newtonians and 6" refractors. Mounts in this class, have superior mechanics providing the best tracking capability and stability among the four classes. The capabilities of these mounts represent significant overkill for EAA unless one has the desire to use one of the larger OTAs. Some will find these a challenge to transport to dark sites given their total weights. That was certainly the case for me with the CGX-L, which I owned briefly, as it consists of a mount weighing 53lbs and a tripod weighing 46lbs. Add to that the counterweights and telescope and we are talking about over 100lbs total that has to be transported. Obviously these mounts are well suited to astrophotography if that is a future option. Then there are mounts with still higher capacities at sky rocketing prices which are well beyond the needs of someone starting out in EAA. We will not consider these here. As one can see, there is an EQ mount for every budget, weight limitation, and carrying capacity. The class of mount that is best for EAA depends on the desired telescope that will be used with it. It is essential to match the mount to the telescope which rides on top of it. Because an SCT is very compact for the size of its optics, one can use a smaller mount than an equivalent sized optics in a Newtonian or refractor due to the fact that they tend to have longer optical tubes. The key is to have a scope/mount combination which will track accurately and be stable against vibrations and wind. In choosing a mount it is also important to look to the future. It is better to wait and save for a higher class mount if you expect to use larger aperture telescopes in the future rather than buy something cheaper right away and out grow it quickly. 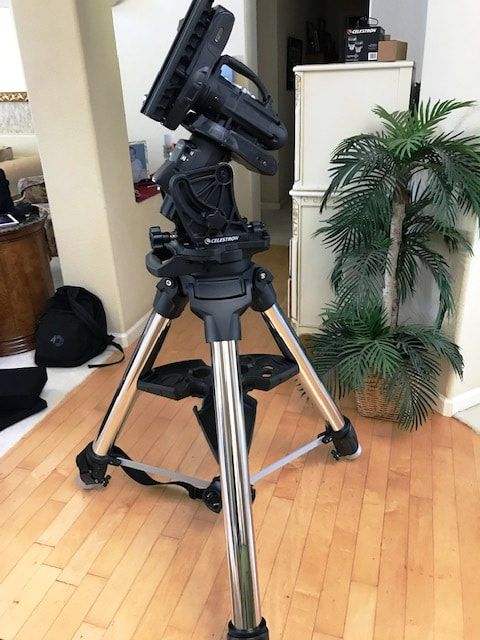 Celestron CGX-L Mount 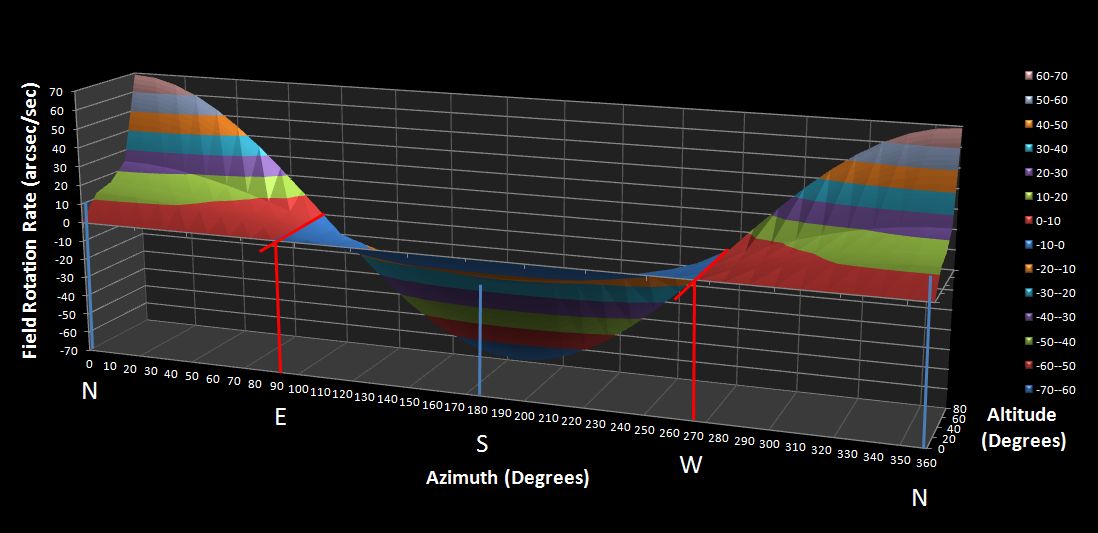 Alt-Azimuth Mounts Alt-Az mounts have become increasingly popular for EAA in the last 5 years. This is because they are typically less expensive compared to an EQ mount and they are generally much lighter. And because they cannot be polar aligned they are simpler and faster to setup for a night of EAA. However, those same advantages also limit the ultimate capability of the mount for EAA and make them totally impractical for astrophotography. An Alt-Az mount has mechanical axes of rotation horizontal (Azimuth) and perpendicular (Altitude) to the plane of the earth. So it cannot completely track the rotation of the sky which is tilted relative to that plane according to the latitude of the observer. So, 30 sec is about the maximum practical exposure to avoid the effects of field rotation. This is long enough to view many deep sky objects of interest. The actual maximum exposure depends on the observers latitude, the altitude of the object being observed and the azimuth angle of the object (see my discussion of field rotation elsewhere on my website). While an Alt-Az mount cannot be polar aligned it can be GoTo aligned similar to an EQ mount so that the observer can accurately slew to objects in the night sky and expect to find them in or very near the FOV avoiding wasted time hunting for objects instead of viewing them. The ~30sec limit on exposures can be increased to more than 5 min, well beyond what is required for EAA, with the use of live stacking software. One popular version is Sharpcap which, like the others, will electronically rotate and translate successive image frames to align the stars with the first frame and stack the frames into a single combined image. This can continue for as long as the observer likes, but again, there is a practical limit which may be anywhere from 5 min to 20 min, much longer than needed for EAA. We will discuss live stacking in detail in a later Blog. 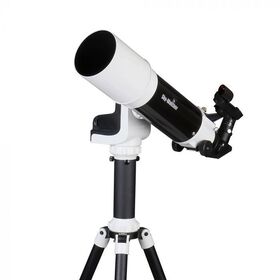 Sky-Watcher Star Travel 102 AZ-GTe Sky-Watcher Star Travel 102 AZ-GTe Motorized Alt-Az mounts are often sold as a package with an included telescope such as an SCT or a refractor which are good options for low cost EAA. If starting from scratch and knowing that astrophotography will not be in your future, these combinations are the most cost effective choices and simplest way to get started in EAA. These also can also be broken down into 4 classes: 1) Budget $349 to $700 with 80 & 100mm refractor & 5" SCT 2) Moderate $800 to $1300 with 80mm refractor & 6 to 8" SCT 3) Intermediate $1700 to $2900 with 108mm refractor & 8" to 12" SCT 4) High End $3000 to $4600 with 9.25" to 12" SCT There are 7 combinations listed in the table below in the budget category for less than $700. These include the Meade Star Navigator 102 Refractor, and the Meade ETX 80 Observer. Also available are the Sky-Watcher Star Travel 102 AZ-GTe and the iOptron 80mm SmartStar Cube Refractor, both with modest 80mm refractors at f/5. These are very light weighing 9 to 14lbs including mount, tripod and scope which makes them ideal for travel. Since these include both the mount and OTA for under $500 you can expect to sacrifice some elements of performance although all will work for EAA when budget is so constrained. I have used the Meader ETX 80 and while I found I had to add a hanging weight on tripod to improve stability and had to use a careful touch when focusing I was able to do EAA of many of the brighter DSO objects. Also in this category are the 102mm refractors from Sky-Watcher and Celestron and the Celeston Nexstar 5SE SCT. If you can afford to, plan to purchase one of the next category of models as they will add a lot more capability for the price. Mount/scope combinations in the price range of $800 to $1300 make up our moderate class. These include the Celestron NexStar 6SE and 8SE, the Meade 6" and 8" LX65 ACF, and the Celestron 6" Nexstar Evolution all with f/10 SCTs. Refractor combinations include the SkyWatcher EvoView Pro ED 80mm. SCTs tend to be excellent choices for EAA as they are native f/10 for small DSO and can be reduced to f/6.3 with a focal reducer to fit larger DSOs into the field of view and also reduce exposure times by speeding up the optics. The Evolution mount has improved mechanics compared to the SE mount from Celestron. This class provides a big step up in capability while still keeping the overall cost down. Weights of the mount, tripod and scope range from to 28 to 38 lbs so these are also very portable combinations. 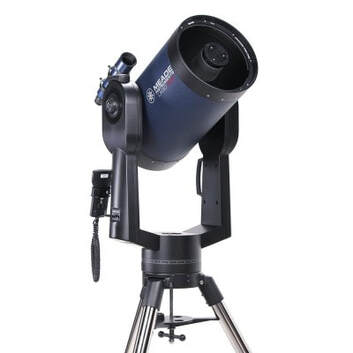 Meade 10" ACF LX90 Meade 10" ACF LX90 The Intermediate class includes mount/OTA combinations in the range of $1700 to $2900. Among these are the Celestron Nexstar Evolution 8" and 9.25" and 8" Edge along with the more stable but heavier dual arm fork mount CPC 8" and 9.25" SCTs. From Meade one can choose between the 8", 10" and 12" ACFs on the LX90 mount along with an 8" ACF on the heavier duty LX200 mount. iOptron offers a 108mm ED APO refractor on their AZ Pro mount. An 8" SCT is considered a "sweet" spot by many who practice EAA. The dual arm fork mounts provide a more stable platform than the single arm mounts but at the cost of more weight since the optical tube and the mount cannot be disassembled like the single arm mounts. The Celestron Evolution models are single arm so the OTA is easily disassembled for transport but stability can be compromised with an optical tube larger than 8" compared to the dual fork designs. Weights for the optical tube and mount range from 23lbs for the refractor, up to 60lbs for the larger scopes on dual fork mounts. The High End class consists of combinations ranging in price from $3000 to $4600. Among these are the Celestron CPC dual arm fork mounts with the 9.25" and 11" Edge SCTs and the 11" non-Edge SCT. Meade offers 10" and 12" ACF SCTs on their heavier duty LX200 mount in this class. At weights of 58 to 75lbs for the mount/scope combination these are much more challenging to transport and set up. Some sort of wheeled system is generally helpful to transport these from inside to outside the house. 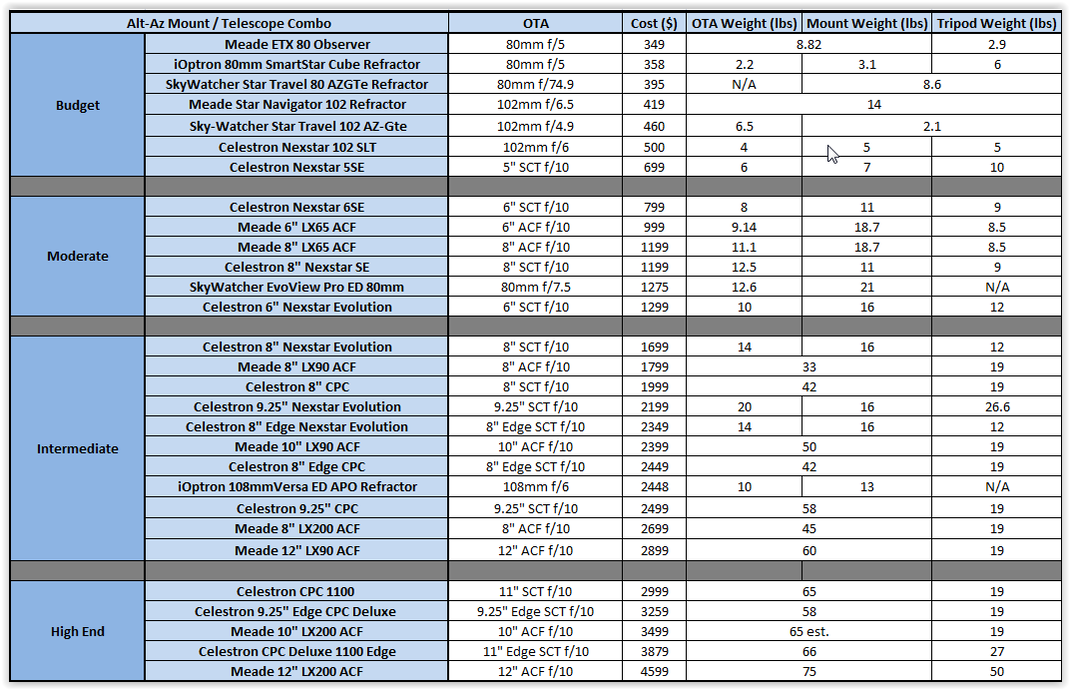 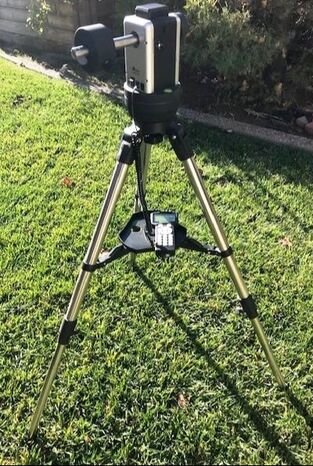 iOptron Cube Pro iOptron Cube Pro If you already own a telescope, or do not want one of the Alt-Az packages you can still purchase a standalone Alt-Az mount. There are a lot less Alt-Az mounts to choose from compared to EQ mounts. SkyWatcher has two models below $400, the AZ-GTe and the AZ-GTi both capable of 11lbs payload and weighing only 8.6lbs. The GTi is the same as the GTe but with built in WiFi. iOptron has the Cube Pro GoTo for less than $428 with a payload capacity of only 8lbs. These are capable of a very light weight scope like an 80mm short tube refractor or a camera attached to a wide field lens instead of an optical tube. iOptron has a heavier duty mount, the AZ Mount Pro which can handle 33lbs for $1300 so it can handle an 8" SCT, 6" Newtonian or 4" refractor. The tripods that come with these mounts are very thin so that stability is compromised when the legs are fully extended. iOptron does offer a larger tripod option on the AZ Mount Pro Model which increases the price to $1618. Again, hanging a weight to the bottom of the tripod always helps with stability. These are all good travel mounts with the mount and accessories fitting nicely into a small carry on case but with the tripod requiring a separate larger bag. I used the Cube Pro GoTo as my light weight scope when traveling by airplane to view the last total solar eclipse. These mounts allow the optical tube to be mounted off to one side so it will not crash into the mount when pointing to the zenith, but can crash into the tripod legs if the scope is too long or an extension tube is not used to attach the mount to the tripod. The other style of Alt-Az mount uses a single fork arm to attach the telescope over the center of the mount. Celestron has two models, the Nexstar SE and the higher end Nexstar Evolution for $430 and $1200, respectively, and with capacities of 12lbs and 25lbs. These are designed for 6" and 8" SCTs respectively. Meade has a similar offering in their LX65 model for $500 with a capacity of 14lbs. 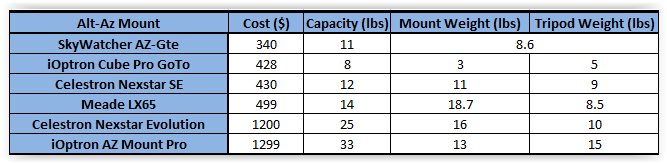 Summary
A computerized mount with both tracking and GoTo capability are essential if you want to do EAA. You do not need to use a computer to use these capabilities as the hand control will accomplish everything you need to do. The "computerized" nomenclature refers to the mount itself, not a separate computer. However, you can connect your computer to the mount and control it either with software from the mount manufacturer like CPWI from Celestron or third party software such as The Sky X or Cartes du Ciel. Just as for astrophotography, invest the most you can in the mount as its ability to keep the target centered on the camera is key to avoiding unpleasant star trailing and disappointing images. The lowest cost option for EAA is an Alt-Az mount. These have become very popular for EAA in recent years due to the ability of live stacking software to offset the fact that an Alt-Az mount does not perfectly track the earths rotation. However, if you plan to try hour hand at astrophotography at some future date or do not want to be limited to exposures of 30sec or less, an EQ mount is the right choice. Whether you choose an EQ or an Alt-Az mount pay careful attention to the rated capacity to make sure it will be stable against vibrations and be able to handle the weight of the telescope you choose to use. Mounts & Mount Telescope Combinations I have used successfully for EAA: Celestron 6SE - good low cost and light weight telescope/mount for EAA Available from High Point Scientific and OPT Corp Meade ETX80 Observer - very light and very low cost but limited long term iOptron Cube Pro - easily fits in a carry on case minus the tripod Celestron CGE - now discontinued but a good choice used Celestron CG5 - upgraded and now named AVX Available from High Point Scientific and OPT Corp Celestron CGX-L - large capacity, extremely stable, but very heavy mount/tripod Available from High Point Scientific and OPT Corp Software Bisque MyT - portable but overkill for EAA unless using an 11" scope Available from High Point Scientific and OPT Corp Software Bisque MX - replaced by the MX+ but overkill for EAA. Available from High Point Scientific and OPT Corp If you are interested in other telescopes you can find lots of options in each category of telescope on the Oceanside Photo & Telescope (OPT) and High Point Scientific web sites. Links are OPT and High Point Scientific Affiliate links. 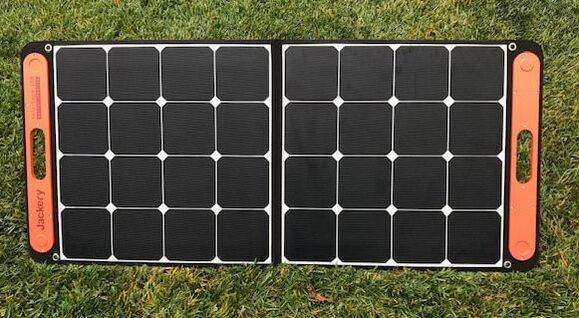 I posted a review of the Jackery 1000Wh solar generator earlier this month with my overall impression being that it is a very well designed and built power supply which can power even the hungriest astronomy setup for 8-10hrs without needing a recharge. While the Jackery can be recharged fastest with an AC outlet using the supplied charging cable, it can also be recharged quickly during the day using Jackery's Solar Saga 100w solar panels. Here I review the results of over a month's testing of a pair of 100w solar panels along with the generator both at my home observatory and during a 3 night trip to a dark site. 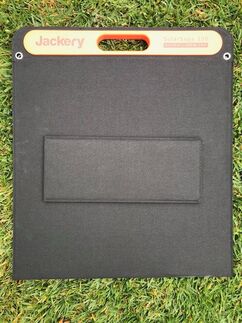 Jackery makes two versions of their solar panels, a 60w and a 100w model. While I tested a pair of the 100w models, they share design features with the 60w model as described here with the differences being size, weight and power output. Both panels use Monocrystalline solar cells with up to 23% efficiency and a voltage output of 18V and a current of 5.55A. The panels have over voltage, short circuit and surge protection built in. They have an operating temperature range of 14 deg F to 149 deg F. They come with a 24 month warranty but an included registration card will extend that to 36 months. The 100w panel is 48in x 21in x 0.2in when fully extended to capture the sun's rays. For transport and storage it conveniently folds in half. A pair of magnets cleverly embedded in plastic at two corners of the panel help to keep the panel folded when not in use or during transport. It also has a built in rubber carrying handle and weighs only 9.1lbs. All of these smart design features make it very easy to transport and set up in the field. 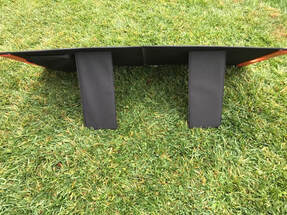 Each half of the full panel has a kickstand which stays put with velcro for travel and can be extended to support the panel when charging. The panels have a protective laminate layer for dust and weather resistance. A zippered pouch on the backside holds the 3m charging cable which is hard wired to the panel. The 8mm connector on the other end plugs into the charging port on the Jackery when charging the generator. Each panel also has a 5V 2.4A USB-A and a 5V 3A USB-C charging port on the backside so that a cell phone or tablet can be charged directly from the panel with the proper charging cable. Overall, I am impressed with the quality of the build and cleverness of the design making it easy to use. I give Jackery an A+ for design smarts and convenience. 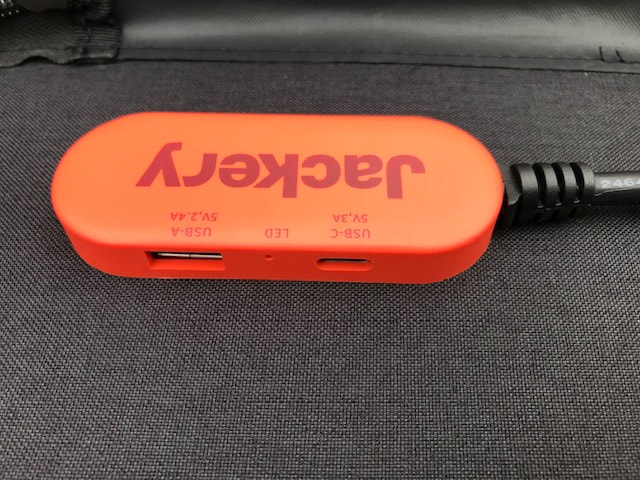 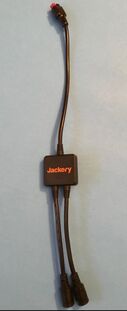 I ran a series of tests with the 1000Wh solar generator using my typical astrophotography imaging setup over 4 weeks at my home observatory and in a three night field test at a dark site location. In between tests I had multiple occasions to recharge the generator with the pair of 100w solar panels under varying sky conditions including best (full sun) and worst (overcast) case skies along with the in between cases of partial sun and clouds. To use two solar panels a Y adapter cable which is supplied with the 1000Wh generator is used to combine the outputs of both solar panels which are then fed into the generator's input port. It is not absolutely necessary to use both solar panels but the recharging time will be significantly reduced with two panels instead of one. I should point out that all of these took place in late September and early October as we moved into fall and the sun is lower in the sky and the days are roughly 11hrs long. The first thing I checked was the output of each solar panel. Keep in mind the output power of a solar panel varies with sun intensity and angle of the panel relative to the suns rays. Maximum output is seldom achieved, and when it is it is not sustained over long periods unless you re-align the panel due to changing solar intensity and angle. The meter on the Jackery 1000Wh generator showed that panel #1 was charging at a rate of 87/88w on a sunny day which is well within what other reviews have shown. Next I tested the second panel but its output was only 42/43w. Clearly the second panel was not performing up to spec. I contacted Jackery and they made arrangements for the second panel to be returned to them and a new one sent in its place, but since I was headed to a dark site for new moon in a week I asked them to wait until after my excursion to replace the second panel and forged ahead with the panels I had on hand. On a very sunny day the input to the generator with the pair of panels connected in parallel with the Y adapter cable varied from 118w to 125w over the course of the day as it charged from 20% to 100% in just 7 hrs. This rate of charge says that it should take ~ 8.75hrs to fully recharge the battery from 0% to 100%, which is in line with the advertised time of 8hrs. Not all days will be sunny so I checked how well the panels worked during several days with very little direct sunlight. The second solar recharge took place during the massive CA wildfires including three of the largest in the state's history very close to my home. With smoke filled hazy skies the entire day, the panels were able to recharge from a SOC of 23% to 100% in approximately 9.5hrs. The input to the solar generator typically read between 80w and 90w for much of the day. Apparently, enough UV light made it through the smoke particles in the sky. I was quite surprised. For the third solar recharge I picked a day with periods of partial sun, high thin clouds, but mostly a steady overcast condition. The output power of the panels fluctuated from 0w to 122w but hovered mostly around 22-48w throughout the day. In this case the two 100w panels could only provide enough power to recharge the generator from 18% SOC to 67% SOC in 9 hours. The Jackery panels are not unique in this regards as no solar panel can provide much output if the sun doesn't shine. But I was impressed that even under these gloomy skies I was able to recharge the generator by almost 50%. Odds are that if the day is that overcast we would not expect a clear night for astronomy so this would not be a problem. The charging rate was very linear with the SOC increasing just over 9% per hour of solar exposure up until the final 1% percent. This is nice in that, if the sky conditions are expected to remain fixed throughout the day, one can make a fairly accurate estimate of how long it will take to recharge under different sky conditions. 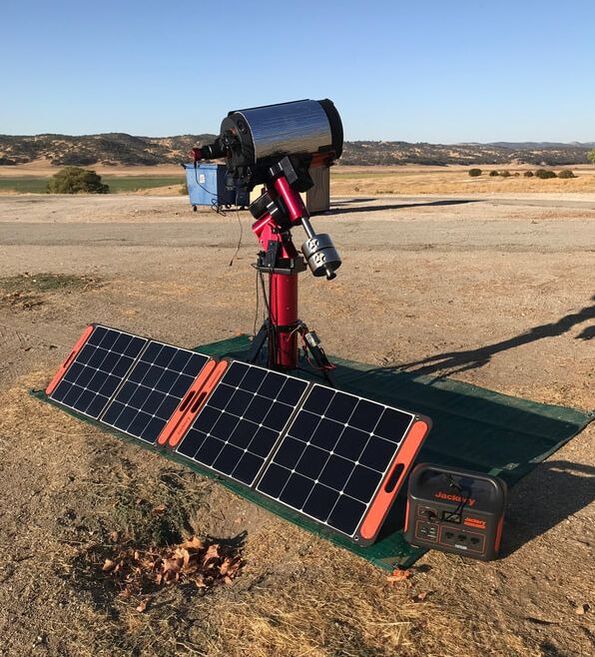 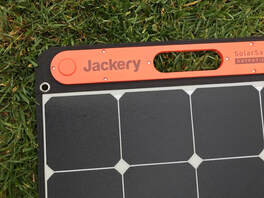 During my 3 night field trip to do astrophotography during the new moon I had the opportunity to recharge the panels after the first two nights. The first night I spent 8 hours imaging resulting in the generator dropping to 28% SOC. With full sun the next day I was able to fully recharge the generator as well as top off my laptop battery with Jackery's pass through charging option in a bit over 6 hours. Pass through charging allows the generator to be recharged at the same time it is supplying power to a load. The second night I imaged for only 6 hours and was easily able to recharge the generator in less than 6 hours in full sun. With this setup I could have easily imaged 8 hours a night indefinitely, fully recharging the generator, laptop and my cell phone during the day with the solar panels so long as I had ~7 hours of sunshine. Once I returned from my field trip I returned the under performing panel to Jackery with a prepaid voucher and quickly received a replacement. The first thing I did was to test it against the first panel under fully sunny skies. This time both panels consistently output 96/97w of power in tests on two different sunny days. This is exceptionally high compared to what I have read for any 100w solar panels on the market. Obviously the sun's intensity and angle or both are extremely important to obtaining maximum power output. I could easily improve the output by ~10w carefully adjusting the azimuth and angle of the panels. Next I checked the output with the pair of panels connected in parallel with the Y adapter. The configuration produced 129w of input power to the generator which remained steady over time. Why not 192W you might ask yourself. If you read my review of the solar generator you will see that with the supplied AC adapter the input power was 164w. Then why the difference with the two 100w panels? Well, I read in one review that the Jackery limits the total input current and since the AC adapter supplies current at 24V that would mean that the current limit is 164w/24V = ~7A. Considering that the solar panels supply current at 18V, and assuming the same current limit of 7A that would set the maximum input power at 18V x 7A = 126W which is very close to what I measured. The net result is that one does not get the full advantage of the two 100w solar panels due to this current limitation which is disappointing. The input power limit of ~126w led me to the next test measuring the total recharge time with a single 100w panel. I monitored the panel output hourly and used that opportunity to adjust the position of the panel to maximize its output, thereby keeping above 90w for most of the time. Since the days are shorter now and the sun is lower in the sky I had to run the test over two days to fully recharge the generator from 1% to 99% SOC. It took a total of 10.5hrs to recharge completely, which is a rate of 9.3% per hour and the rate was very steady all the way up until 99%. 9.3% of 1000w is 93w which is consistent with my observation of the fact that the output remained above 90w for most of the charging period. Also, 93w x 10.5hr = 977Wh which is also consistent with the fact that the SOC went from 1% to 99%, or 98% of 1000Wh = 980Wh. So, I suspect that during the typical star party season with the sun rising earlier and setting later than it does in Nov, one could fully recharge the 1000Wh generator with a single panel in one day. Overall, I was suitably impressed with the build quality, design smarts and obvious capabilities of the Jackery Solar Saga 100. My truly on complaint is the price. At a price of $299.99 the Jackery 100w solar panels are more expensive than other folding panels. However, none of the other folding panels I have reviewed on line appear to have as durable, compact and ergonomic design as the Jackery. Nonetheless, it is best to keep an eye out for one of Jackery's sales to get the best possible price. Summary Pros High efficiency solar cells Lightweight with handles Sturdy, durable design Embedded USB charging ports Cons Price No protective case Hard wired charging cable You can shop for Jackery products at Amazon.com. Links are Amazon Associate links. Jackery Solar Saga 100 amzn.to/48XXdyk Edit: You can find a video version of my Jackery 1000 and 500 review on YouTube  I have been powering my astronomy rig in the field using either two 100Ah lead acid deep cycle batteries or my Yamaha EF2000is generator for a dozen years. While relatively cheap, batteries are heavy (50-60lbs), can only be discharged to 50% of capacity, are not voltage regulated, need to be maintained monthly, and do not have built in meters, USB charging, AC output, etc. At $1000 a generator is expensive, heavy (~50lbs), does not have either DC or USB outputs and is not permitted at most star parties. So I decided it was time to look at Li based power with solar recharging. Why Li? Because the power to weight ratio is much, much better than lead acid batteries, Li batteries have a higher depth of discharge (DoD) than lead acid batteries without damage and they maintain their voltage through most of the discharge cycle. The obvious downside to Li based power is the higher initial cost. 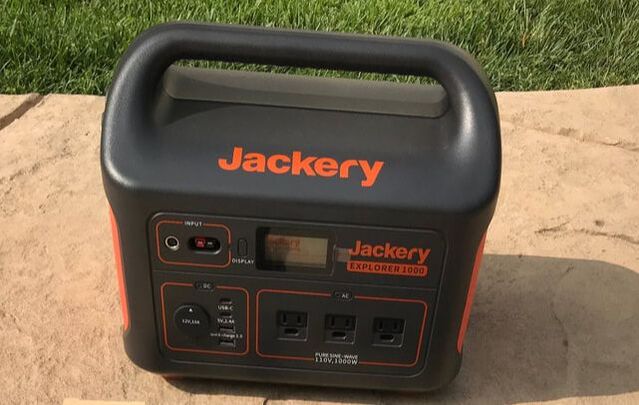 Solar Generators At first I considered 100Ahr LiFePO4 batteries like the well regarded Battleborn batteries marketed primarily to the RV and boating industries since I am planning to use these to add solar to my new RV in the coming year. But after much research I decided that a "solar generator" rather than a standalone Li battery is a much better match for astronomy applications. What is a solar generator? It is a Li battery with a battery management system (BMS), DC, AC and USB outputs, power input/output/SOC meter, an LCD display, power charging ports and a solar charge controller all built into a single lightweight, rugged and portable unit. There are many different suppliers of solar generators available today which are primarily marketed to the outdoor adventurer. Many solar generators use Lithium Nickel Manganese Cobalt Oxide (NMC) chemistry instead of LiFePO4 because of its nearly 2 to 1 advantage in energy density to weight ratio. I zeroed in on the solar generators from Jackery after reading many positive reviews about their design, features and performance. Their line of solar generators includes 160Whr (13.9Ah @ 12V), 240Whr (20Ah @ 12V), 300Whr(25Ah @ 12V), 500Whr (41.7Ah @ 12V) and 1000Whr(83.5Ah @ 12V) models with prices ranging from $139.99 to $999.99 with frequent sale pricing. These provide plenty of options for different astronomy needs. I contacted Jackery and suggested that amateur astronomers might be a market for them and they were kind enough one of their 1000Whr generators with a pair of their 100w solar panels for me to put to the test with my astronomy rig. Below are the results of more than a month of extensive testing in my backyard observatory and on a 3 night star gazing adventure in the field.  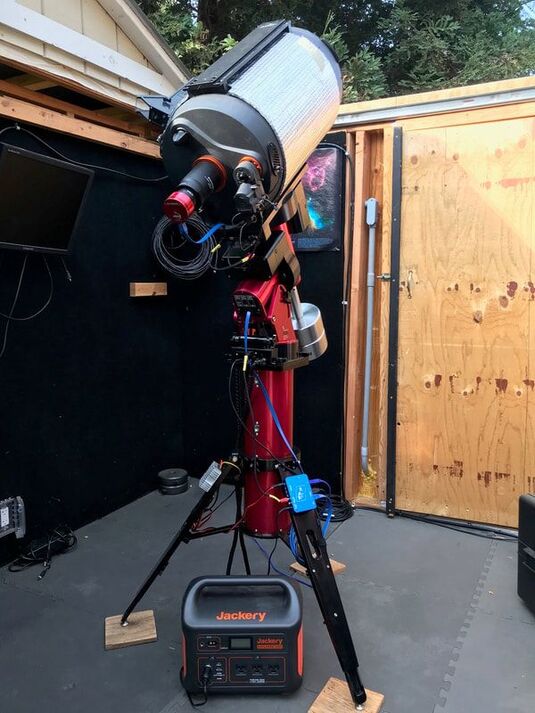 The Jackery comes well packaged with the generator shipped triple boxed. The PS1000 generator includes an AC charger in a soft carrying case, a car charger cable, an adapter to connect two solar panels in parallel for faster charging and a user manual. It enjoys free shipping, a 30 day free return and a 2 year warranty. Inside the box I found a registration card which enables a warranty extension to 3 years. The generator is solidly built using rigid ABS plastic casing and sports a smart functional design. With dimensions of 13.1 x 9.2 x 11.1 in. (L x W x D) it is only slightly larger than my lead acid batteries and fits nicely between the tripod legs of my mount. It's molded handle and weight of only 22lbs makes it a breeze to transport. Everything one needs to access is conveniently located on the front of the generator including: 1) a 10A DC cigarette adapter socket with dust cap; 2) a 5V 2.4A USB-A output ; 3) two 3A USB-C outputs; 4) a USB-A Quick Charge 3.0 output; 5) three 110V AC outputs from the internal 1000w pure sine wave inverter; 6) 8mm and Anderson Power Pole inputs to recharge the generator; 7) an LCD display which shows power output, input and battery % SOC and is low enough intensity as to not disturb fellow astronomers. 8) On/Off buttons for the power outputs and the display. A small LED light is mounted on the side. The Jackery can be recharged with the included AC charger, with optional solar panels or by car. Observatory Testing I conducted a series of tests of the Jackery using my Software Bisque MyT mount, Celestron C11 OTA, Celestron focuser, ASI1600MC camera, Orion SSAG guide camera (not shown in the accompanying photo), Astrozap dew heat strap, TEMP-est cooling fans, and a Pegasus Power Box Advanced (PPBA). I used a cigarette adapter to 5.5mm x 2.1mm cable to supply power from the Jackery to the PPBA which in turn distributed power to the MyT, dew heater and focuser. The cameras and fans drew their power from the MyT. Since the MyT requires 48V I used a DC-DC up converter on the output of the PPBA to transform 12V to 48V rather than using the less efficient AC adapter. I use The Sky X (TSX) to control everything except the PPBA which is controlled by its own application. I did run one test using the Jackery's AC outlet to power the MyT without any problems but that method unnecessarily wastes power in the conversion process. Since the first month of testing occurred during the massive wildfires here in CA I could not actually image. Instead, I ran everything exactly as I would during a regular imaging session with the ASI capturing dark frames to the laptop, the fans running, the guider taking dark frames and the heater powered at 50%. Since a laptop is typically the most power hungry device used and not everyone uses the same laptop, if they use one at all, I decided to run 3 different test setups: 1. Everything but the 15.4" laptop powered by the Jackery through the PPBA. 2. As in 1 but with the laptop powered through the Jackery's AC inverter. 3 As in 1 including a BeeLink mini-pc powered by the Jackery through the PPBA. The Beelink ran TSX and I used my laptop on its internal battery linked to the Beelink via Team Viewer as a monitor only to minimize power consumption. For these tests I tried not to discharge the generator batteries below 20% SOC to be very conservative in terms of long term battery lifetime. The manufacturer specs the batteries to > 500 full discharges to 0% SOC so you could increase all of my total times below by 25% if you are comfortable using the full capacity of the Jackery. Here are the test results: Test #1: I was able to achieve a total run time of 27hrs over 3 successive sessions before reaching a SOC of 20%. That is enough power for 3 nights of 9 hour imaging sessions without the need for a recharge in between, although a recharge is always possible. I noted that the ouput voltage of the Jackery remained steady at 12.9-13.1V all the way down to 20% SOC. Test # 2: To extend the session as long as possible, I disconnected the laptop from the Jackery when it reached a SOC of 25% and let the laptop run on its own internal battery until it reached ~5% and the Jackery reached 20%. This powered everything for 9hrs, sufficient for a long overnight imaging session powering everything with the Jackery. Considering that the Jackery was able to be fully recharged with 2 solar panels in 7.5hr , one could run indefinitely this way so long as a reasonable degree of sunshine is available during the day. Alternatively, the Jackery could be recharged in 6-7hrs with an AC outlet. Test#3: For this test I only used my laptop on its internal battery to check in on the BeeLink via Team Viewer occasionally. As I show below, the BeeLink which has no monitor consumes much less power than a 15.4" laptop so I was able to run for 8hrs and only draw the Jackery's SOC down to 59%. At that rate of power consumption I should be able to run for 15.6hrs without dropping the Jackery below a 20% SOC. That is nearly enough power for 2 nights of 8hr imaging without the need to recharge in between. Or I could use the extra power of the Jackery to keep my laptop powered using it as a monitor to check on imaging progress from time to time. 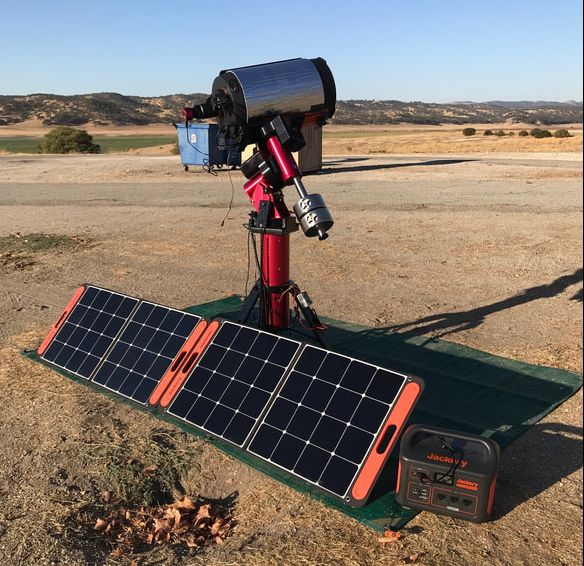 Actual Field Tests While the tests at my home observatory are telling, there is nothing like an actual test in the field. So, just after the October new moon and with clear skies at last I headed to a dark sky site along the central CA coast. I did not use the SSAG since I wasn't guiding and I also did not need the heater. However, for all three nights I powered my laptop with the Jackery as in Test #2 above for a completely self contained test of the Jackery. The first night I powered everything up at 6:17PM, just before dark and rough aligned on the crescent moon. As it turns out, my first night would be one of frustration as I learned after running a 120 point TPoint model that my PA was way off. It took a second TPoint run for me to realize that my daytime mechanical alignment was so far off that I had to rotate the entire mount and tripod and adjust the gross altitude pin on the mount to have any hope of an accurate PA. After 2 more TPoint runs I finally got a good PA and was able to begin imaging the M74 galaxy in Pisces at f/10. I typically dislike first nights in the field given my history of such self-inflicted wounds. My frustration actually provided a good power test since the mount spent a great deal of the first 4 hrs slewing back and forth across the sky more than 500 times. I powered down at 2:15 for a total run time of 8hrs with the laptop still fully charged and the Jackery at a SOC of 28%. In other words, I could have run for another 2 hours if I had been able to stay awake. During the next day I fully recharged the Jackery with the solar panels in about 6hrs so it was ready for the following night. I ran for 6hrs on the 2nd night completing my image collection of M74 and finishing with 50% SOC, easily recharging once again with the solar panels during the next day. The final night I ran for another 6 hrs finishing with 47% SOC as I imaged the edge on spiral galaxy NGC891 in Andromeda. Overall, the Jackery performed as I had expected allowing me to image for as long as 8-10hrs had I been able to stay awake, fully recharging each day with two 100w solar panels to be ready for the next evening. I was also able to use the Jackery during the day using its pass through charging feature to keep my cell phone recharged. Pass through charging allows the Jackery to simultaneously charge a device like the cell phone or laptop, while it is itself being recharged by solar or AC power. It will take correspondingly longer to recharge the generator depending upon the power used to recharge the connected device. Power Use Case Analysis Since everyone uses different equipment for their setups, I used the PPBA to measure the power requirements for each individual device and built the power consumption table shown below. Since my camera does not have cooling, I borrowed an ASI294MC Pro with cooing from a friend and measured the power requirements for three different degrees of cooling. Not surprisingly, the biggest power draw by far is my laptop and that is with the display turned down, Bluetooth and WiFi turned off. The camera cooler and dew heater on full are the next biggest power hogs. I find that I can usually run my heater at 50% with a dew shield and not have any dew problems, but others may find they need to run full power. Also, smaller OTAs will require smaller heater straps and correspondingly less power. The MyT mount power increases during slews but as I found when running TPoint in my field tests, 15w is a good average power consumption to estimate the total power needs for this mount if running by DC. In the past I measured the current requirements for a number of different mounts (CGE, CG5, Nexstar 6", ETX80 and IOptron Cube) and found that they use significantly less power than the MyT ranging from 2w to 6w during tracking. The ASI1600 is typical of cameras, including guiders, which operate on 0.5w or less without cooling. I do not have a powered filter wheel or camera rotator but I suspect that the power draw from those is negligible since they are used sparingly through the course of the night. 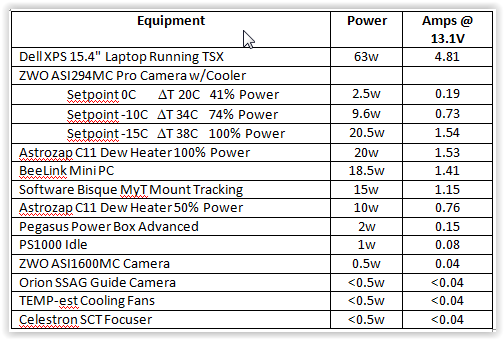 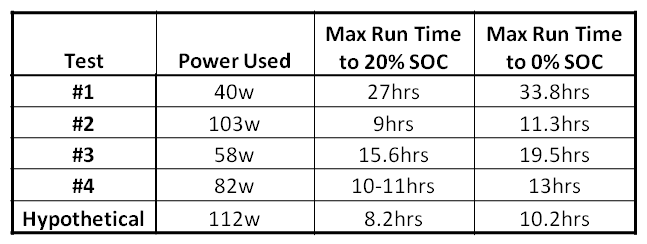 Taking these numbers into account, the following table summarizes the power required for each of my test cases and the corresponding maximum capable run time for discharges to 20% and 0% SOC of the Jackery. I added an additional case called "Hypothetical" which is identical to my Field test with the laptop powered by the Jackery up until the last 2 hours, but I added the additional power requirements of the dew heater at 50% power (10w) and a camera cooler at 100% power (20.5w) to get a total power requirement of 112w. One can see that for a setup that draws between 40 and 60w, fairly typical of an imaging rig using a mini-pc or a separately powered laptop, the Jackery 1000 can supply multiple nights of power without a need to recharge in between. Even in the most power hungry 'Hypothetical" case the Jackery 1000 can supply power for a long night of imaging. Additional Observations As noted above, the Jackery has a regulated power output. In my tests, the output voltage remained between 12.9 and 13.1V all the way down to 15% SOC showing excellent power stability. Another thing to note is that the drop in SOC was very linear with time, falling by the same % each hour all the way down to 15%. Like all other solar generators that I have investigated, Jackery specs the battery life to >500 full cycles after which the full capacity of the batteries will drop to 80%, or 800Wh for this particular model. At that point it will still supply 80% of its original capacity so one would still be able to get continued use out of it but the total run time would be shorter than during the first ~500 or more cycles. The Jackery can be used to power devices over the temperature range of 14deg F to 104deg F which will cover the typical star party season but might be a problem for hardy soles who like to observe away from home during frigid nights. Recharging of the Jackery requires a temperature above freezing, 32deg F, but I read of a clever trick where the generator is placed inside a cooler so that it stays warm enough under its own heat while recharging at temperatures below 32deg F. These are limitations typical of Li-chemistry batteries and it should be noted that the BMS will prevent the battery from being used outside these conditions so it cannot be accidentally damaged. Maintenance of the generator is simple requiring a discharge to 50% SOC and recharge once every 3 months. Summary I am thoroughly impressed with the build quality, performance and ease of use of the Jackery PS1000 as a source to power a typical astro-imaging session through a long night under dark skies. With the option to recharge within 7hrs by AC outlet and 8hrs by twin solar panels, if not less, I can look forward to eliminating those heavy lead acid batteries and avoid annoying my friends with my generator running through the night. The biggest downside to the PS1000 is its price. However, when I look at the cost of two 75Ah AGM batteries needed to match the Jackery's power, plus a quality pure sine wave inverter, MPPT charge controller for solar charging, power meters, USB charging sockets, cases, etc. I believe the cost of a DIY system easily exceeds $600 not counting the assembly effort. And one still has to carry two 50lb home built power supplies and connect them in series. Another consideration is that the Jackery can double as a backup generator in case of a power outage. The PS1000 will keep my refrigerator running for 9hrs before needing a recharge and, unlike my Yamaha generator, I can use it inside my house. For those with lesser power needs, say 40-60w the $499.99 Jackery 500 would be a lower cost option to achieve a 7-8hr imaging session. And for visual observers, the much less expensive 160 and 240w models would be more than sufficient for their power needs. I gave the folks at Jackery feedback on how they might make their generators more user friendly to the astronomy community. First, they might consider a 5.5mm x 2.1mm or an Anderson Power Pole DC output in addition to the cigarette adapter output. Or they could supply a cigarette adapter to 5.5mm x 2.1mm or Anderson Power Pole extension cable to make it easier to for us to connect the Jackery to our equipment. However, it was easy to find a cigarette to 5.5mm x 2.1mm power cord on Amazon that serves the purpose. The Jackery generator can be recharged with one or two of the Jackery Solar Saga panels in parallel or, with an MPPT to 8mm adapter with any solar panel under 30V and 10A. I plan to do a separate review of their solar panels in another blog soon so look for that soon. Pros High capacity and DoD Extremely light weight Voltage regulation Well designed and simple to use Simple to add solar recharging Cons Price Single 12V output No 5.5mm x 2.1mm or Anderson Power Pole output 500 cycles to 80% remaining capacity 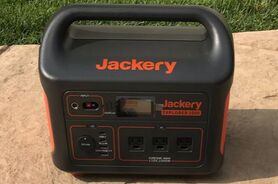 You may also want to watch my video review of the Jackery 1002Wh and 518Wh solar generator models on my YouTube Channel.
If you want to find out more about and shop for Jackery products, you can find them here Amazon.com. Links are Amazon Associate links. Jackery 1000 amzn.to/47DIVSm Jackery 500 amzn.to/47zeWep Jackery 240 amzn.to/3RX7QdM 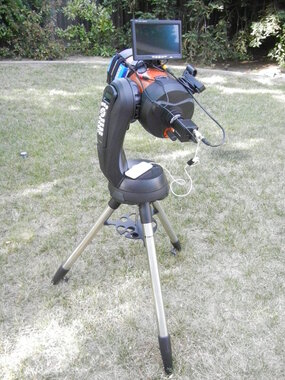
It is apparent that more and more amateur astronomers are interested in Electronically Assisted Astronomy (EAA) based upon the many posts on the Cloudy Nights forum asking for help to get started. EAA, using a camera with short exposures to view Deep Sky Objects in real time, has been around since the late 90s when the first video cameras like the SBIG STV were used instead of an EP at the focus of a telescope to greatly enhance the views of Deep Sky Objects. You can read about the history and evolution of EAA in my blog here " A History of Camera Assisted Viewing". While the CN forum is a great source of information, particularly for newcomers to EAA, that information is not organized in one compendium which is easy to access and use. So, while I still recommend anyone new to EAA to take advantage of the many experienced and helpful folks on CN, I hope to put together in a series of blogs the fundamental information needed to successfully and more easily get started at EAA.
The very first and most important question one has to answer is which type of camera, analog or digital, is best for them. For most people and most use cases my recommendation is to go digital as that is the direction things have been heading for the last 5 years and will continue to advance in the coming years. However, there are significant reasons why someone would want to start with an analog camera and we cannot simply dismiss those. The Case for Analog If you are a person who absolutely does not want to use a computer then your only choice is to use an analog camera. While analog cameras can be used with a computer, they also work without one which is not the case for digital cameras. An analog camera without a computer is about as simple as it gets and has the added advantage that it requires a minimum amount of power to operate since laptops tend to be very power hungry devices. The simplest configuration includes a telescope, a camera attached to the telescope in place of the EP, a small LCD monitor connected to the camera video output, and a power source with cables to connect the power to the mount, camera and monitor. If you are working in your own backyard you can use a 3-5A AC power transformer to power everything from an AC outlet. If you are working at a dark site without AC power you can use a battery to supply the necessary power. The nice thing about this simple setup is that you can use a very small, lightweight Li battery which can even be attached to the scope along with the monitor. Analog cameras use less than 400mA of current, a 9" LCD monitor less than 300mA, and a Celestron SE, AVX or CGE mount will use less than 500mA. So an 8.3Ah battery like the one from Talentcell that I use for my simple setup will last an entire night or two before needing a recharge. This type of setup is often used for family viewing or Public Outreach events where several people at once can view the object on the display screen while the astronomer discusses interesting facts about the Deep Sky Object. It is also useful for anyone with a seeing impairment since the image can be displayed on as large of a monitor as one desires. I have used a 34" LCD TV for my public outreach but that requires a bigger battery and a DC to AC inverter to operate. 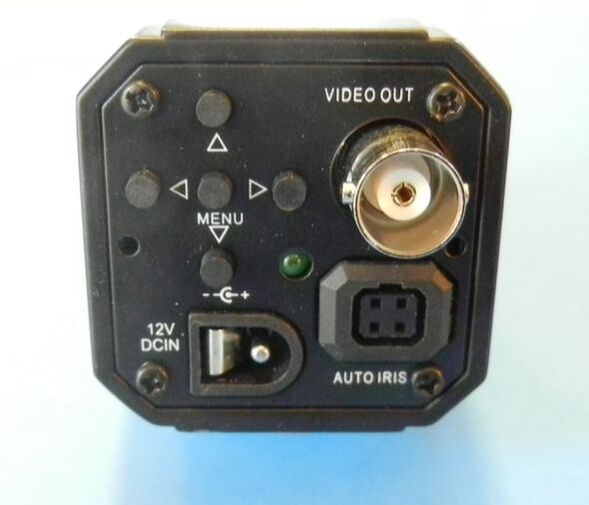
The back of the analog camera has a 12VDC power input, a video output to send the images to the display and a set of 5 buttons which are used to adjust the camera settings. There is typically another input called an Auto IRIS which is not used unless the camera is setup to use this input for either hand control or computer control of the camera menu. Otherwise the camera menu is accessed and controlled by the 5 small buttons on the back of the camera while watching the On Screen Display (OSD) of the menu on the LCD display. The video out uses a BNC connector so it is necessary to have a cable with a BNC connector on the camera end and an RCA connector on the other end to connect to a display device.
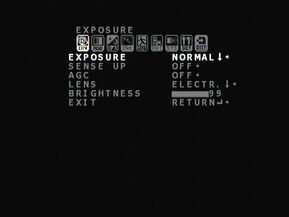
An example of an OSD is shown here. Many analog cameras are simply re-badged security video cameras, while others are security cameras with a few modifications such as increased exposure times and cooling of the sensor to reduce background noise. That means that the camera menu is designed for security applications and not for astronomy. So the menu is not intuitive and it takes a bit of a learning curve to understand how the settings apply to an astronomy application. Also, the menu consists of many layers which are accessed by clicking on one item and finding an expanded display hidden within. This can be confusing to some people at first but eventually becomes rote. It also takes some time to learn which settings need to be adjusted and what values for these settings are typical. Suppliers of these cameras offer guides for typical settings to get you started. And, you can read my blog on de-mystifying the OSD here: "Making Sense of Video Camera OSD Menus".
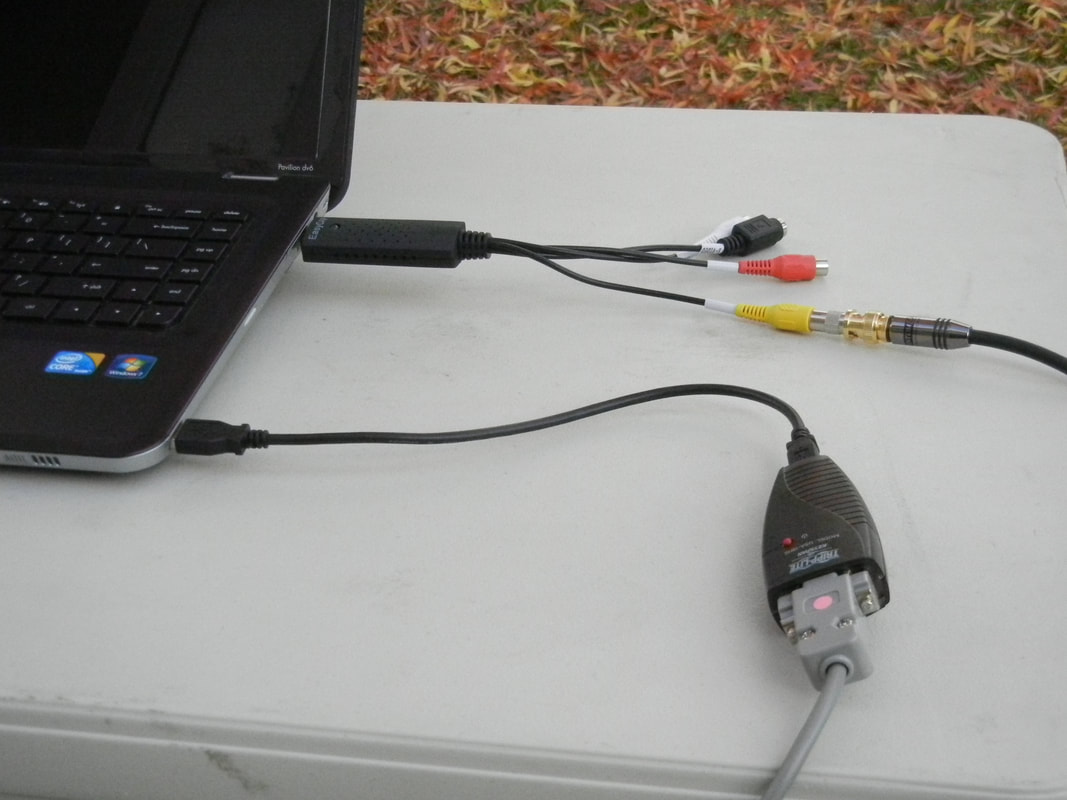
As I mentioned, an analog camera can be used both without and with a computer. There are software programs, some free, which can be used with the Mallincam video cameras like the Xtreme and Xterminator to control the camera menus and to capture and display the video image. For this to be possible the camera has been modified to connect to the computer. This is done with an RS232 cable connected on one end to the computer control input on the camera and on the other end to the computer through a USB adapter like the Keyspan from Tripp Lite. This replaces the buttons on the back which can be tricky to manipulate in the dark, with gloves, especially as the scope rotates about the sky and the orientation of the buttons changes.
While computer control of the camera is very useful, the biggest advantage of the computer is the ability to use the same software to enhance the image by using a live image stacking feature. Stacking is done in the computer as it takes successive image frames from the camera, aligns them and combines them into a stack during a live viewing session. As each new frame is added to the last, the image improves as background noise is reduced and more detail begins to emerge. This provides an enhanced live view of Deep Sky Objects. To connect the video output of an analog camera to a computer a digital capture device is required. This takes the analog signal from the camera video output, digitizes it and sends it to the USB input of the camera where the software recognizes it for display, stacking or capture. While there are many of these devices out there it can often be a challenge to find one that works. The one I have used religiously without any issues is the Pinnacle Dazzle device. While more expensive than others it just works. It should be noted that digital cameras can also use a computer both for camera control and live stacking. In fact, when used with a computer a digital camera requires only one cable for both power, control and viewing compared to 3 for an analog camera. With the two suppliers of the CCDs used in analog cameras having decided to stop production in favor of CMOS sensors used in digital cameras there are just a few suppliers of analog cameras still available. You can still get the Xtreme and Xterminator from Mallincam and the much less expensive Revolution Imager II from a number of different suppliers. The Revolution Imager II does not come set up to use computer control but does come with a hand control which simulates the buttons on the back of the camera making it much easier to manipulate the OSD and also allows one to do this remotely. There are many options of older, but very good, analog cameras which can be found on the used camera market. In summary, you would choose an analog camera if you really do not want to use a computer or want the option to use it both without and with a computer. 
The Case for Digital
I recommend a digital camera for anyone just starting out. The era of analog cameras is waning and there will not be any new entries. On the other hand, new digital cameras become available as new CMOS sensors are released. The digital cameras available today provide much better images than any of the analog cameras. That is because digital cameras use sensors with many more pixels, between 1 and 61 Mpixels, compared to analog cameras which have less than 0.6Mpixels. Most digital cameras used for EAA have between 11 and 16 Mpixels . This combined with the fact that digital cameras use much smaller pixels than analog cameras, 3.75 to 4.6 microns compared to 8 to 9 microns, results in much higher resolution and a much larger field of view from digital cameras. In addition, the pixels in digital cameras are square whereas they are slightly rectangular in analog cameras. Between the size and shape of the pixels, digital cameras produce much rounder and pin point stars. Also, video sensors tend to produce a dark halo around stars resulting in a "raccoon eye" appearance for the stars viewed with a video camera. Putting this all together, the images from digital cameras are far superior and more natural looking than from the best analog cameras. Another big advantage of today's digital cameras is their extremely low read noise, on the order of 1.5 electrons. This helps with stacking since there is no disadvantage in taking many very short exposures to stack instead of few long exposures. This stacking strategy is very common as the short exposures reduce demands on the quality of the polar alignment and tracking precision. Shorter exposures also mean that field rotation, i.e. apparent rotation of the stars as the earth turns on its axis, is much less of an issue. This makes it much more practical to get by with an Alt-Az mount instead of requiring the use of a more expensive EQ mount. 
In contrast to analog cameras, digital cameras require only a single cable to connect to a computer. This USB cable provides power to the camera, allows the computer to control the camera settings and downloads the image from the camera for display and capture on the computer. Like analog cameras these digital cameras use less than 500mA of current. If the camera has a cooler for the sensor a separate power cable identical to that for an analog camera is necessary. Power from an AC transformer or DC battery capable of supplying 3-5A is required to handle the current load.
While the image from a digital camera is naturally displayed on the computer screen, it can be shared on a 2nd, larger monitor for viewing by a group such as for Public Outreach. With the right software the image can also be wireless displayed on a tablet as well. Of course, the additional monitor will require power as well. Many digital cameras come with their own proprietary software designed to provide camera control and include features to live stack images and even process images like in traditional astrophotography but on the fly while watching the image improve with time. Sharpcap is a more universal software program which works with most cameras either natively or through an ASCOM driver. It provides a seamless interface to the camera. The good thing about Sharpcap is that it is free, although there is a pay version which has lots of useful additional features. Sharpcap does have a steep learning curve, but it is written specifically for astronomy cameras so it is much more intuitive than the OSD menus of video cameras. Plus there is a well written manual and some on line tutorials to help one get started. Some of the proprietary software is easier to master quickly but may lack many of Sharpcap's added features. While Sharpcap will also work with analog cameras it cannot control the camera settings. The other important point to consider in choosing between analog and digital cameras is your future intention. If, like so many who practice EAA, you think you would like to try astrophotography in the future, you will want the higher image quality and wider field of view of a digital camera. There is no comparison between the best images taken with an analog camera and an average image taken with a digital camera. In fact, with a program like Sharpcap, one can do both live stacking for live viewing while also saving the individual images to be used later for traditional astrophotography processing. So, unless you need to go computerless, I strongly suggest getting a digital camera. Next issue of "Beginning EAA" will address Mounts.
You can find some of the products shown in this blog along with some others I would recommend in the links provided below. I have only listed products which I use myself or know to work well. Links are Amazon Associate links.
Revolution Imager - nice complete kit with analog camera, battery, display, cables, focal reducer, filter and adapter ZWO ASI224MC - this is the camera that started the switch to CMOS for EAA. Small sensor but highly capable and low cost ZWO ASI294MC Pro Cooled - while I have not used this one, it is the successor to the ASI1600MC which I do have and is widely popular now for EAA Starlight Xpress Lodestar X2C - while this is actually a guide camera, this is one of the first digital cameras used for EAA including by myself. 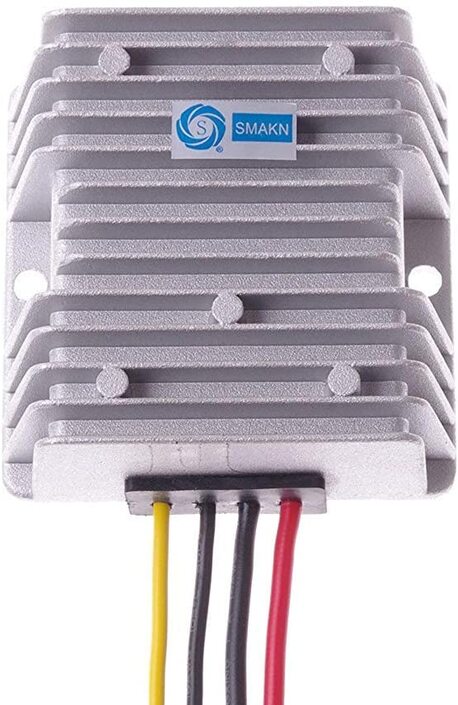
Last year I purchased a SB MyT telescope mount to use when I travel to dark sites. The one annoyance to me with SB mounts (MyT, MX+, ME) is the fact that they are designed to work with 48V instead of 12V like almost every other mount along with cameras, focusers, filter wheels, heaters, coolers, etc. This is not a problem when one has AC power available as the mount comes with a very good 110VAC to 48VDC transformer. However, one seldom has access to AC power in the field. While using an DC to AC inverter is an option, inverters are an inefficient way to power a mount especially considering that power out in the field can be a precious commodity.
Software Bisque recommends the 56VDC EGO battery for use with their mounts in the field because their mounts can operate at voltages between 48v and 60V. But again, since almost every other piece of equipment we typically use for astronomy works on 12VDC, I prefer not to add another battery type, to the list of equipment I need to carry with me in the field. And the EGO battery, charger and SB adapter are fairly expensive. The solution for me and many others is to use a DC-DC voltage boost converter which will take a 12VDC input (actually many take a range of input voltages) and convert this to 48VDC output. This allows me to stick 12VDC power for all of my power needs in the field. There are quite a few different converters available on Amazon for ~$15 to $30. I initially purchased the SMAKN for under $30. The MyT AC transformer supplies a maximum of 1.6A at 48V or 77W so this converter is more than sufficient for the application. The manufacturer lists the following features for this unit: 1. Embeded Smart Chips provide protection from (1) Over current; (2) Over heating; (3) Short Circuit; (4) High voltage 2. High conversion efficiency and stability with synchronization rectification technology. Up to 95% efficiency. 3. SMT technology 4. Aluminum casing with silicone seal for waterproof, dust proof and anti-shock performance. The input wires, red + and black -, are 14 AWG while the output wires, yellow + and black -, are 16 AWG as the input current will be 4X the output current in proportion to the voltage boost of 12V to 48V. I first tested this on the bench with a dummy load to measure the voltage output of the converter and to make sure it was a steady 48V and that the unit did not overheat under extended use. The output of the converter is 48.5V which compares well with the no load output of the SB AC transformer of 47.9V. The converter does not get hot, but does get slightly warm to the touch under extended use. The voltage remained steady within +/-0.3V during extended testing. I was also able to measure the efficiency of this unit to be 95-96% in line with the manufacturer's specs. 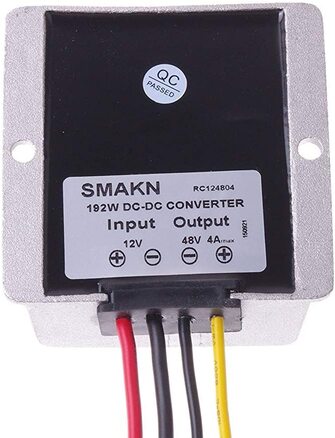

Since the converter comes with 2 pairs of pigtail wires I had to decide how to connect the input of the converter to my power supply and the output to my mount. I considered hard wiring the pigtails to the appropriate cables on either side, but then decided to use Anderson Power Pole connectors instead. You will need the 30A version connectors because of the larger gauge of the power input wires. I ordered a 14AWG cable with Anderson Power Pole connectors on one end and a 2.5mm x 2.1mm connector on the other end for the connection between the power supply and the DC-DC converter. For the output, I made my own cable with 16AWG wire and 30A Anderson connectors on one end and a locking 5.5mm x 2.1mm DC connector on the other end. I attach the DC-DC converter to the leg of my tripod and run the wires from there to the power supply and up to the mount.
Since I like to have spares when it comes to any critical component that can fail in the field, I purchased a slightly different converter, the 3A, 144W version from Aweking for ~$25, as the backup. At 144W this is still more than sufficient for use with the MyT. Looking at the two side by side it is apparent that these are built in the same factory, but to slightly different specs, and sold by different distributors on Amazon. The only observable difference is the writing on the backsides identifying the current/power rating and the name of the company distributing
them. The Aweking unit performed identically to the SMAKN unit on the bench. 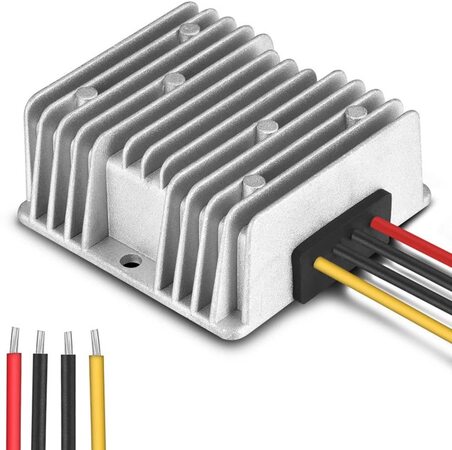
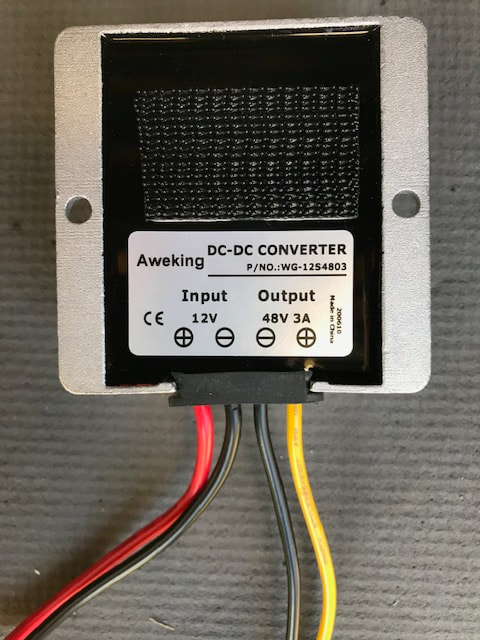
Next I tested each converter separately to power the mount over several different days. I supplied power to the voltage converters through my Pegasus Power Box Advanced which provides a constant view of the current and voltage drawn as well as a time log of the same and watt-hours. I could find no discernible issues running the mount with the DC/DC converter instead of the AC transformer. I am sold on this approach as a viable field power option.
While I was at it, I was able to log the power draw of the mount under different conditions. I share that here for those trying to figure out what size battery they need to power the MyT. I am using a Celestron C11 Edge with a Stellarview 50mm guide scope mounted with an ADM rail along with an ASI1600MC camera, a SSAG guide camera and Celestron motorized focuser. Total weight should be around 40lbs and is well balanced. Tracking draws 12-16w of power (0.9 to 1.25amps at 13.25V) depending upon the orientation of the OTA. Slews in one axis consume 25-35w (1.9 to 2.6 amps at 13.25V) and high speed slews in both axes take as much as 62w (4.9 amps at 12.7V). Hopefully this is helpful data for others wanting to use their MyT in the field with a 12V battery. You can find the products listed in this blog in the links provided below. I only list products which I use myself or know to work well. Links are Amazon Associate links. |
Categories
All
Archives
January 2024
|
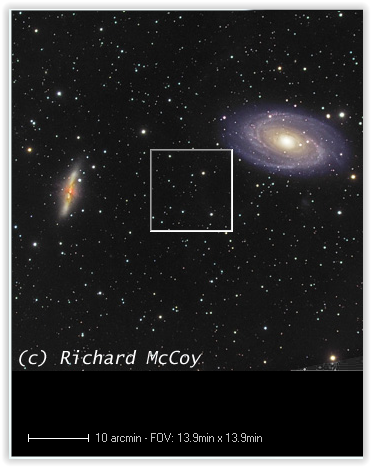
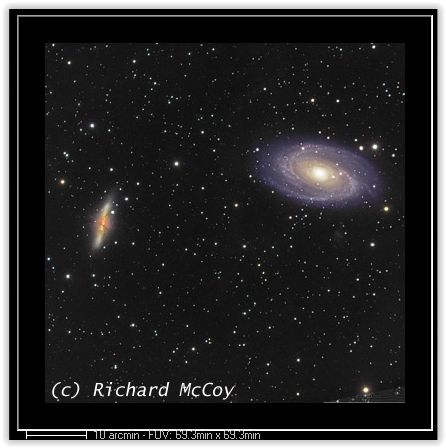
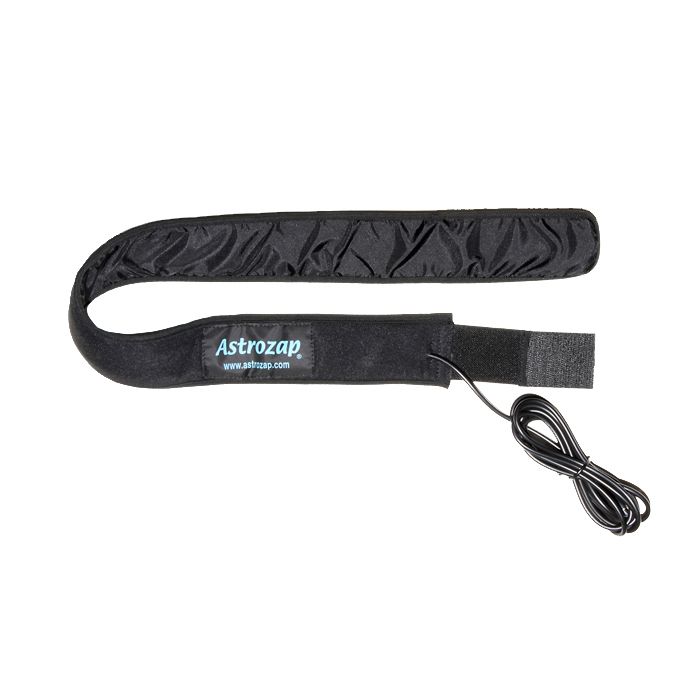
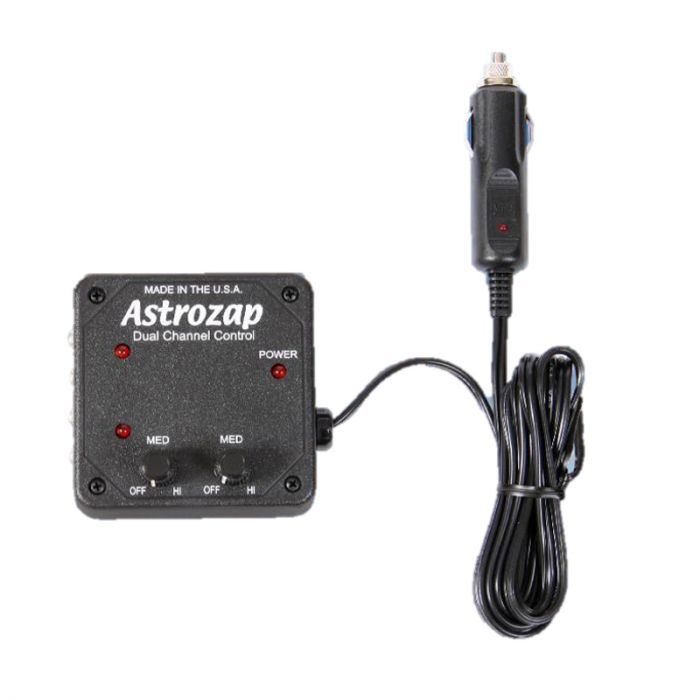
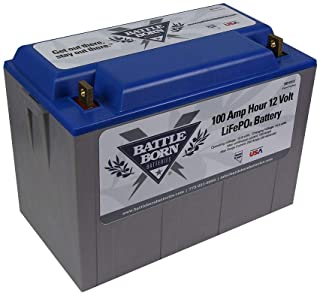
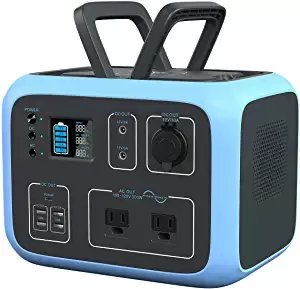
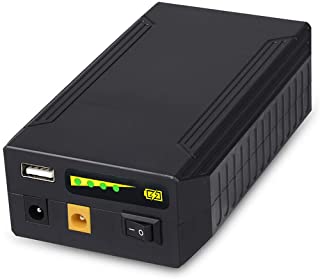

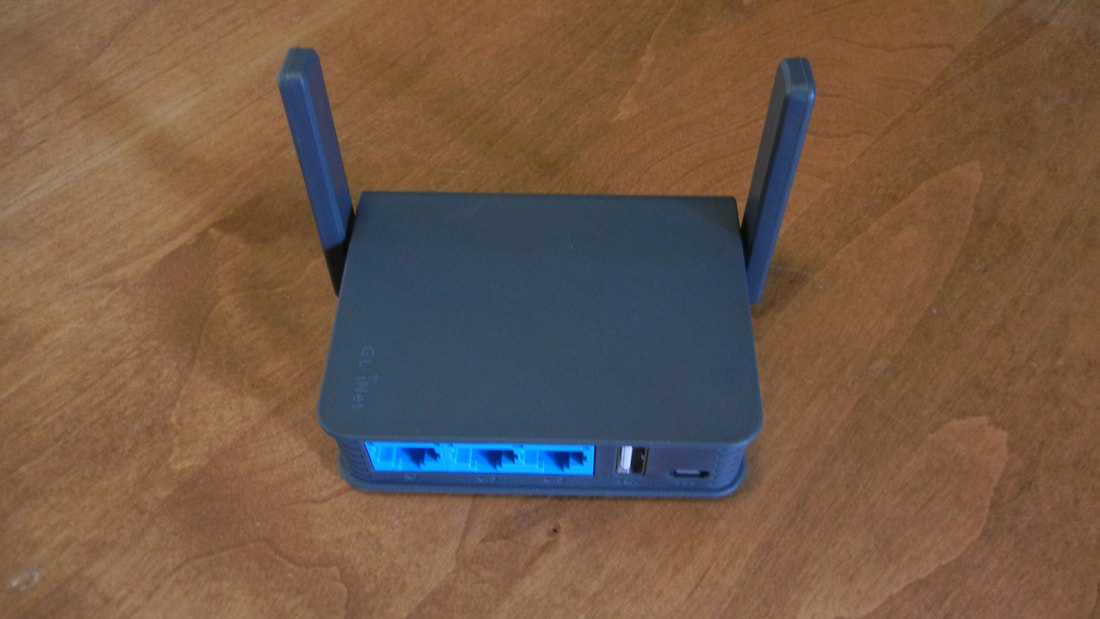
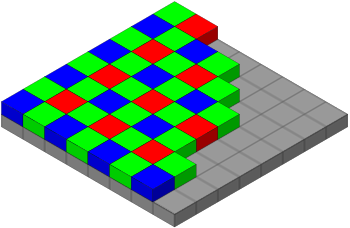
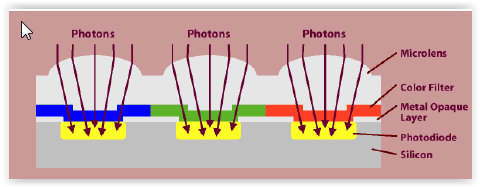
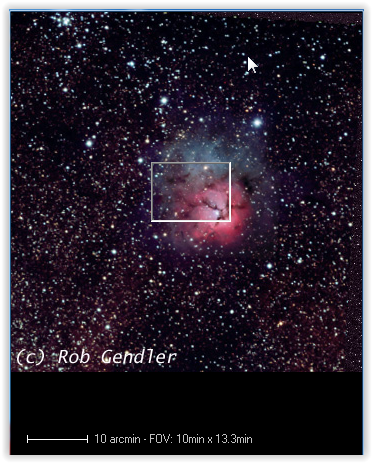
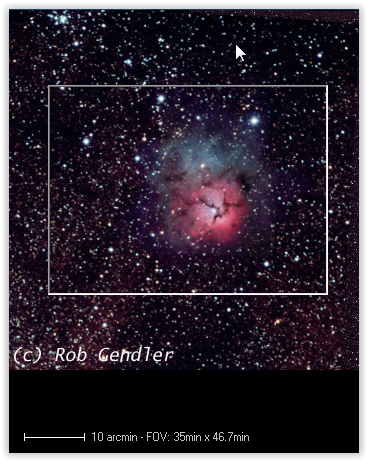
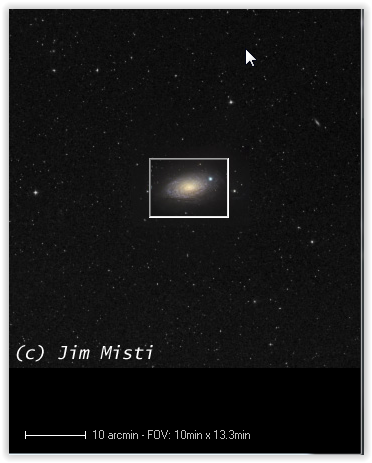
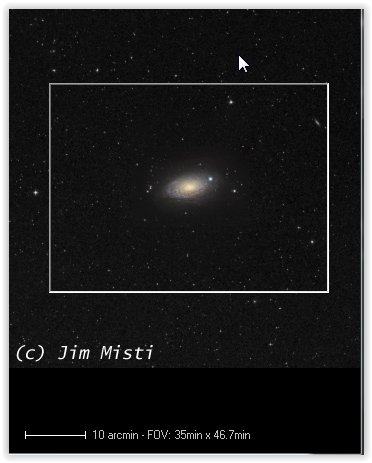


 RSS Feed